搜索到
171
篇与
的结果
-
 NIO基础 - 网络编程 4. 网络编程4.1 阻塞模式单线程模式下,阻塞方法之间存在互相影响ServerSocketChannel.accept() 方法会在没有连接建立时阻塞SocketChannel.read() 在没有可读数据时阻塞Severpackage com.sw.netty._04.block; import lombok.extern.slf4j.Slf4j; import java.io.IOException; import java.net.InetSocketAddress; import java.nio.ByteBuffer; import java.nio.channels.ServerSocketChannel; import java.nio.channels.SocketChannel; import java.util.ArrayList; import java.util.List; import static utils.ByteBufferUtil.debugAll; @Slf4j public class Server { public static void main(String[] args) throws IOException { ByteBuffer bf = ByteBuffer.allocate(16); ServerSocketChannel ssc = ServerSocketChannel.open(); ssc.bind(new InetSocketAddress(8088)); List<SocketChannel> channelList = new ArrayList<>(); while (true) { log.info("connecting..."); SocketChannel channel = ssc.accept(); log.info("connected - [{}]", channel); channelList.add(channel); for (SocketChannel sc : channelList) { log.info("before read - [{}]", channel); sc.read(bf); bf.flip(); debugAll(bf); bf.clear(); log.info("after read - [{}]", channel); } } } } Clientpackage com.sw.netty._04.block; import lombok.extern.slf4j.Slf4j; import java.io.IOException; import java.net.InetSocketAddress; import java.nio.channels.SocketChannel; @Slf4j public class Client { public static void main(String[] args) throws IOException { SocketChannel sc = SocketChannel.open(); sc.connect(new InetSocketAddress("localhost", 8088)); log.info("waiting..."); } } 4.2 非阻塞模式非阻塞模式下,相关方法的线程不会阻塞ServerSocketChannel.accept() 方法会在没有连接建立时返回 null,继续运行SocketChannel.read() 在没有可读数据时返回 0写数据时,数据写入 Channel 后,线程即可继续运行,无需等待 Channel 通过网络把数据发送出去或发送完但非阻塞模式下,即使没有新的连接建立、可读数据,线程仍在运行;且数据复的制过程线程是阻塞的Severpackage com.sw.netty._04.nonBlock; import lombok.extern.slf4j.Slf4j; import java.io.IOException; import java.net.InetSocketAddress; import java.nio.ByteBuffer; import java.nio.channels.ServerSocketChannel; import java.nio.channels.SocketChannel; import java.util.ArrayList; import java.util.List; import static utils.ByteBufferUtil.debugAll; @Slf4j public class Server { public static void main(String[] args) throws IOException { ByteBuffer bf = ByteBuffer.allocate(16); ServerSocketChannel ssc = ServerSocketChannel.open(); // 切换为非阻塞模式 ssc.configureBlocking(false); ssc.bind(new InetSocketAddress(8088)); List<SocketChannel> channelList = new ArrayList<>(); while (true) { SocketChannel channel = ssc.accept(); if (channel != null) { log.info("connected - [{}]", channel); // 切换为非阻塞模式 channel.configureBlocking(false); channelList.add(channel); } for (SocketChannel sc : channelList) { if (sc.read(bf) > 0) { bf.flip(); debugAll(bf); bf.clear(); log.info("after read - [{}]", channel); } } } } } Clientpackage com.sw.netty._04.nonBlock; import lombok.extern.slf4j.Slf4j; import java.io.IOException; import java.net.InetSocketAddress; import java.nio.channels.SocketChannel; @Slf4j public class Client { public static void main(String[] args) throws IOException { SocketChannel sc = SocketChannel.open(); sc.connect(new InetSocketAddress("localhost", 8088)); log.info("waiting..."); } } 4.3 多路复用概念:单线程配合 Selector 完成对多个 Channel 可读、可写事件的监听仅针对网络 IO、文件 IO 操作无法使用多路复用Selector 的作用:有可连接事件时建立连接有可读事件时执行读取操作有可写事件时执行写入操作注:Channel 不一定时时可写,当 Channel 可写时,则会触发 Selector 的可写事件4.4 Selector与 Selector 协作的线程可以监听多个 Channel,当事件发生时才去处理对应的事件,此时的线程可被充分利用,同时也节约的线程的数量,减少了线程间的上下文切换(1)创建Selector selector = Selector.open();(2)绑定 Channel 事件(注册)Selector selector = Selector.open(); ServerSocketChannel ssc = ServerSocketChannel.open(); // 切换为非阻塞模式 ssc.configureBlocking(false); // 注册 Channel SelectionKey sscKey = ssc.register(selector, 0, null);注:Channel 必须以非阻塞模式运行绑定的事件类型如下:accept:有连接请求时触发connection:(客户端)连接建立后触发read:读事件write:写事件(3)监听 Channel 事件// 方式一:阻塞直到绑定事件发生 int count = selector.select(); // 方式二:阻塞到超时时间(ms)或绑定事件发生 int count = selector.select(long timeout); // 方式三:selector 立即返回,后续流程根据返回值检查是否有事件发生 int count = selector.selectNow();(4)selector 何时不阻塞发生对应事件时:accept 事件 - 客户端发起连接请求read 事件 - 客户端发送数据、正常/异常关闭(当客户端发送的数据过大,服务端无法一次处理完时,会触发多次读取事件)write 事件 - channel 当前状态可写出数据调用 selector.wakeup()调用 selector.close()selector 所在的线程中断4.5 处理 accept 事件package com.sw.netty._04.selector; import lombok.extern.slf4j.Slf4j; import java.io.IOException; import java.net.InetSocketAddress; import java.nio.ByteBuffer; import java.nio.channels.*; import java.util.ArrayList; import java.util.Iterator; import java.util.List; import static utils.ByteBufferUtil.debugAll; @Slf4j public class Server { public static void main(String[] args) throws IOException { // 1. Selector Selector selector = Selector.open(); ByteBuffer bf = ByteBuffer.allocate(16); ServerSocketChannel ssc = ServerSocketChannel.open(); // 切换为非阻塞模式 ssc.configureBlocking(false); // 2. 注册 Channel /** * 通过 SelectionKey,可以知道发生的事件和发生事件的 Channel * 事件类型: * accept:有连接请求时触发 * connection:(客户端)连接建立后触发 * read:读事件 * write:写事件 */ SelectionKey sscKey = ssc.register(selector, 0, null); // sscKey 只关注 accept 事件 sscKey.interestOps(SelectionKey.OP_ACCEPT); log.info("register channel key-[{}]", sscKey); ssc.bind(new InetSocketAddress(8088)); while (true) { // 3. select 方法,没有事件发生或事件取消时,线程阻塞,否则反之 selector.select(); // 4. 处理事件 Iterator<SelectionKey> iterator = selector.selectedKeys().iterator(); while (iterator.hasNext()) { SelectionKey key = iterator.next(); // 处理完事件后,需要显式删除对应的key(事件处理完了,但 Selector 不会删除对应的key) iterator.remove(); // 5. 区分事件类型 if (key.isAcceptable()) { log.info("Deal Accept Event"); ServerSocketChannel channel = (ServerSocketChannel) key.channel(); SocketChannel sc = channel.accept(); sc.configureBlocking(false); SelectionKey scKey = sc.register(selector, 0, null); scKey.interestOps(SelectionKey.OP_READ); } } } } } 注:当事件发生后,要么处理,要么取消,如果什么都不做,下次该事件还会触发4.6 处理 read 事件(1)演示 Demopackage com.sw.netty._04.selector; import lombok.extern.slf4j.Slf4j; import java.io.IOException; import java.net.InetSocketAddress; import java.nio.ByteBuffer; import java.nio.channels.*; import java.util.ArrayList; import java.util.Iterator; import java.util.List; import static utils.ByteBufferUtil.debugAll; @Slf4j public class Server { public static void main(String[] args) throws IOException { // 1. Selector Selector selector = Selector.open(); ByteBuffer bf = ByteBuffer.allocate(16); ServerSocketChannel ssc = ServerSocketChannel.open(); // 切换为非阻塞模式 ssc.configureBlocking(false); // 2. 注册 Channel /** * 通过 SelectionKey,可以知道发生的事件和发生事件的 Channel * 事件类型: * accept:有连接请求时触发 * connection:(客户端)连接建立后触发 * read:读事件 * write:写事件 */ SelectionKey sscKey = ssc.register(selector, 0, null); // sscKey 只关注 accept 事件 sscKey.interestOps(SelectionKey.OP_ACCEPT); log.info("register channel key-[{}]", sscKey); ssc.bind(new InetSocketAddress(8088)); while (true) { // 3. select 方法,没有事件发生或事件取消时,线程阻塞,否则反之 selector.select(); // 4. 处理事件 Iterator<SelectionKey> iterator = selector.selectedKeys().iterator(); while (iterator.hasNext()) { SelectionKey key = iterator.next(); // 处理完事件后,需要显式删除对应的key(事件处理完了,但 Selector 不会删除对应的key) iterator.remove(); // 5. 区分事件类型 if (key.isAcceptable()) { log.info("Deal Accept Event"); ServerSocketChannel channel = (ServerSocketChannel) key.channel(); SocketChannel sc = channel.accept(); sc.configureBlocking(false); SelectionKey scKey = sc.register(selector, 0, null); scKey.interestOps(SelectionKey.OP_READ); } if (key.isReadable()) { try { log.info("Deal Read Event"); SocketChannel channel = (SocketChannel) key.channel(); ByteBuffer readBf = ByteBuffer.allocate(16); if (-1 != channel.read(readBf)) { readBf.flip(); debugAll(readBf); } else { // 处理客户端读事件结束,正常断开 log.info("Client - [{}] close", key); key.cancel(); } } catch (IOException e) { // 对发生异常的事件取消注册(从 Selector key 集合中移除) // 如:客户端关闭主动断开连接 key.cancel(); e.printStackTrace(); } } } } } } (2)iterator.remove() 解释当 selector 事件发生后,会将对应的 key 存入 selectedKeys 集合,但在事件处理完后并不会删除对应的 key,需要显式删除处理,如:第一次触发 accept 事件,处理完后,下一次循环再进来,key.isAcceptable() 判断为真,进入对应的判断后 channel.accept() 值为空(此时并不是 accept 事件),触发空指针异常(3)cancel 的作用取消注册在 selector 上的 channel,并从 SelectionKeys 集合中删除对应的事件 key4.7 处理消息边界固定消息长度(数据包大小一样),但是在一定程度上会浪费带宽按分隔符拆分,效率低TLV 格式,即:Type 类型、Length 长度、Value 数据,在消息类型和长度已知的情况下,就可以方便的获取消息的大小,以此分配 buffer;需要提前分配 buffer,如果内容过大,会对 server 的吞吐量造成影响HTTP 1.0 TLV 格式HTTP 2.0 LTV 格式(1)此处以按分隔符拆分为例:Serverpackage com.sw.netty._04.msgBoundary; import lombok.extern.slf4j.Slf4j; import java.io.IOException; import java.net.InetSocketAddress; import java.nio.ByteBuffer; import java.nio.channels.SelectionKey; import java.nio.channels.Selector; import java.nio.channels.ServerSocketChannel; import java.nio.channels.SocketChannel; import java.util.Iterator; import static utils.ByteBufferUtil.debugAll; @Slf4j public class Server { public static void main(String[] args) throws IOException { // 1. Selector Selector selector = Selector.open(); ByteBuffer bf = ByteBuffer.allocate(16); ServerSocketChannel ssc = ServerSocketChannel.open(); // 切换为非阻塞模式 ssc.configureBlocking(false); // 2. 注册 Channel /** * 通过 SelectionKey,可以知道发生的事件和发生事件的 Channel * 事件类型: * accept:有连接请求时触发 * connection:(客户端)连接建立后触发 * read:读事件 * write:写事件 */ SelectionKey sscKey = ssc.register(selector, 0, null); // sscKey 只关注 accept 事件 sscKey.interestOps(SelectionKey.OP_ACCEPT); log.info("register channel key-[{}]", sscKey); ssc.bind(new InetSocketAddress(8088)); while (true) { // 3. select 方法,没有事件发生或事件取消时,线程阻塞,否则反之 selector.select(); // 4. 处理事件 Iterator<SelectionKey> iterator = selector.selectedKeys().iterator(); while (iterator.hasNext()) { SelectionKey key = iterator.next(); // 处理完事件后,需要显式删除对应的key(事件处理完了,但 Selector 不会删除对应的key) iterator.remove(); // 5. 区分事件类型 if (key.isAcceptable()) { log.info("Deal Accept Event"); ServerSocketChannel channel = (ServerSocketChannel) key.channel(); SocketChannel sc = channel.accept(); sc.configureBlocking(false); ByteBuffer readBf = ByteBuffer.allocate(16); // 将 readBf 作为附件关联到事件 key 上 // 将 readBf 的生命周期提升到与 SelectionKey 平级 SelectionKey scKey = sc.register(selector, 0, readBf); scKey.interestOps(SelectionKey.OP_READ); } if (key.isReadable()) { try { log.info("Deal Read Event"); SocketChannel channel = (SocketChannel) key.channel(); ByteBuffer readBf = (ByteBuffer) key.attachment(); if (-1 != channel.read(readBf)) { split(readBf); // 当传输的内容超过 readbf 初始容量时,需进行扩容 if (readBf.position() == readBf.limit()) { ByteBuffer newReadBf = ByteBuffer.allocate(readBf.capacity() * 2); readBf.flip(); newReadBf.put(readBf); key.attach(newReadBf); } } else { // 处理客户端读事件结束,正常断开 log.info("Client - [{}] close", key); key.cancel(); } } catch (IOException e) { // 对发生异常的事件取消注册(从 Selector key 集合中移除) // 如:客户端关闭主动断开连接 key.cancel(); e.printStackTrace(); } } } } } private static void split(ByteBuffer source) { source.flip(); for (int i = 0; i < source.limit(); i++) { if ('\n' == source.get(i)) { int length = i + 1 - source.position(); ByteBuffer target = ByteBuffer.allocate(length); // 从 source 读,向 target 写 for (int j = 0; j < length; j++) { target.put(source.get()); } debugAll(target); } } // 此处不使用 clear,需使用 compact 将剩余未读的部分向前移动 source.compact(); } } Clientpackage com.sw.netty._04.msgBoundary; import lombok.extern.slf4j.Slf4j; import java.io.IOException; import java.net.InetSocketAddress; import java.nio.channels.SocketChannel; import java.nio.charset.Charset; @Slf4j public class Client { public static void main(String[] args) throws IOException { SocketChannel sc = SocketChannel.open(); sc.connect(new InetSocketAddress("localhost", 8088)); sc.write(Charset.defaultCharset().encode("012\n0123456789abcdefyao\n")); sc.write(Charset.defaultCharset().encode("0123456789abcdefsunxiaochuan\nyaoshuige\n")); sc.close(); } } 4.8 ByteBuffer 大小分配每个 Channel 都需要记录可能被切分的消息,因为 ByteBuffer 不能被多个 Channel 共享,需要独立维护ByteBuffer 不能太大,需要可变:思路一:先分配一个小的 buffer,不够的时候再进行扩容,优点是消息连续存储,缺点是数据拷贝存在一定的性能损耗思路二:用数组维护 buffer,可以避免数据拷贝产生的性能损耗,但消息存储不连续4.9 处理 write 事件此处以写入内容过多问题(一次性发送数据)为例:Serverpackage com.sw.netty._04.writeableEvents; import java.io.IOException; import java.net.InetSocketAddress; import java.nio.ByteBuffer; import java.nio.channels.SelectionKey; import java.nio.channels.Selector; import java.nio.channels.ServerSocketChannel; import java.nio.channels.SocketChannel; import java.nio.charset.Charset; import java.util.Iterator; import java.util.UUID; public class Server { public static void main(String[] args) throws IOException { ServerSocketChannel ssc = ServerSocketChannel.open(); ssc.configureBlocking(false); Selector selector = Selector.open(); ssc.register(selector, SelectionKey.OP_ACCEPT); ssc.bind(new InetSocketAddress(8088)); while (true) { selector.select(); Iterator<SelectionKey> iterator = selector.selectedKeys().iterator(); while (iterator.hasNext()) { SelectionKey key = iterator.next(); iterator.remove(); if (key.isAcceptable()) { SocketChannel sc = ssc.accept(); sc.configureBlocking(false); // 1. 向客户端发送大量数据 StringBuilder sb = new StringBuilder(); for (int i = 0; i < 999999; i++) { sb.append(UUID.randomUUID().toString().replace("-", "")); } ByteBuffer bf = Charset.defaultCharset().encode(sb.toString()); while (bf.hasRemaining()) { int write = sc.write(bf); System.out.println("发送:" + write + " 字节数据"); } } } } } } Clientpackage com.sw.netty._04.writeableEvents; import java.io.IOException; import java.net.InetSocketAddress; import java.nio.ByteBuffer; import java.nio.channels.SocketChannel; public class Client { public static void main(String[] args) throws IOException { SocketChannel sc = SocketChannel.open(); sc.connect(new InetSocketAddress("localhost", 8088)); int count = 0; while (true) { ByteBuffer bf = ByteBuffer.allocate(1024 * 1024); count += sc.read(bf); System.out.println("接收到:" + count + " 字节数据"); } } } 改进优化:Serverpackage com.sw.netty._04.writeableEvents; import java.io.IOException; import java.net.InetSocketAddress; import java.nio.ByteBuffer; import java.nio.channels.SelectionKey; import java.nio.channels.Selector; import java.nio.channels.ServerSocketChannel; import java.nio.channels.SocketChannel; import java.nio.charset.Charset; import java.util.Iterator; import java.util.UUID; public class Server { public static void main(String[] args) throws IOException { ServerSocketChannel ssc = ServerSocketChannel.open(); ssc.configureBlocking(false); Selector selector = Selector.open(); ssc.register(selector, SelectionKey.OP_ACCEPT); ssc.bind(new InetSocketAddress(8088)); while (true) { selector.select(); Iterator<SelectionKey> iterator = selector.selectedKeys().iterator(); while (iterator.hasNext()) { SelectionKey key = iterator.next(); iterator.remove(); if (key.isAcceptable()) { SocketChannel sc = ssc.accept(); sc.configureBlocking(false); SelectionKey scKey = sc.register(selector, 0, null); scKey.interestOps(SelectionKey.OP_READ); // 1. 向客户端发送大量数据 StringBuilder sb = new StringBuilder(); for (int i = 0; i < 999999; i++) { sb.append(UUID.randomUUID().toString().replace("-", "")); } ByteBuffer bf = Charset.defaultCharset().encode(sb.toString()); int write = sc.write(bf); System.out.println("OP_READ - 发送:" + write + " 字节数据"); // 2. 判断是否有剩余内容 if (bf.hasRemaining()) { // 3. 关注可写事件(在原关注事件的基础上,需额外关注写事件) scKey.interestOps(scKey.interestOps() + SelectionKey.OP_WRITE); // scKey.interestOps(scKey.interestOps() | SelectionKey.OP_WRITE); // 4. 将未写完的数据挂载到 scKey 上 scKey.attach(bf); } } if (key.isWritable()) { ByteBuffer bf = (ByteBuffer) key.attachment(); SocketChannel sc = (SocketChannel) key.channel(); int write = sc.write(bf); System.out.println("OP_WRITE - 发送:" + write + " 字节数据"); // 5. 关闭资源 if (!bf.hasRemaining()) { // 清除挂载的 buffer key.attach(null); // 清除关注的事件 key.interestOps(key.interestOps() - SelectionKey.OP_WRITE); } } } } } } 注:当 channel 发送数据,且 socket 缓冲区可写时,对应的事件会频繁发生,故需要在 socket 缓冲区写不下时再关注写事件,写完之后需要取消关注Clientpackage com.sw.netty._04.writeableEvents; import lombok.extern.slf4j.Slf4j; import java.io.IOException; import java.net.InetSocketAddress; import java.nio.ByteBuffer; import java.nio.channels.SelectionKey; import java.nio.channels.Selector; import java.nio.channels.SocketChannel; import java.util.Iterator; @Slf4j public class Client { public static void main(String[] args) throws IOException { Selector selector = Selector.open(); SocketChannel sc = SocketChannel.open(); sc.configureBlocking(false); sc.register(selector, SelectionKey.OP_CONNECT | SelectionKey.OP_READ); sc.connect(new InetSocketAddress("localhost", 8088)); int count = 0; while (true) { selector.select(); Iterator<SelectionKey> iterator = selector.selectedKeys().iterator(); while (iterator.hasNext()) { SelectionKey key = iterator.next(); iterator.remove(); if (key.isConnectable()) { log.info("key [{}] connected", key); sc.finishConnect(); } if (key.isReadable()) { ByteBuffer bf = ByteBuffer.allocate(1024 * 1024); count += sc.read(bf); bf.clear(); System.out.println("接收到:" + count + " 字节数据"); } } } } }
 -
NIO基础 - 文件编程 3. 文件编程3.1 FileChannelFileChannel 只能工作在阻塞模式下(1)获取通过 FileInputStream(读)、FileOutputStream(写)、RandomAccessFile(根据指定的模式决定读或写) 的 getChannel() 方法获取(2)读取// 返回值表示读取的字节,-1 表示读取到了文件的末尾 int readBytes = channel.read(bf);(3)写入ByteBuffer bf = ByteBuffer.allcate(16); bf.put(...); bf.flip(); // 后续还有值则继续写入,channel.write() 方法不一定能一次写完全部内容 while (bf.hasRemaining()) { channel.write(bf); }(4)关闭channel 使用完后必须关闭,可以使用 try-with-resources 语法糖或手动关闭 channel.close()(5)获取当前位置// 获取位置 long position = channel.position(); // 设置指定下标索引位置 channel.position(123);如果设置为文件末尾:这时进行读取,返回值为 -1执行写入时,会进行追加,如果 position 超过了文件末尾,新内容和原末尾之间会产生空洞(00)(6)大小channel.size();(7)强制写入写入的数据在操作系统的管理下并不是立刻写入磁盘,而是先到缓存中,可以通过 channel.force(true) 方法将文件内容和元数据进行立即写入3.2 两个 Channel 传输数据package com.sw.netty._01; import java.io.FileOutputStream; import java.net.URL; import java.nio.channels.FileChannel; import java.nio.file.Paths; public class FileChannelTransferToTest { public static void main(String[] args) { URL resource = ScatteringReadsTest.class.getClassLoader().getResource("ByteBufferTest.txt"); if (resource == null) { throw new IllegalArgumentException("resource not found: ScatteringReadsTest.txt"); } // try (FileChannel from = FileChannel.open(Paths.get(resource.toURI())); // FileChannel to = new FileOutputStream("FileChannelTransferTo.txt").getChannel()) { // // transferTo 一次最多传输 2G 的数据 // from.transferTo(0, from.size(), to); // } catch (Exception e) { // e.printStackTrace(); // } try (FileChannel from = FileChannel.open(Paths.get(resource.toURI())); FileChannel to = new FileOutputStream("FileChannelTransferTo.txt").getChannel()) { // 传输大于 2G 的文件 long size = from.size(); for (long left = size; left > 0; ) { left -= from.transferTo((size - left), left, to); } } catch (Exception e) { e.printStackTrace(); } } }
-
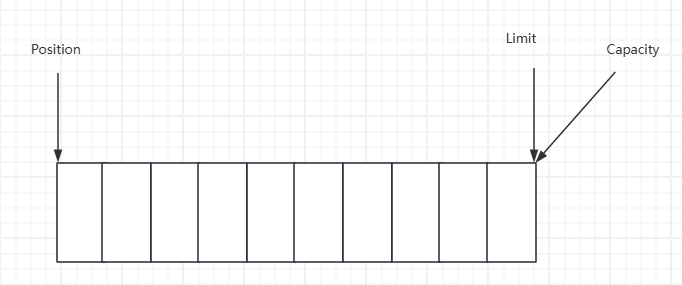
NIO基础 - ByteBuffer 2. ByteBuffer2.1 基本使用package com.sw.netty._01; import lombok.extern.slf4j.Slf4j; import java.io.IOException; import java.io.InputStream; import java.nio.ByteBuffer; import java.nio.channels.Channels; import java.nio.channels.ReadableByteChannel; @Slf4j public class ByteBufferTest { public static void main(String[] args) { try (InputStream is = ByteBufferTest.class.getClassLoader().getResourceAsStream("ByteBufferTest.txt")) { if (is == null) { throw new IllegalArgumentException("resource not found: ByteBufferTest.txt"); } try (ReadableByteChannel channel = Channels.newChannel(is)) { // 准备缓冲区 ByteBuffer bf = ByteBuffer.allocate(10); // 从 channel 读数据,写入 buffer int len = channel.read(bf); log.info("读取到的字节数:{}", len); // 切换为读模式 bf.flip(); while (bf.hasRemaining()) { byte b = bf.get(); log.info("读取到的字节:{}", (char) b); } // 切换为写模式 bf.clear(); } } catch (IOException e) { e.printStackTrace(); } } } 执行流程:向 buffer 写入数据, channel.read(buffer)调用 flip() 切换至读模式从 buffer 读数据,buffer.get()调用 clear() 或 compact() 切换至写模式重复步骤 1 - 42.2 结构buffer 包含的属性有:capacity、position、limit开始:写模式下,position 表示写入位置,limit 表示容量,写入4个字节调用 flip 后,position 切换为读取位置, limit切换为读取限制读取4个字节后的状态调用 clear 后调用 compact 方法,它的作用是把未读完的部分向前压缩,然后切换至写模式ByteBufferReadWriteTestpublic class ByteBufferReadWriteTest { public static void main(String[] args) { ByteBuffer bf = ByteBuffer.allocate(10); bf.put((byte) 0x16); debugAll(bf); bf.put(new byte[]{0x17, 0x18, 0x19}); debugAll(bf); bf.flip(); System.out.println(bf.get()); debugAll(bf); bf.compact(); debugAll(bf); bf.put(new byte[]{0x20, 0x21, 0x22}); debugAll(bf); // +--------+-------------------- all ------------------------+----------------+ // position: [1], limit: [10] // +-------------------------------------------------+ // | 0 1 2 3 4 5 6 7 8 9 a b c d e f | // +--------+-------------------------------------------------+----------------+ // |00000000| 16 00 00 00 00 00 00 00 00 00 |.......... | // +--------+-------------------------------------------------+----------------+ // +--------+-------------------- all ------------------------+----------------+ // position: [4], limit: [10] // +-------------------------------------------------+ // | 0 1 2 3 4 5 6 7 8 9 a b c d e f | // +--------+-------------------------------------------------+----------------+ // |00000000| 16 17 18 19 00 00 00 00 00 00 |.......... | // +--------+-------------------------------------------------+----------------+ // 22 // +--------+-------------------- all ------------------------+----------------+ // position: [1], limit: [4] // +-------------------------------------------------+ // | 0 1 2 3 4 5 6 7 8 9 a b c d e f | // +--------+-------------------------------------------------+----------------+ // |00000000| 16 17 18 19 00 00 00 00 00 00 |.......... | // +--------+-------------------------------------------------+----------------+ // +--------+-------------------- all ------------------------+----------------+ // position: [3], limit: [10] // +-------------------------------------------------+ // | 0 1 2 3 4 5 6 7 8 9 a b c d e f | // +--------+-------------------------------------------------+----------------+ // |00000000| 17 18 19 19 00 00 00 00 00 00 |.......... | // +--------+-------------------------------------------------+----------------+ // +--------+-------------------- all ------------------------+----------------+ // position: [6], limit: [10] // +-------------------------------------------------+ // | 0 1 2 3 4 5 6 7 8 9 a b c d e f | // +--------+-------------------------------------------------+----------------+ // |00000000| 17 18 19 20 21 22 00 00 00 00 |... !".... | // +--------+-------------------------------------------------+----------------+ } } 2.3 常见方法(1)分配空间// 使用堆内存,会受 gc 的影响 ByteBuffer.allocate(10); // 使用直接(物理)内存,读写效率高,但分配效率低 ByteBuffer.allocateDirect(10);(2)向 buffer 写入数据调用 channel 的 read 方法int len = channel.read(bf);调用 buffer 的 put 方法bf.put((byte) 0x16)(3)从 buffer 读取数据调用 channel 的 write 方法int len = channel.write(bf);调用 buffer 的 get 方法// get 方法会让 position 读指针向后走 // rewind 方法可以将 position 重新置为 0 // get(index) 方法获取指定索引下标的内容时,不会移动读指针 byte b = bf.get();ByteBufferReadTestpackage com.sw.netty._01; import java.nio.ByteBuffer; import static utils.ByteBufferUtil.debugAll; public class ByteBufferReadTest { public static void main(String[] args) { ByteBuffer bf = ByteBuffer.allocate(10); bf.put(new byte[]{'a', 'b', 'c', 'd'}); bf.flip(); // 读全部 bf.get(new byte[4]); debugAll(bf); // 从头重新开始读取一个字节 bf.rewind(); System.out.println((char) bf.get()); // +--------+-------------------- all ------------------------+----------------+ // position: [4], limit: [4] // +-------------------------------------------------+ // | 0 1 2 3 4 5 6 7 8 9 a b c d e f | // +--------+-------------------------------------------------+----------------+ // |00000000| 61 62 63 64 00 00 00 00 00 00 |abcd...... | // +--------+-------------------------------------------------+----------------+ // a // mark 标记 position 位置,reset 将 position 位置重置到 mark 标记的位置 System.out.println((char) bf.get()); // b bf.mark(); System.out.println((char) bf.get()); // c System.out.println((char) bf.get()); // d bf.reset(); System.out.println((char) bf.get()); // c // get(index) 不会改变读索引的位置 System.out.println((char) bf.get(3)); debugAll(bf); // d // +--------+-------------------- all ------------------------+----------------+ // position: [1], limit: [4] // +-------------------------------------------------+ // | 0 1 2 3 4 5 6 7 8 9 a b c d e f | // +--------+-------------------------------------------------+----------------+ // |00000000| 61 62 63 64 00 00 00 00 00 00 |abcd...... | // +--------+-------------------------------------------------+----------------+ } } (4)字符串与 ByteBuffer 互转package com.sw.netty._01; import java.nio.ByteBuffer; import java.nio.charset.StandardCharsets; import static utils.ByteBufferUtil.debugAll; public class ByteBuffer2StringTest { public static void main(String[] args) { ByteBuffer bf = ByteBuffer.allocate(10); // 字符串转 ByteBuffer // 1. 字符串 getBytes() bf.put("sxc".getBytes()); debugAll(bf); // +--------+-------------------- all ------------------------+----------------+ // position: [3], limit: [16] // +-------------------------------------------------+ // | 0 1 2 3 4 5 6 7 8 9 a b c d e f | // +--------+-------------------------------------------------+----------------+ // |00000000| 73 78 63 00 00 00 00 00 00 00 00 00 00 00 00 00 |sxc.............| // +--------+-------------------------------------------------+----------------+ // 2. Charset encode之后自动切换为读模式 ByteBuffer bf1 = StandardCharsets.UTF_8.encode("sxc"); debugAll(bf1); // +--------+-------------------- all ------------------------+----------------+ // position: [0], limit: [3] // +-------------------------------------------------+ // | 0 1 2 3 4 5 6 7 8 9 a b c d e f | // +--------+-------------------------------------------------+----------------+ // |00000000| 73 78 63 |sxc | // +--------+-------------------------------------------------+----------------+ // 3. wrap 同理方法2,自动切换为读模式 ByteBuffer bf2 = ByteBuffer.wrap("sxc".getBytes()); debugAll(bf2); // +--------+-------------------- all ------------------------+----------------+ // position: [0], limit: [3] // +-------------------------------------------------+ // | 0 1 2 3 4 5 6 7 8 9 a b c d e f | // +--------+-------------------------------------------------+----------------+ // |00000000| 73 78 63 |sxc | // +--------+-------------------------------------------------+----------------+ // ByteBuffer 转字符串 bf.flip(); System.out.println(StandardCharsets.UTF_8.decode(bf)); //sxc // Charset、wrap 方法生成的 ByteBuffer 对象不需要再手动显示切换为读模式 System.out.println(StandardCharsets.UTF_8.decode(bf1)); //sxc System.out.println(StandardCharsets.UTF_8.decode(bf2)); //sxc } } 2.4 Scattering Reads 分散读ScatteringReadsTestpackage com.sw.netty._01; import java.net.URL; import java.nio.ByteBuffer; import java.nio.channels.FileChannel; import java.nio.file.Paths; import static utils.ByteBufferUtil.debugAll; public class ScatteringReadsTest { public static void main(String[] args) { URL resource = ScatteringReadsTest.class.getClassLoader().getResource("ScatteringReadsTest.txt"); if (resource == null) { throw new IllegalArgumentException("resource not found: ScatteringReadsTest.txt"); } try (FileChannel channel = FileChannel.open(Paths.get(resource.toURI()))) { ByteBuffer bf1 = ByteBuffer.allocate(3); ByteBuffer bf2 = ByteBuffer.allocate(3); ByteBuffer bf3 = ByteBuffer.allocate(3); channel.read(new ByteBuffer[]{bf1, bf2, bf3}); bf1.flip(); bf2.flip(); bf3.flip(); debugAll(bf1); debugAll(bf2); debugAll(bf3); // +--------+-------------------- all ------------------------+----------------+ // position: [0], limit: [3] // +-------------------------------------------------+ // | 0 1 2 3 4 5 6 7 8 9 a b c d e f | // +--------+-------------------------------------------------+----------------+ // |00000000| 31 32 33 |123 | // +--------+-------------------------------------------------+----------------+ // +--------+-------------------- all ------------------------+----------------+ // position: [0], limit: [3] // +-------------------------------------------------+ // | 0 1 2 3 4 5 6 7 8 9 a b c d e f | // +--------+-------------------------------------------------+----------------+ // |00000000| 34 35 36 |456 | // +--------+-------------------------------------------------+----------------+ // +--------+-------------------- all ------------------------+----------------+ // position: [0], limit: [3] // +-------------------------------------------------+ // | 0 1 2 3 4 5 6 7 8 9 a b c d e f | // +--------+-------------------------------------------------+----------------+ // |00000000| 37 38 39 |789 | // +--------+-------------------------------------------------+----------------+ } catch (Exception e) { e.printStackTrace(); } } } 2.5 GatheringWrites 集中写GatheringWritesTestpackage com.sw.netty._01; import java.io.IOException; import java.io.RandomAccessFile; import java.nio.ByteBuffer; import java.nio.channels.FileChannel; import java.nio.charset.StandardCharsets; public class GatheringWritesTest { public static void main(String[] args) { ByteBuffer bf1 = StandardCharsets.UTF_8.encode("sun"); ByteBuffer bf2 = StandardCharsets.UTF_8.encode("xiao"); ByteBuffer bf3 = StandardCharsets.UTF_8.encode("chuan"); try (FileChannel channel = new RandomAccessFile("GatheringWritesTest.txt", "rw").getChannel()) { channel.write(new ByteBuffer[]{bf1, bf2, bf3}); } catch (IOException e) { e.printStackTrace(); } } } 2.6 黏包、半包ByteBufferExamTestpackage com.sw.netty._01; import java.nio.ByteBuffer; import static utils.ByteBufferUtil.debugAll; public class ByteBufferExamTest { public static void main(String[] args) { /** * 例:通过网络发送给服务器的多条数据如下: * Yao Shui Ge,\n * Jin Se Wei Ye Na,\n * Zhi Bo Jian. * 由于各种原因,变成了如下的形式(黏包、半包) * Yao Shui Ge,\nJin S * e Wei Ye Na,\nZ * hi Bo Jian. * 现要求将黏包、半包的数据恢复为正确的按 \n 分隔的数据 */ ByteBuffer originBf = ByteBuffer.allocate(45); originBf.put("Yao Shui Ge,\nJin S".getBytes()); split(originBf); originBf.put("e Wei Ye Na,\nZ".getBytes()); split(originBf); originBf.put("hi Bo Jian.\n".getBytes()); split(originBf); } private static void split(ByteBuffer source) { source.flip(); for (int i = 0; i < source.limit(); i++) { if ('\n' == source.get(i)) { int length = i + 1 - source.position(); ByteBuffer target = ByteBuffer.allocate(length); // 从 source 读,向 target 写 for (int j = 0; j < length; j++) { target.put(source.get()); } debugAll(target); } } // 此处不使用 clear,需使用 compact 将剩余未读的部分向前移动 source.compact(); } // +--------+-------------------- all ------------------------+----------------+ // position: [13], limit: [13] // +-------------------------------------------------+ // | 0 1 2 3 4 5 6 7 8 9 a b c d e f | // +--------+-------------------------------------------------+----------------+ // |00000000| 59 61 6f 20 53 68 75 69 20 47 65 2c 0a |Yao Shui Ge,. | // +--------+-------------------------------------------------+----------------+ // +--------+-------------------- all ------------------------+----------------+ // position: [18], limit: [18] // +-------------------------------------------------+ // | 0 1 2 3 4 5 6 7 8 9 a b c d e f | // +--------+-------------------------------------------------+----------------+ // |00000000| 4a 69 6e 20 53 65 20 57 65 69 20 59 65 20 4e 61 |Jin Se Wei Ye Na| // |00000010| 2c 0a |,. | // +--------+-------------------------------------------------+----------------+ // +--------+-------------------- all ------------------------+----------------+ // position: [13], limit: [13] // +-------------------------------------------------+ // | 0 1 2 3 4 5 6 7 8 9 a b c d e f | // +--------+-------------------------------------------------+----------------+ // |00000000| 5a 68 69 20 42 6f 20 4a 69 61 6e 2e 0a |Zhi Bo Jian.. | // +--------+-------------------------------------------------+----------------+ }
-
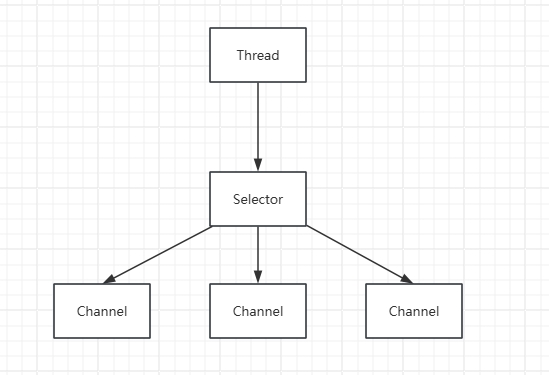
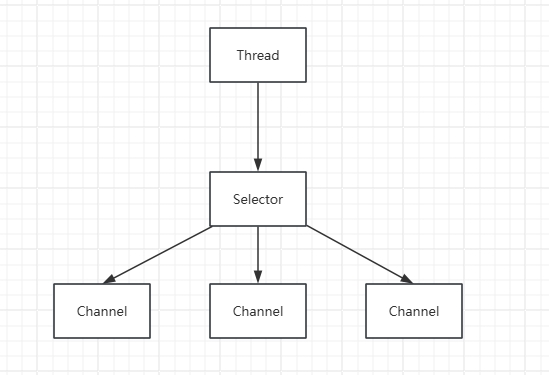
NIO基础 - 三大组件 Netty参考 B站 it黑马 Netty 课程一、NIO 基础1. 三大组件1.1 Channel、BufferChannel 是读写数据的双向通道,可以从 channel 将数据读入 buffer,也可以从 buffer 将数据写入 channel,常见的 Channel 有:FileChannelDatagramChannelSocketChannelServerSocketChannelBuffer 用于缓冲读写数据,常见的 Buffer 有:ByteBufferMappedByteBufferDirectByteBufferHeapByteBufferShortBufferIntBufferLongBufferFloatBufferDoubleBufferCharBuffer1.2 SelectorSelector 的作用是配合一个线程来管理多个 Channel,获取不同 Channel 上发生的事件,这些 Channel 工作在非阻塞模式下,不会让线程一直工作在一个 Channel 上,适合连接数多,但数据量不大的场景
-
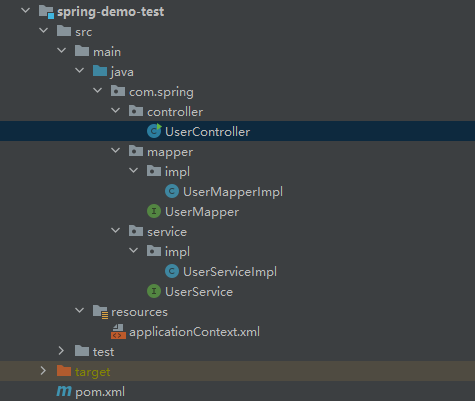
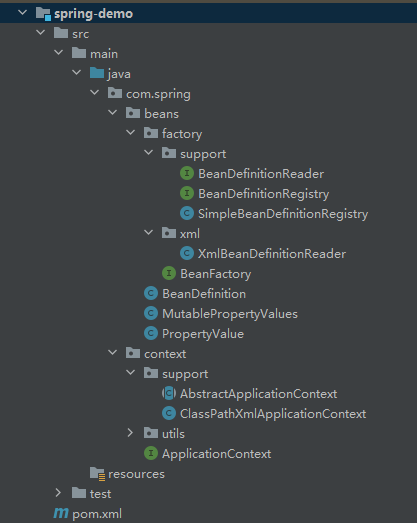
spring-context Test Demo 项目结构pom.xml <dependencies> <!-- <dependency>--> <!-- <groupId>org.springframework</groupId>--> <!-- <artifactId>spring-context</artifactId>--> <!-- <version>5.2.0.RELEASE</version>--> <!-- </dependency>--> <dependency> <groupId>com.spring</groupId> <artifactId>spring-demo</artifactId> <version>1.0-SNAPSHOT</version> </dependency> </dependencies>applicationContext.xml<?xml version="1.0" encoding="UTF-8"?> <beans> <bean id="userMapper" class="com.spring.mapper.impl.UserMapperImpl"> <property name="name" value="孙笑川"/> <property name="password" value="123456"/> </bean> <bean id="userService" class="com.spring.service.impl.UserServiceImpl"> <property name="userMapper" ref="userMapper"/> </bean> </beans>mapper 数据访问层UserMapperpublic interface UserMapper { /** * 添加 */ void add(); }UserMapperImplpublic class UserMapperImpl implements UserMapper { private String name; private String password; public UserMapperImpl() { System.out.println("UserMapper被创建了"); } public void setName(String name) { this.name = name; } public void setPassword(String password) { this.password = password; } @Override public void add() { System.out.println("UserMapper..." + "name: " + name + ",password: " + password); } }service 业务逻辑层UserServicepublic interface UserService { /** * 添加 */ void add(); }UserServiceImplpublic class UserServiceImpl implements UserService { private UserMapper userMapper; public UserServiceImpl() { System.out.println("UserService被创建了"); } public void setUserMapper(UserMapper userMapper) { this.userMapper = userMapper; } @Override public void add() { System.out.println("UserService..."); userMapper.add(); } }Controllerpublic class UserController { public static void main(String[] args) throws Exception { //创建spring容器 ApplicationContext applicationContext = new ClassPathXmlApplicationContext("applicationContext.xml"); //BeanFactory beanFactory = new XmlBeanFactory(new ClassPathResource("applicationContext.xml")); //从容器中获取userService对象 UserService userService = (UserService) applicationContext.getBean("userService"); //业务逻辑处理 userService.add(); /* UserMapper被创建了 UserService被创建了 UserService... UserMapper...name: 孙笑川,password: 123456 */ } }
-
自定义 spring-context Demo applicationContext.xml<?xml version="1.0" encoding="UTF-8"?> <beans> <bean id="userMapper" class="com.spring.mapper.impl.UserMapperImpl"> <property name="name" value="孙笑川"/> <property name="password" value="123456"/> </bean> <bean id="userService" class="com.spring.service.impl.UserServiceImpl"> <property name="userMapper" ref="userMapper"/> </bean> </beans>1. pojo(1)PropertyValue类用于封装bean的属性public class PropertyValue { /** * name */ private String name; /** * ref */ private String ref; /** * value:给基本数据类型及String类型赋的值 */ private String value; public PropertyValue() { } public PropertyValue(String name, String ref, String value) { this.name = name; this.ref = ref; this.value = value; } public String getName() { return name; } public void setName(String name) { this.name = name; } public String getRef() { return ref; } public void setRef(String ref) { this.ref = ref; } public String getValue() { return value; } public void setValue(String value) { this.value = value; } }(2)MutablePropertyValues类一个bean标签可以有多个 property 子标签,该类用于存储并管理多个 Propertyvalue 对象public class MutablePropertyValues implements Iterable<PropertyValue> { private final List<PropertyValue> propertyValueList; public MutablePropertyValues() { this.propertyValueList = new ArrayList<>(); } public MutablePropertyValues(List<PropertyValue> propertyValueList) { if (propertyValueList == null) { this.propertyValueList = new ArrayList<>(); } else { this.propertyValueList = propertyValueList; } } /** * 获取PropertyValue数组 * * @return */ public PropertyValue[] getPropertyValues() { return propertyValueList.toArray(new PropertyValue[0]); } /** * 根据名称获取PropertyValue对象 * * @param propertyName * @return */ public PropertyValue getPropertyValueByName(String propertyName) { for (PropertyValue propertyValue : propertyValueList) { if (propertyValue.getName().equals(propertyValue)) { return propertyValue; } } return null; } /** * 判断集合是否为空 * * @return */ public boolean isEmpty() { return propertyValueList.isEmpty(); } /** * 添加 * * @param propertyValue * @return */ public MutablePropertyValues addPropertyValue(PropertyValue propertyValue) { for (int i = 0; i < propertyValueList.size(); i++) { PropertyValue currentPropertyValue = this.propertyValueList.get(i); if (currentPropertyValue.getName().equals(propertyValue.getName())) { propertyValueList.set(i, new PropertyValue(propertyValue.getName(), propertyValue.getRef(), propertyValue.getValue())); return this; } } this.propertyValueList.add(propertyValue); return this; } /** * 判断是否包含指定名称的PropertyValue对象 * * @param propertyName * @return */ public boolean contains(String propertyName) { return this.getPropertyValueByName(propertyName) != null; } /** * 获取迭代器对象 * * @return */ @Override public Iterator<PropertyValue> iterator() { return propertyValueList.listIterator(); } } (3)BeanDefinitionBeanDefinition 用来封装 bean 的信息,主要包含id(bean对象的名称)、class(需交由 spring 管理的类的全路径类名)、子标签 property 数据public class BeanDefinition { private String id; private String className; private MutablePropertyValues propertyValues; public BeanDefinition() { propertyValues = new MutablePropertyValues(); } public String getId() { return id; } public void setId(String id) { this.id = id; } public String getClassName() { return className; } public void setClassName(String className) { this.className = className; } public MutablePropertyValues getPropertyValues() { return propertyValues; } public void setPropertyValues(MutablePropertyValues propertyValues) { this.propertyValues = propertyValues; } }2. 注册表(1)BeanDefinitionRegistry接口注册 BeanDefinition 对象到注册表中从注册表中删除指定名称的对象根据名称获取指定对象根据名称判断是否包含指定对象获取已注册 bean 的个数获取已注册 bean 的名称数组 public interface BeanDefinitionRegistry { /** * 注册BeanDefinition对象到注册表中 * * @param beanName * @param beanDefinition */ void registerBeanDefinition(String beanName, BeanDefinition beanDefinition); /** * 从注册表中删除指定名称的对象 * * @param beanName */ void removeBeanDefinition(String beanName); /** * 根据名称获取指定对象 * * @param beanName * @return */ BeanDefinition getBeanDefinition(String beanName); /** * 根据名称判断是否包含指定对象 * * @param beanName * @return */ boolean containsBeanDefinition(String beanName); /** * 获取已注册bean的个数 * * @return */ int getBeanDefinitionCount(); /** * 获取已注册bean的名称数组 * * @return */ String[] getBeanDefinitionNames(); }(2)SimpleBeanDefinitionRegistry类该类实现了 BeanDefinitionRegistry 接口,并定义Map集合作为注册表容器public class SimpleBeanDefinitionRegistry implements BeanDefinitionRegistry { /** * BeanDefinition存储容器 */ private Map<String, BeanDefinition> beanDefinitionMap = new HashMap<>(); @Override public void registerBeanDefinition(String beanName, BeanDefinition beanDefinition) { beanDefinitionMap.put(beanName, beanDefinition); } @Override public void removeBeanDefinition(String beanName) { beanDefinitionMap.remove(beanName); } @Override public BeanDefinition getBeanDefinition(String beanName) { return beanDefinitionMap.get(beanName); } @Override public boolean containsBeanDefinition(String beanName) { return beanDefinitionMap.containsKey(beanName); } @Override public int getBeanDefinitionCount() { return beanDefinitionMap.size(); } @Override public String[] getBeanDefinitionNames() { return beanDefinitionMap.keySet().toArray(new String[0]); } }3. 解析器(1)BeanDefinitionReader接口用于解析配置文件并在注册表中注册bean的信息:获取注册表功能,让外界可以通过此对象获取注册表对象加载配置文件,并注册bean数据 public interface BeanDefinitionReader { /** * 获取注册表对象 * * @return */ BeanDefinitionRegistry getRegistry(); /** * 加载配置文件并在注册表中注册 * * @param configLocation */ void loadBeanDefinitions(String configLocation) throws DocumentException; }(2)XmlBeanDefinitionReader类用于解析xml配置文件,该类实现了 BeanDefinitionReader 接口public class XmlBeanDefinitionReader implements BeanDefinitionReader { /** * 声明注册表对象 */ private BeanDefinitionRegistry registry; public XmlBeanDefinitionReader() { registry = new SimpleBeanDefinitionRegistry(); } @Override public BeanDefinitionRegistry getRegistry() { return registry; } @Override public void loadBeanDefinitions(String configLocation) throws DocumentException { SAXReader reader = new SAXReader(); //获取类路径下的配置文件 InputStream is = XmlBeanDefinitionReader.class.getClassLoader().getResourceAsStream(configLocation); Document document = reader.read(is); //根标签 Element rootElement = document.getRootElement(); //根标签下的bean标签对象 List<Element> beanElementList = rootElement.elements(); for (Element beanElement : beanElementList) { //id String id = beanElement.attributeValue("id"); //class String className = beanElement.attributeValue("class"); MutablePropertyValues propertyValues = new MutablePropertyValues(); //property List<Element> propertyList = beanElement.elements("property"); for (Element propertyElement : propertyList) { String name = propertyElement.attributeValue("name"); String ref = propertyElement.attributeValue("ref"); String value = propertyElement.attributeValue("value"); propertyValues.addPropertyValue(new PropertyValue(name, ref, value)); } //封装 BeanDefinition beanDefinition = new BeanDefinition(); beanDefinition.setId(id); beanDefinition.setClassName(className); beanDefinition.setPropertyValues(propertyValues); //将beanDefinition注册到注册表中 registry.registerBeanDefinition(id, beanDefinition); } } }4. IOC容器(1)BeanFactory接口在该接口中定义IOC容器的统一规范(即获取 bean 对象)public interface BeanFactory { /** * 根据名称获取bean * * @param name * @return */ Object getBean(String name) throws Exception; /** * 根据名称、class类获取bean * * @param name * @param clazz * @param <T> * @return */ <T> T getBean(String name, Class<? extends T> clazz) throws Exception; }(2)ApplicationContext接口该接口的所有子实现类对 bean 对象的创建都是非延时的,所以在该接口中定义 refresh() 方法:加载配置文件根据注册表中的 BeanDefinition 对象封装的数据进行 bean 对象的创建public interface ApplicationContext extends BeanFactory { /** * 加载配置文件并创建对象 * * @throws Exception */ void refresh() throws Exception; }(3)AbstractApplicationContext类作为 ApplicationContext 接口的子类,该类也是非延时加载,所以在该类中定义Map集合作为 bean 对象的存储容器声明 BeanDefinitionReader 类型的变量,进行xml配置文件解析; BeanDefinitionReader 类型的对象的创建交由子类实现(因为只有子类明确创建 BeanDefinitionReader 哪个子实现类对象)public abstract class AbstractApplicationContext implements ApplicationContext { /** * 声明解析器 */ protected BeanDefinitionReader beanDefinitionReader; /** * 存储bean的容器 */ protected Map<String, Object> singleObjects = new HashMap<>(); /** * 配置文件路径 */ protected String configLocation; @Override public void refresh() throws Exception { //加载BeanDefinition beanDefinitionReader.loadBeanDefinitions(configLocation); //初始化bean this.finishBeanInitialization(); } /** * 初始化bean */ private void finishBeanInitialization() throws Exception { //获取注册表对象 BeanDefinitionRegistry registry = beanDefinitionReader.getRegistry(); //获取BeanDefinition String[] beanNames = registry.getBeanDefinitionNames(); for (String beanName : beanNames) { //执行初始化 getBean(beanName); } } }注:finishBeanInitialization() 方法中的 getBean() 使用了模板方法(4)ClassPathXmlApplicationContext类该类主要功能是加载类路径下的配置文件,并创建 bean 对象:在构造方法中,创建 BeanDefinitionReader 对象在构造方法中,调用 refresh() 方法,用于加载配置文件、创建 bean 对象并存储到容器中重写父接口中的 getBean() 方法,并实现依赖注入public class ClassPathXmlApplicationContext extends AbstractApplicationContext { public ClassPathXmlApplicationContext(String configLocation) { this.configLocation = configLocation; //构建解析器 beanDefinitionReader = new XmlBeanDefinitionReader(); try { this.refresh(); } catch (Exception e) { } } @Override public Object getBean(String name) throws Exception { //判断对象容器中是否包含指定名称的容器对象,如果有则直接返回,反之进行创建 Object obj = singleObjects.get(name); if (obj != null) { return obj; } //获取BeanDefinition BeanDefinitionRegistry registry = beanDefinitionReader.getRegistry(); BeanDefinition beanDefinition = registry.getBeanDefinition(name); //根据bean标签数据中的类名反射创建对象 Class<?> clazz = Class.forName(beanDefinition.getClassName()); Object beanObj = clazz.newInstance(); //执行依赖注入 for (PropertyValue propertyValue : beanDefinition.getPropertyValues()) { //name String propertyName = propertyValue.getName(); //value String value = propertyValue.getValue(); //ref String ref = propertyValue.getRef(); if (ref != null && !"".equals(ref)) { //获取依赖的bean对象 Object bean = getBean(ref); //拼接方法名 String methodName = StringUtils.getSetMethodNameByFieldName(propertyName); Method[] methods = clazz.getMethods(); for (Method method : methods) { if (method.getName().equals(methodName)) { method.invoke(beanObj, bean); } } } if (value != null && !"".equals(value)) { String methodName = StringUtils.getSetMethodNameByFieldName(propertyName); Method method = clazz.getMethod(methodName, String.class); method.invoke(beanObj, value); } } //在返回之前将该对象存储到bean容器中 singleObjects.put(name, beanObj); return beanObj; } @Override public <T> T getBean(String name, Class<? extends T> clazz) throws Exception { Object bean = getBean(name); if (bean == null) { return null; } return clazz.cast(bean); } }5. 补充pom.xml<!-- dom4j --> <dependency> <groupId>dom4j</groupId> <artifactId>dom4j</artifactId> <version>1.6.1</version> </dependency>项目结构:
-
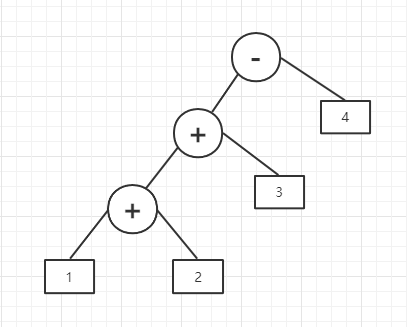
行为型模式-解释器模式 (1)概述定义一个语言,定义它的文法表示,并定义一个解释器,根据文法规则来解释语言中的句子文法(语法)规则:用于描述语言的语法结构的形式规则# 例: expression ::= value | plus | minus # ::= 表示定义为 plus ::= expression '+' expression minus ::= expression '-' expression value ::= integer # 表达式可以是一个值,也可以是plus、minus运算, 而plus、minus又由表达式结合运算符构成,值的类型为整数抽象语法树在计算机科学中,抽象语法树(AbstractSyntaxTree,ATS)简称语法树(Syntax Tree),是源代码语法的一种抽象表示,它以树状的形式表现编程语言的语法结构,树上的每个节点都表示源代码中的一种结构。如:1 + 2 + 3 - 4(2)结构抽象表达式:定义解释器的接口,约定解释器的解释操作,主要包含解释方法 interpret()终结符表达式:抽象表达式的子类,实现文法与终结符相关的操作,文法中的每一个终结符都有与之对应的具体终结表达式非终结符表达式:抽象表达式的子类,实现文法与非终结符相关的操作,文法中的每条规则都对应一个非终结符表达式环境角色:包含各个解释器需要的数据或公共功能,用来传递被所有解释器共享的数据,后面的解释器可以从该角色获取相应的数据客户端:将需要分析的句子或表达式转换成使用解释器对象描述的抽象语法树,然后调用解释器的解释方法,同时也可以通过环境角色间接访问解释器的解释方法(3)案例以加减运算为例抽象表达式public abstract class AbstractExpression { /** * 解释(解析) * * @param context 环境变量 * @return */ public abstract int interpret(Context context); }非终结符表达式public class Minus extends AbstractExpression { //减号左边的表达式 private AbstractExpression left; //减号右边的表达式 private AbstractExpression right; public Minus(AbstractExpression left, AbstractExpression right) { this.left = left; this.right = right; } @Override public int interpret(Context context) { return left.interpret(context) - right.interpret(context); } @Override public String toString() { return "(" + left.toString() + " - " + right.toString() + ")"; } } public class Plus extends AbstractExpression { //加号左边的表达式 private AbstractExpression left; //加号右边的表达式 private AbstractExpression right; public Plus(AbstractExpression left, AbstractExpression right) { this.left = left; this.right = right; } @Override public int interpret(Context context) { return left.interpret(context) + right.interpret(context); } @Override public String toString() { return "(" + left.toString() + " + " + right.toString() + ")"; } }终结符表达式public class Variable extends AbstractExpression { //变量名 private String name; public Variable(String name) { this.name = name; } @Override public int interpret(Context context) { //直接返回变量值 return context.getVariable(this); } @Override public String toString() { return name; } }环境角色public class Context { private Map<Variable, Integer> map = new HashMap<>(); /** * 添加变量 * * @param var key * @param value value */ public void assign(Variable var, Integer value) { map.put(var, value); } /** * 获取变量 * * @param var key * @return */ public int getVariable(Variable var) { return map.get(var); } }Clientpublic class Client { public static void main(String[] args) { //创建环境对象 Context context = new Context(); //创建多个变量对象 Variable a = new Variable("a"); Variable b = new Variable("b"); Variable c = new Variable("c"); Variable d = new Variable("d"); //存储变量 context.assign(a, 1); context.assign(b, 2); context.assign(c, 3); context.assign(d, 4); //获取抽象语法树 a + b - c + d AbstractExpression expression = new Plus(a, new Minus(b, new Plus(c, d))); //解释(解析) System.out.println(expression.interpret(context)); } }(4)优缺点易于改变和扩展文法:由于解释器模式中使用类来表示语言的文法规则,因此可以使用继承等机制来扩展或改变文法实现文法较为容易:在抽象语法树中,每一个表达式节点类的实现方式都是类似的,且不是特别复杂增加新的解释表达式较为方便:在需要扩展时只需增加一个对应的终结符/非终结符表达式类,符合开闭原则复杂文法难以维护:在该模式中,每一条规则至少需要定义一个类,类的个数会随着文法规则的增加而增加执行效率低:该模式使用了大量的循环和递归调用,在解释较为复杂的句子时存在性能问题(变量类型重写抽象表达式的解释(解析)方法,直接获取对应 key 的值,非终结符表达式先调用其他表达式父类的解释(解析)方法,然后才到自身这边)
-
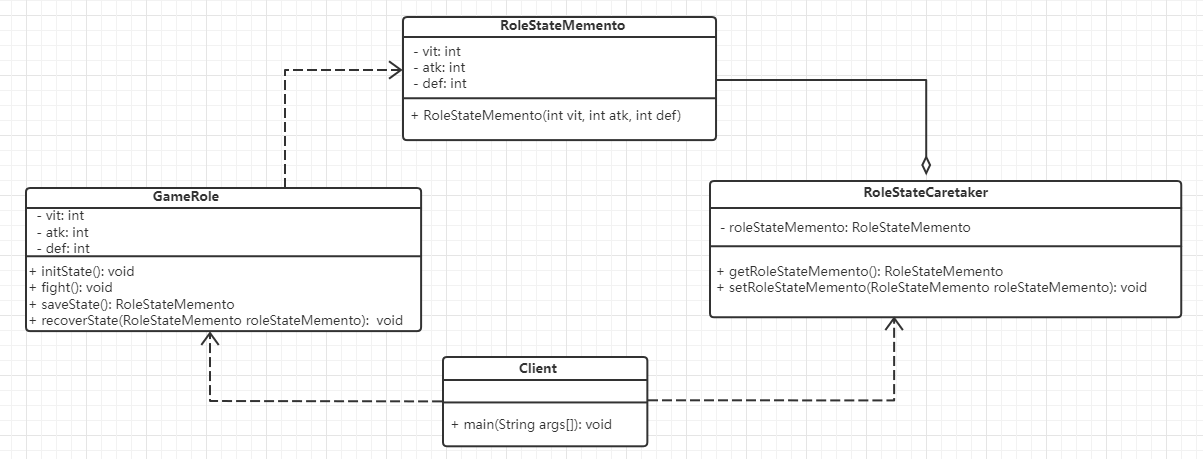
行为型模式-备忘录模式 (1)概述备忘录模式又叫快照模式,在不破坏封装性的前提下,捕获一个对象的内部状态,并在该对象之外保存这个状态,以便需要时能将该对象恢复到之前保存的状态(2)结构发起人角色:记录当前时刻的内部状态信息,提供创建备忘录和恢复备忘录的功能,它可以访问备忘录里的所有信息备忘录角色:负责存储发起人的内部状态,在需要的时候提供这些内部状态给发起人管理者角色:对备忘录进行管理,提供保存与获取备忘录的功能,但其不能对备忘录没有读写权限备忘录有两个等效接口:窄接口:管理者对象(和其他除发起人对象之外的任何对象),看到的是窄接口,该接口只允许把备忘录对象传递给其他对象宽接口:发起人对象可以看到宽接口,该接口允许读取所有的数据,以便恢复对象之前的内部状态(3)案例以游戏存档为例:“白箱”备忘录备忘录角色对任何对象都提供宽接口(破坏了封装性)发起人角色public class GameRole { /** * 生命值 */ private int vit; /** * 攻击值 */ private int atk; /** * 防御值 */ private int def; public int getVit() { return vit; } public void setVit(int vit) { this.vit = vit; } public int getAtk() { return atk; } public void setAtk(int atk) { this.atk = atk; } public int getDef() { return def; } public void setDef(int def) { this.def = def; } /** * 初始化内部状态 */ public void initState() { this.vit = 100; this.atk = 100; this.def = 100; } /** * 战斗 */ public void fight() { this.vit = 0; this.atk = 0; this.def = 0; } /** * 保存游戏角色状态 * * @return */ public RoleStateMemento saveState() { return new RoleStateMemento(vit, atk, def); } /** * 恢复角色状态 * * @param roleStateMemento */ public void recoverState(RoleStateMemento roleStateMemento) { this.vit = roleStateMemento.getVit(); this.atk = roleStateMemento.getAtk(); this.def = roleStateMemento.getDef(); } /** * 展示角色状态 */ public void displayState() { System.out.println("生命值:" + vit); System.out.println("攻击值:" + vit); System.out.println("防御值:" + vit); } }备忘录角色public class RoleStateMemento { /** * 生命值 */ private int vit; /** * 攻击值 */ private int atk; /** * 防御值 */ private int def; public RoleStateMemento() { } public RoleStateMemento(int vit, int atk, int def) { this.vit = vit; this.atk = atk; this.def = def; } public int getVit() { return vit; } public void setVit(int vit) { this.vit = vit; } public int getAtk() { return atk; } public void setAtk(int atk) { this.atk = atk; } public int getDef() { return def; } public void setDef(int def) { this.def = def; } }备忘录管理者public class RoleStateCaretaker { private RoleStateMemento roleStateMemento; public RoleStateMemento getRoleStateMemento() { return roleStateMemento; } public void setRoleStateMemento(RoleStateMemento roleStateMemento) { this.roleStateMemento = roleStateMemento; } }Clientpublic class Client { public static void main(String[] args) { System.out.println("====战斗前===="); GameRole gameRole = new GameRole(); gameRole.initState(); gameRole.displayState(); //备份角色状态 RoleStateCaretaker roleStateCaretaker = new RoleStateCaretaker(); roleStateCaretaker.setRoleStateMemento(gameRole.saveState()); System.out.println("====战斗后===="); gameRole.fight(); gameRole.displayState(); System.out.println("====恢复状态===="); gameRole.recoverState(roleStateCaretaker.getRoleStateMemento()); gameRole.displayState(); } }“黑箱”备忘录备忘录角色对发起人提供宽接口,对其他对象提供窄接口(即将备忘录类设置为发起人的内部类)发起人角色public class GameRole { /** * 生命值 */ private int vit; /** * 攻击值 */ private int atk; /** * 防御值 */ private int def; public int getVit() { return vit; } public void setVit(int vit) { this.vit = vit; } public int getAtk() { return atk; } public void setAtk(int atk) { this.atk = atk; } public int getDef() { return def; } public void setDef(int def) { this.def = def; } /** * 初始化内部状态 */ public void initState() { this.vit = 100; this.atk = 100; this.def = 100; } /** * 战斗 */ public void fight() { this.vit = 0; this.atk = 0; this.def = 0; } /** * 保存游戏角色状态 * * @return */ public Memento saveState() { return new RoleStateMemento(vit, atk, def); } /** * 恢复角色状态 * * @param memento */ public void recoverState(Memento memento) { RoleStateMemento roleStateMemento = (RoleStateMemento) memento; this.vit = roleStateMemento.getVit(); this.atk = roleStateMemento.getAtk(); this.def = roleStateMemento.getDef(); } /** * 展示角色状态 */ public void displayState() { System.out.println("生命值:" + vit); System.out.println("攻击值:" + vit); System.out.println("防御值:" + vit); } private class RoleStateMemento implements Memento { /** * 生命值 */ private int vit; /** * 攻击值 */ private int atk; /** * 防御值 */ private int def; public RoleStateMemento() { } public RoleStateMemento(int vit, int atk, int def) { this.vit = vit; this.atk = atk; this.def = def; } public int getVit() { return vit; } public void setVit(int vit) { this.vit = vit; } public int getAtk() { return atk; } public void setAtk(int atk) { this.atk = atk; } public int getDef() { return def; } public void setDef(int def) { this.def = def; } } }备忘录接口(对外提供的窄接口)public interface Memento { }备忘录管理者角色public class RoleStateCaretaker { private Memento memento; public Memento getMemento() { return memento; } public void setMemento(Memento memento) { this.memento = memento; } }Clientpublic class Client { public static void main(String[] args) { System.out.println("====战斗前===="); GameRole gameRole = new GameRole(); gameRole.initState(); gameRole.displayState(); //备份角色状态 RoleStateCaretaker roleStateCaretaker = new RoleStateCaretaker(); roleStateCaretaker.setMemento(gameRole.saveState()); System.out.println("====战斗后===="); gameRole.fight(); gameRole.displayState(); System.out.println("====恢复状态===="); gameRole.recoverState(roleStateCaretaker.getMemento()); gameRole.displayState(); } }(4)优缺点提供了一种可恢复状态的机制,当用户需要事,可方便的恢复到某个历史状态实现了内部状态的封装,除发起人之外的角色对这些状态信息都没有读写权限简化了发起人类,内部状态由管理者进行管理,发起人无需关心,复合单一职责原则当需要存储的状态信息及频率过多过大时,需要消耗更多的资源(5)使用场景需要保存与恢复数据时需要提供可回滚操作时,如 ctrl + z 、数据库回滚等
-
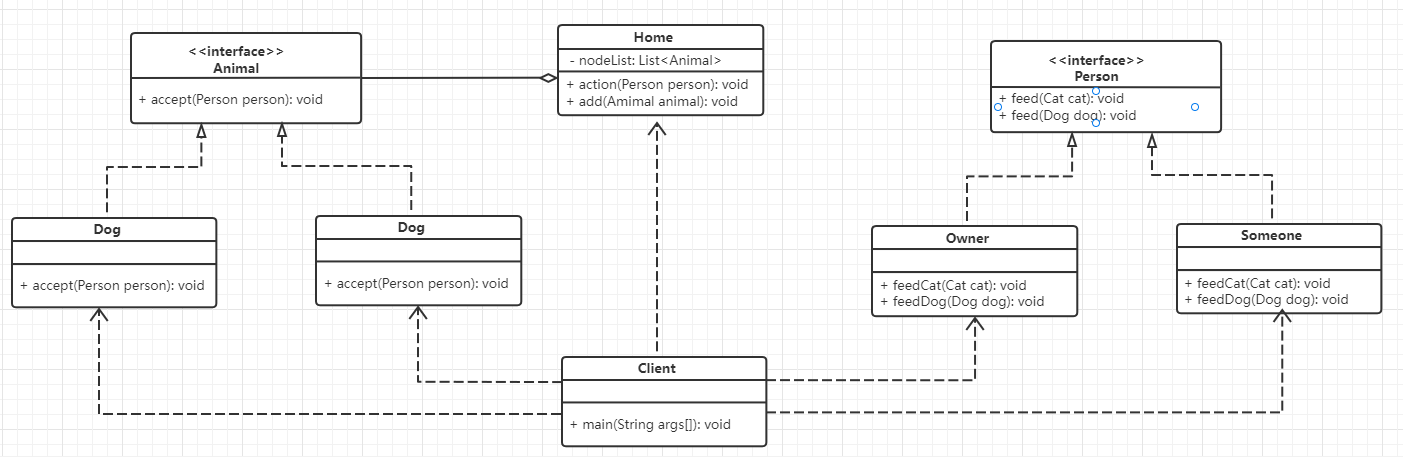
行为型模式-访问者模式 (1)概述封装一些作用于某种数据结构中的各元素的操作,它可以在不改变这个数据结构的前提下定义作用于这些元素的新的操作(2)结构抽象访问者角色:定义对每一个元素访问的行为,它的参数就是可以访问的元素(它的方法个数理论上来说与元素个数相等)具体访问者角色:给出对每一个元素类访问时所产生的具体行为抽象元素角色:定义接受访问者的方法(即每一个元素都可以被访问者访问)具体元素角色:提供接受访问方法的具体实现,而这个具体的实现,通常情况下是使用访问者提供的访问该元素类的方法对象结构角色:一个具有容器性质或复合对象特性的类,它含有一组元素,且可以迭代这些元素,供访问者访问(3)案例以宠物喂食为例访问者角色:给宠物喂食的人具体访问者角色:宠物主人、其他人等抽象元素角色:动物抽象类具体元素角色:宠物狗、宠物猫结构对象角色:主人家抽象访问者角色public interface Person { /** * 喂猫 * * @param cat 猫 */ void feed(Cat cat); /** * 喂狗 * * @param dog 狗 */ void feed(Dog dog); }具体访问者public class Owner implements Person { @Override public void feed(Cat cat) { System.out.println("主人喂猫"); } @Override public void feed(Dog dog) { System.out.println("主人喂狗"); } } public class Someone implements Person { @Override public void feed(Cat cat) { System.out.println("客人喂猫"); } @Override public void feed(Dog dog) { System.out.println("客人喂狗"); } }抽象元素角色public interface Animal { /** * 接受访问者访问 * * @param person 访问者 */ void accept(Person person); }具体元素角色public class Dog implements Animal { @Override public void accept(Person person) { person.feed(this); System.out.println("喂狗吃狗粮"); } } public class Cat implements Animal { @Override public void accept(Person person) { person.feed(this); System.out.println("喂猫吃猫粮"); } }结构对象角色public class Home { private List<Animal> nodeList = new ArrayList<>(); void add(Animal animal) { nodeList.add(animal); } void action(Person person) { //访问者访问每一个元素 for (Animal animal : nodeList) { animal.accept(person); } } }Clientpublic class Client { public static void main(String[] args) { //创建Home Home home = new Home(); //添加元素 home.add(new Dog()); home.add(new Cat()); //创建主人对象 Owner owner = new Owner(); //主人喂宠物 home.action(owner); } }(4)优缺点扩展性好:在不修改对象结构中的元素的情况下,为对象结构中的元素添加新的功能复用性好:通过访问者来定义整个对象结构的通用的功能,从而提高代码复用分离无关行为:通过访问者来分离无关的行为,把相关的行为封装在一起,构成一个访问者,使得每一个访问者的功能都比较单一对象结构变化困难:每增加一个新的元素类,都要在每一个具体访问者中增加相应的具体操作,违背了开闭原则违反了依赖倒置原则:访问者依赖具体类,而不依赖抽象类(5)使用场景对象结构稳定,但其操作算法经常变更时对象结构中对象需要提供多种不同且不相关的操作,而且要避免让这些操作的变化影响对象的结构时(6)扩展访问者模式使用了双分派技术1. 分派变量被声明时的类型叫做变量的静态类型,变量所引用的对象的真实类型叫实际类型 Map map = new HashMap()静态分派:发生在编译时期,分派根据静态类型信息发生,如:方法重载动态分派:发生在运行时期,动态分派动态地置换掉某个方法,如:方法重写2. 动态分派public class Animal { public void execute() { System.out.println("Animal"); } } public class Dog extends Animal { @Override public void execute() { System.out.println("Dog"); } } public class Cat extends Animal { @Override public void execute() { System.out.println("Cat"); } } public class Client { public static void main(String[] args) { Animal a = new Dog(); a.execute(); Animal a1 = new Cat(); a1.execute(); } }Java编译器在编译时期并不总是知道哪些代码会被执行,因为编译器仅仅知道对象的静态类型,而方法的调用则是根据对象的真实类型3. 静态分派public class Animal { } public class Dog extends Animal { } public class Cat extends Animal { } public class Execute() { public void print(Animal a) { System.out.println("Animal"); } public void print(Dog d) { System.out.println("Dog"); } public void print(Cat c) { System.out.println("Cat"); } } public class Client { public static void main(String[] args) { Animal a = new Animal(); Animal d = new Dog(); Animal c = new Cat(); Execute execute = new Execute(); execute.print(a); //Animal execute.print(d); //Animal execute.print(c); //Animal } }重载是根据方法的静态类型进行的,该分派过程在编译期完成,所以打印结果都是 Animal4. 双分派双分派在选择一个方法的时候,不仅要根据消息接收者的运行时区别,还要根据参数的运行时区别public class Animal { public void accept(Execute execute) { execute.print(this); } } public class Dog extends Animal { @Override public void accept(Execute execute) { execute.print(this); } } public class Cat extends Animal { @Override public void accept(Execute execute) { execute.print(this); } } public class Execute() { public void print(Animal a) { System.out.println("Animal"); } public void print(Dog d) { System.out.println("Dog"); } public void print(Cat c) { System.out.println("Cat"); } } public class Client { public static void main(String[] args) { Animal a = new Animal(); Animal d = new Dog(); Animal c = new Cat(); Execute execute = new Execute(); a.accept(execute); //Animal d.accept(execute); //Dog c.accept(execute); //Cat } }客户端将 Execute 作为参数传递给 Animal 类型的变量调用的方法,这里通过方法重写完成了第一次分派(动态分派),同时也将自己 this 作为参数传递到 Execute.print() 方法中,这里通过方法重载完成了第二次分派(静态分派)双分派实现动态绑定的本质就是在重载委派之前加上继承体系中的重写
-
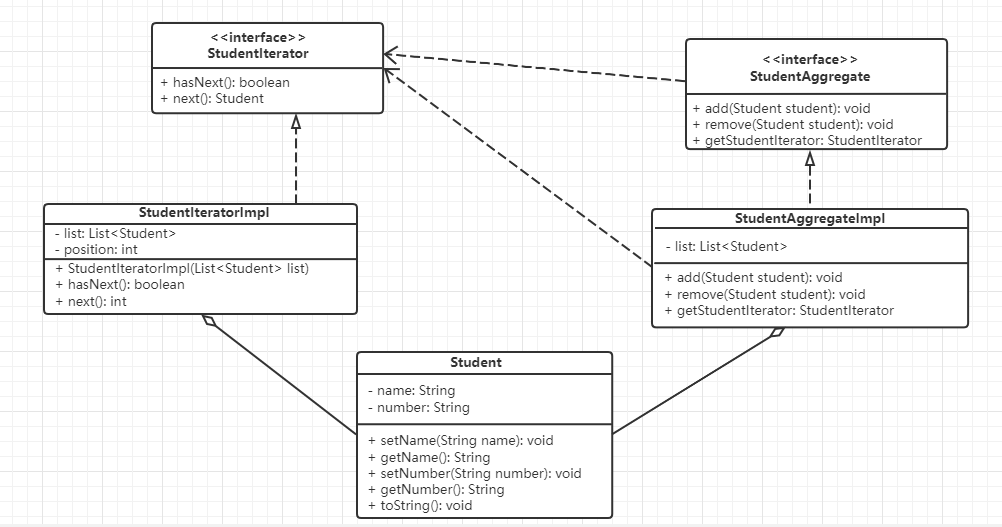
行为型模式-迭代器模式 (1)概述提供一个对象来顺序访问聚合对象中的一系列数据,而不暴露内部对象的表示(2)结构抽象聚合角色:定义存储、添加、删除聚合元素以及创建迭代器对象的接口具体聚合角色:实现抽象聚合类,返回一个具体迭代器的实例抽象迭代器角色:定义访问和遍历聚合元素的接口,通常包含 hasNext()、next() 等方法具体迭代器角色:实现抽象迭代器接口中所定义的方法,完成对聚合对象的遍历,记录遍历的当前位置(3)案例以遍历学生对象集合为例抽象聚合角色public interface StudentAggregate { /** * 添加元素 * * @param student */ void add(Student student); /** * 移除元素 * * @param student */ void remove(Student student); /** * 获取迭代器 * * @return */ StudentIterator getStudentIterator(); }具体聚合角色public class StudentAggregateImpl implements StudentAggregate { private List<Student> list = new ArrayList<>(); @Override public void add(Student student) { list.add(student); } @Override public void remove(Student student) { list.remove(student); } @Override public StudentIterator getStudentIterator() { return new StudentIteratorImpl(list); } }抽象迭代器角色public interface StudentIterator { /** * 判断是否还有元素 * * @return */ boolean hasNext(); /** * 获取下一个元素 * * @return */ Student next(); }具体迭代器角色public class StudentIteratorImpl implements StudentIterator { private List<Student> list; //记录遍历时的位置 private int position = 0; public StudentIteratorImpl(List<Student> list) { this.list = list; } @Override public boolean hasNext() { return position < list.size(); } @Override public Student next() { Student currentStudent = list.get(position); position++; return currentStudent; } }Clientpublic class Client { public static void main(String[] args) { //创建聚合对象 StudentAggregateImpl studentAggregate = new StudentAggregateImpl(); //添加元素 studentAggregate.add(new Student("孙笑川", "001")); studentAggregate.add(new Student("药水哥", "002")); studentAggregate.add(new Student("刘波", "003")); //获取迭代器对象 StudentIterator iterator = studentAggregate.getStudentIterator(); //遍历 while (iterator.hasNext()) { System.out.println(iterator.next()); } } }(4)优缺点支持以不同的方式遍历一个聚合对象,在同一个聚合对象上可以定义多种遍历方式,在迭代器模式中只需要用一个不同的迭代器来替换原有的迭代器即可改变遍历算法简化了聚合类,在原有的聚合类中不需要再自行提供遍历等方法由于引入了抽象层,新增新的聚合类和迭代器类都很方便,满足开闭原则(5)使用场景当需要为聚合对象提供多种遍历方式时当需要为遍历不同的聚合结构提供一个统一的接口时当需要访问一个聚合对象的内容而无需暴露其内部细节时