搜索到
47
篇与
的结果
-
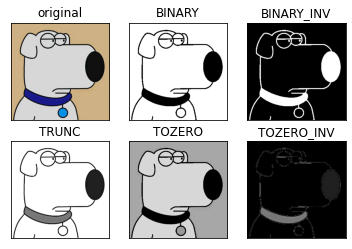
 三、阈值与平滑处理 1. 图像阈值ret, dst = cv2.threshold(src, thresh, maxval, type)参数说明:src:输入图(只能输入单通道图像,一般为灰度图)dst:输出图thresh:阈值maxval:当像素值大于/小于阈值(根据type决定大于/小于),所赋予的值type:二值化的操作类型,包含以下5种:cv2.THRESH_BINARY:超过阈值部分取maxval,否则取0cv2.THRESH_BINARY_INV:THRESH_BINARY取反cv2.THRESH_TRUNC:大于阈值的像素值设为阈值,其他的不变cv2.THRESH_TOZERO:大于阈值的像素值不变,其他的设为0cv2.THRESH_TOZERO_INV:THRESH_TOZERO取反import cv2 # OpenCV 读取的格式是 BGR import matplotlib.pyplot as plt import numpy as np %matplotlib inline img = cv2.imread('ble.jpg') img_gray = cv2.imread('ble.jpg', cv2.IMREAD_GRAYSCALE) ret, thresh1 = cv2.threshold(img_gray, 127, 255, cv2.THRESH_BINARY) ret, thresh2 = cv2.threshold(img_gray, 127, 255, cv2.THRESH_BINARY_INV) ret, thresh3 = cv2.threshold(img_gray, 127, 255, cv2.THRESH_TRUNC) ret, thresh4 = cv2.threshold(img_gray, 127, 255, cv2.THRESH_TOZERO) ret, thresh5 = cv2.threshold(img_gray, 127, 255, cv2.THRESH_TOZERO_INV) titles = ['original', 'BINARY', 'BINARY_INV', 'TRUNC', 'TOZERO', 'TOZERO_INV'] images = [img, thresh1, thresh2, thresh3, thresh4, thresh5] for i in range(6): plt.subplot(2, 3, i + 1), plt.imshow(images[i], 'gray') plt.title(titles[i]) plt.xticks([]), plt.yticks([]) plt.show()2. 图像平滑img = cv2.imread('ysg.png') # cv2.imshow('img', img) # cv2.waitKey(0) # cv2.destroyAllWindows() plt.imshow(cv2.cvtColor(img, cv2.COLOR_BGR2RGB))<matplotlib.image.AxesImage at 0x2a857fb4d68># 均值滤波(平卷积操作) blur = cv2.blur(img, (5, 5)) # cv2.imshow('blur', blur) # cv2.waitKey(0) # cv2.destroyAllWindows() plt.imshow(cv2.cvtColor(blur, cv2.COLOR_BGR2RGB))<matplotlib.image.AxesImage at 0x2a8592e8c50># 方框滤波 # normalize=True 即选择归一化时和均值滤波一样 box_normalize_true = cv2.boxFilter(img, -1, (5, 5), normalize=True) # cv2.imshow('box_normalize_true', box_normalize_true) # cv2.waitKey(0) # cv2.destroyAllWindows() plt.imshow(cv2.cvtColor(box_normalize_true, cv2.COLOR_BGR2RGB))<matplotlib.image.AxesImage at 0x2a8592532b0># normalize=False 不做归一化,矩阵中的像素值相加,超过255取255 box_normalize_false = cv2.boxFilter(img, -1, (5, 5), normalize=False) # cv2.imshow('box_normalize_false', box_normalize_false) # cv2.waitKey(0) # cv2.destroyAllWindows() plt.imshow(cv2.cvtColor(box_normalize_false, cv2.COLOR_BGR2RGB))<matplotlib.image.AxesImage at 0x2a8579eed30># 高斯滤波 gaussian = cv2.GaussianBlur(img, (5, 5), 1) # cv2.imshow('gaussian', gaussian) # cv2.waitKey(0) # cv2.destroyAllWindows() plt.imshow(cv2.cvtColor(gaussian, cv2.COLOR_BGR2RGB))<matplotlib.image.AxesImage at 0x2a857a7b828># 中值滤波 median = cv2.medianBlur(img, 5) # cv2.imshow('median', median) # cv2.waitKey(0) # cv2.destroyAllWindows() plt.imshow(cv2.cvtColor(median, cv2.COLOR_BGR2RGB))<matplotlib.image.AxesImage at 0x2a8579d0588>
 -
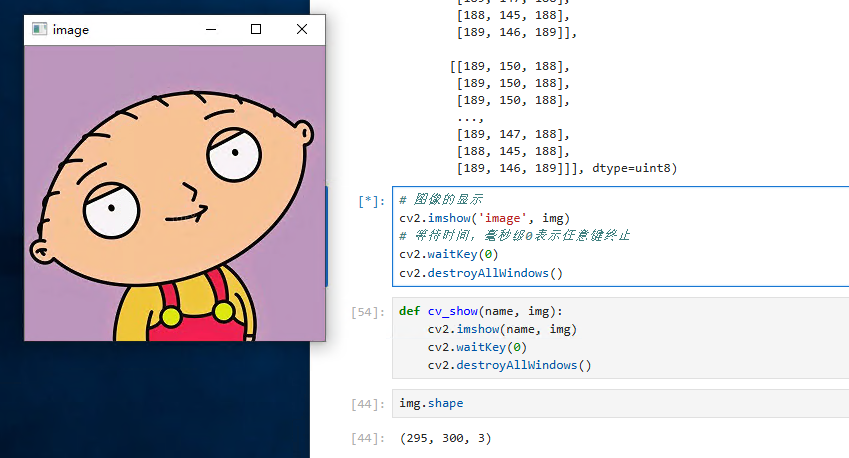
二、图像基本操作 1. 图像的读取与显示cv2.IMREAD_COLOR 彩色图像cv2.IMGREAD_GRAYSCALE 灰度图像import cv2 # OpenCV 读取的格式是 BGR import matplotlib.pyplot as plt import numpy as np %matplotlib inline img = cv2.imread('test.jpg') # 执行 img 回车可显示该图像的数据 array([[[189, 150, 188], [189, 150, 188], [188, 149, 187], ..., [189, 147, 188], [188, 146, 187], [189, 146, 189]], [[189, 150, 188], [188, 149, 187], [188, 149, 187], ..., [189, 147, 188], [188, 146, 187], [189, 146, 189]], [[188, 149, 187], [188, 149, 187], [188, 149, 187], ..., [189, 147, 188], [188, 146, 187], [189, 146, 189]], ..., [[189, 150, 188], [189, 150, 188], [189, 150, 188], ..., [189, 147, 188], [188, 146, 187], [189, 146, 189]], [[189, 150, 188], [189, 150, 188], [189, 150, 188], ..., [189, 147, 188], [188, 145, 188], [189, 146, 189]], [[189, 150, 188], [189, 150, 188], [189, 150, 188], ..., [189, 147, 188], [188, 145, 188], [189, 146, 189]]], dtype=uint8)# 图像的显示 cv2.imshow('image', img) # 等待时间,毫秒级0表示任意键终止 cv2.waitKey(0) cv2.destroyAllWindows()def cv_show(name, img): cv2.imshow(name, img) cv2.waitKey(0) cv2.destroyAllWindows()# 执行 img.shape 可输出该图像的 shape 数据 img.shape (295, 300, 3)# 读取灰度图 img = cv2.imread('test.jpg', cv2.IMREAD_GRAYSCALE) img array([[166, 166, 165, ..., 164, 163, 164], [166, 165, 165, ..., 164, 163, 164], [165, 165, 165, ..., 164, 163, 164], ..., [166, 166, 166, ..., 164, 163, 164], [166, 166, 166, ..., 164, 163, 164], [166, 166, 166, ..., 164, 163, 164]], dtype=uint8)# 图像的显示(灰度图) cv2.imshow('image', img) # 等待时间,毫秒级0表示任意键终止 cv2.waitKey(0) cv2.destroyAllWindows()# 保存 cv2.imwrite('test1.jpg', img)type(img) numpy.ndarray2. 读取视频cv2.VideoCapture 可以捕获摄像头,用数字来控制不同的设备,如:0,1如果是视频文件,可以直接指定路径vc = cv2.VideoCapture('jswyn.mp4') if vc.isOpened(): open, frame = vc.read() else: open = False while open: ret, frame = vc.read() if frame is None: break if ret == True: gray = cv2.cvtColor(frame, cv2.COLOR_BGR2GRAY) cv2.imshow('result', gray) if cv2.waitKey(10) & 0xFF == 27: break vc.release() cv2.destroyAllWindows()3. 截取部分图像数据(ROI区域)img = cv2.imread('test.jpg') jiaozi = img[0:50, 0: 150] cv_show('jiaozi', jiaozi)4. 颜色通道提取b,g,r = cv2.split(img) r array([[188, 188, 187, ..., 188, 187, 189], [188, 187, 187, ..., 188, 187, 189], [187, 187, 187, ..., 188, 187, 189], ..., [188, 188, 188, ..., 188, 187, 189], [188, 188, 188, ..., 188, 188, 189], [188, 188, 188, ..., 188, 188, 189]], dtype=uint8) r.shape (295, 300)# 合并 img = cv2.merge((b,g,r)) img.shape (295, 300, 3)# 只保留 R 通道 cur_img = img.copy() cur_img[:,:,0] = 0 cur_img[:,:,1] = 0 cv_show('R', cur_img)# 只保留 G 通道 cur_img = img.copy() cur_img[:,:,0] = 0 cur_img[:,:,2] = 0 cv_show('G', cur_img)# 只保留 B 通道 cur_img = img.copy() cur_img[:,:,1] = 0 cur_img[:,:,2] = 0 cv_show('B', cur_img)5. 边界填充top_size,bottom_size,left_size,right_size = (50, 50, 50, 50) replicate = cv2.copyMakeBorder(img, top_size, bottom_size, left_size, right_size, borderType=cv2.BORDER_REPLICATE) reflect = cv2.copyMakeBorder(img, top_size, bottom_size, left_size, right_size, borderType=cv2.BORDER_REFLECT) reflect101 = cv2.copyMakeBorder(img, top_size, bottom_size, left_size, right_size, borderType=cv2.BORDER_REFLECT_101) wrap = cv2.copyMakeBorder(img, top_size, bottom_size, left_size, right_size, borderType=cv2.BORDER_WRAP) constant = cv2.copyMakeBorder(img, top_size, bottom_size, left_size, right_size, borderType=cv2.BORDER_CONSTANT, value=0)import matplotlib.pyplot as plt plt.subplot(231), plt.imshow(img, 'gray'), plt.title('ORIGINAL') # plt.subplot(231), plt.imshow(replicate, 'gray'), plt.title('REPLICATE') # plt.subplot(231), plt.imshow(reflect, 'gray'), plt.title('REFLECT') # plt.subplot(231), plt.imshow(reflect101, 'gray'), plt.title('REFLECT_101') # plt.subplot(231), plt.imshow(wrap, 'gray'), plt.title('WRAP') # plt.subplot(231), plt.imshow(constant, 'gray'), plt.title('CONSTANT') plt.show()BORDER_REPLICATE:复制法,复制最边缘像素BORDER_REFLECT:反射法,对感兴趣的图像中的像素在两边进行复制,如:dcba|abcde|edcBORDER_REFLECT_101:反射法,以最边缘像素为轴,对称复制,如:dcb|abcd|cbaBORDER_WRAP:外包装法,如:bcde|abcde|abcdBORDER_CONSTANT:常量法,常量数值进行填充6. 数值计算img_jz = cv2.imread('test.jpg') img_jz[:5,:,0] array([[189, 189, 188, ..., 189, 188, 189], [189, 188, 188, ..., 189, 188, 189], [188, 188, 188, ..., 189, 188, 189], [188, 188, 188, ..., 189, 188, 189], [188, 188, 188, ..., 189, 188, 189]], dtype=uint8)img_jz1 = img_jz + 10 img_jz1[:5,:,0] array([[199, 199, 198, ..., 199, 198, 199], [199, 198, 198, ..., 199, 198, 199], [198, 198, 198, ..., 199, 198, 199], [198, 198, 198, ..., 199, 198, 199], [198, 198, 198, ..., 199, 198, 199]], dtype=uint8)# 相加时如果像素点的数值超过边界 255,则会将该值与256进行 % 取余操作 (img_jz + img_jz1)[:5,:,0] array([[132, 132, 130, ..., 132, 130, 132], [132, 130, 130, ..., 132, 130, 132], [130, 130, 130, ..., 132, 130, 132], [130, 130, 130, ..., 132, 130, 132], [130, 130, 130, ..., 132, 130, 132]], dtype=uint8)# 通过cv2的add方法进行操作时,如果像素点的数值超过边界 255,则取255,否则取它自身 cv2.add(img_jz,img_jz1)[:5,:,0] array([[255, 255, 255, ..., 255, 255, 255], [255, 255, 255, ..., 255, 255, 255], [255, 255, 255, ..., 255, 255, 255], [255, 255, 255, ..., 255, 255, 255], [255, 255, 255, ..., 255, 255, 255]], dtype=uint8)7. 图像融合# 当两张图的大小不一致时,无法进行融合,先用cv2.resize()方法调整 img_ble = cv2.imread('ble.jpg') img_jz + img_ble array([[[139, 68, 57], [140, 69, 58], [137, 68, 59], ..., [139, 70, 55], [138, 69, 53], [139, 69, 55]], [[140, 69, 58], [139, 68, 57], [137, 68, 59], ..., [139, 70, 55], [138, 69, 53], [139, 69, 55]], [[139, 68, 57], [139, 68, 57], [136, 67, 58], ..., [139, 70, 55], [138, 69, 53], [139, 69, 55]], ..., [[144, 68, 56], [137, 65, 57], [137, 70, 61], ..., [138, 68, 55], [137, 67, 54], [138, 68, 55]], [[143, 67, 55], [136, 64, 56], [135, 68, 59], ..., [138, 68, 55], [137, 66, 55], [139, 69, 56]], [[142, 66, 54], [141, 68, 60], [132, 65, 56], ..., [139, 69, 56], [138, 67, 56], [139, 69, 56]]], dtype=uint8)# 参数说明:img1,比例,img2,比例,亮度级 res = cv2.addWeighted(img_jz, 0.1, img_ble, 0.6, 0) plt.imshow(res)<matplotlib.image.AxesImage at 0x24ad14c8860># 将目标值设置为,通过x,y比例进行调整 res = cv2.resize(img, (0, 0), fx=3, fy=2.5) plt.imshow(res)<matplotlib.image.AxesImage at 0x24ad4d2f4e0>
-
一、环境配置 参考 b 站人工智能算法工程师 up 主1. 安装Anaconda下载地址:https://www.anaconda.com/download安装后使用 Python3.6 虚拟环境及 opencv-python 3.4.1.15 版本# 注:以管理员身份运行 Anaconda Prompt conda create -p C:\ProgramData\anaconda3\envs\py36 python=3.6 conda activate C:\ProgramData\anaconda3\envs\py36 pip install opencv-python==3.4.1.15 # 验证 opncv cd /d C:\ProgramData\anaconda3\envs\py36 python ipmort cv2 cv2.__version__安装拓展pip install opencv-contrib-python==3.4.1.152. Notebook安装并切换 Python3.6 内核# 继续在刚刚的 Anaconda Prompt 命令行窗口中执行以下代码 pip install ipykernel python -m ipykernel install --user --name py36 --display-name "Python 3.6 (py36)"打开 Jupyter Notebook,通过 http://localhost:8888/tree 可以访问到网页版 Notebook新建一个python测试文件,在顶部的 kernel 选项卡中可找到切换内核选项,切换至刚刚安装的 3.6 版本
-
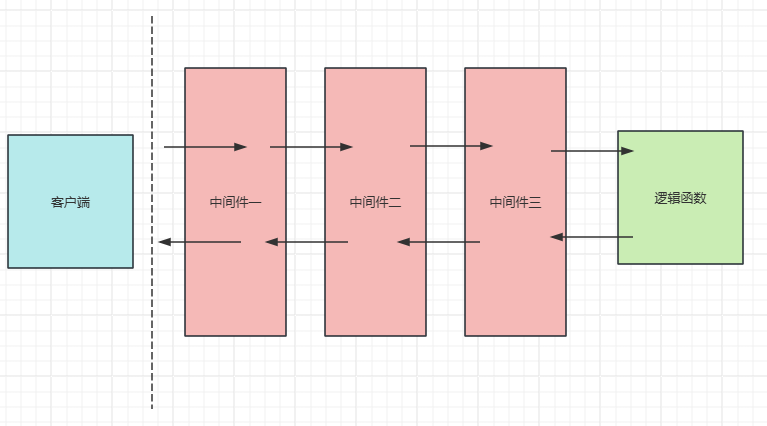
中间件 四、中间件1. 概念"中间件"是一个函数,它在每个请求被特定的路径操作处理之前,以及在每个响应之后工作。2. 使用在函数的顶部使用装饰器 @app.middleware("http")中间件接收的参数:requestcall_next 函数接收 request,作为参数在处理完相应的逻辑后,将 request 传递给下一步操作返回对应路径请求的 response3. 示例from fastapi import FastAPI, Request, Response app = FastAPI() @app.middleware("http") async def middleware2(request: Request, call_next): print("中间件2-请求") response = await call_next(request) print("中间件2-响应") return response @app.middleware("http") async def middleware1(request: Request, call_next): print("中间件1-请求") response = await call_next(request) print("中间件1-响应") return response @app.get("/{user_id}") async def get_user(user_id: int): print(f'查询用户id为: {user_id}的用户') return { "user": "孙笑川" } if __name__ == '__main__': import uvicorn uvicorn.run("main:app", host="127.0.0.1", port=8088, reload=True) 当请求 get_user 时,控制台会打印如下信息(中间件需按顺序写,从上至下倒序):4. CORS 中间件示例from fastapi import FastAPI from fastapi.middleware.cors import CORSMiddleware app = FastAPI() origins = [ "http://localhost:8089" ] app.add_middleware( CORSMiddleware, allow_origins=origins, # 值为*时代表所有客户端 allow_credentials=True, allow_methods=["GET", "POST", "PUT", "DELETE"], allow_headers=["*"], ) @app.get("/") def main(): return { "message": "你好,孙笑川" } if __name__ == '__main__': import uvicorn uvicorn.run("main:app", host="127.0.0.1", port=8088, reload=True)
-
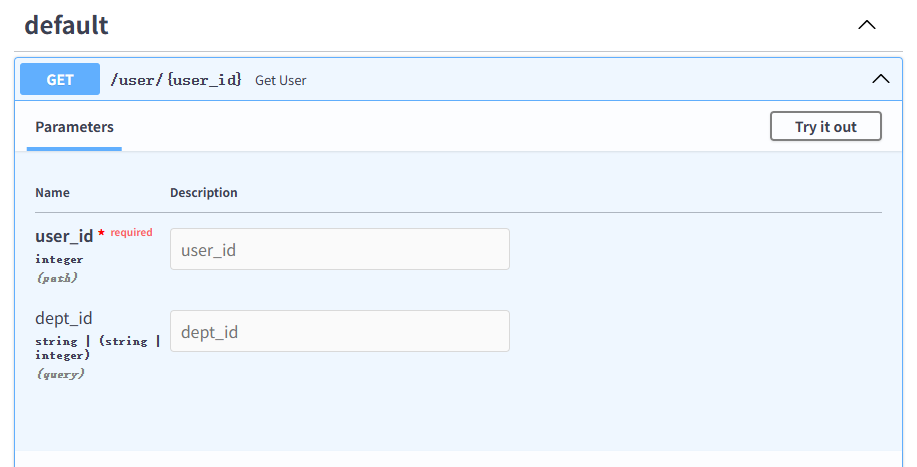
请求与响应 1. 路径参数(1)基本使用@app.get("/user/{user_id}") async def get_user(user_id): print(user_id, type(user_id)) return { "user_id": user_id }(2)声明路径参数类型此例中参数类型为 int@app.get("/user/{user_id}") async def get_user(user_id: int): print(user_id, type(user_id)) return { "user_id": user_id }(3)注意定义的函数顺序问题""" 注意定义的函数顺序问题 例:有请求路径为 /user/list 的方法,它需要置于 /user/{user/id} 之前 否则会出现请求 /user/list 方法,但请求最终落在了 /user/{user_id} 方法上的问题 """ @app.get("/user/list") async def get_user_list(): return tuple([ { "user": "user1" }, { "user": "user2" } ]) @app.get("/user/{user_id}") async def get_user(user_id: int): print(user_id, type(user_id)) return { "user_id": user_id }2. 查询参数(请求参数)路径函数中声明不属于路径参数的其他函数参数时,它们将被自动解释为查询字符串参数,就是 url? 之后用&分割的 key-value 键值对。from typing import Union from fastapi import FastAPI app = FastAPI() """ 此例中有路径参数 user_id,查询参数 dept_id 参数 dept_id 通过 Union 声明为 str、int 类型,或者为None(不传) """ @app.get("/user/{user_id}") async def get_user(user_id: int, dept_id: Union[str, int] = None): print(f'user_id={user_id}, dept_id={dept_id}') return { "user_id": user_id, "dept_id": dept_id } if __name__ == '__main__': import uvicorn uvicorn.run("main:app", host="127.0.0.1", port=8088, reload=True) 补充:自 Python 3.5 开始,PEP484 为 Python 引入了类型注解(type hints)类型检查,防止运行时出现参数、返回值类型不符作为开发文档附加说明,方便使用者调用时传入和返回参数类型模块加入不会影响程序的运行不会报正式的错误,pycharm 支持 typing 检查错误时会出现黄色警告Union 和 Optional,Optional[str] 是 Union[str] = None 的语法糖3. 请求体数据FastApi 请求体数据基于 Pydantic,Pydantic 主要用于做类型强制检查(校验数据)。(1)安装pip install pydantic(2)使用from typing import Union, Optional from fastapi import FastAPI from pydantic import BaseModel, Field, validator app = FastAPI() class User(BaseModel): id: int name: str age: int = Field(default=0, gt=0, lt=100) no: int address: Optional[str] @validator('name') def name_validator(cls, val): assert len(val) >= 2, '用户名不能少于2个字' return val @app.post("/user") async def add(user: User): print(f'新增用户: {user}') return user if __name__ == '__main__': import uvicorn uvicorn.run("main:app", host="127.0.0.1", port=8088, reload=True) 补充:FastApi 会自动将定义的模型类转化为 JSON Schemaswagger 文档参数校验当接口请求数据为{ "id": 1, "name": "测", "age": 0, "no": 10, "address": "成都" }服务端参数校验返回4. form 表单数据在 FastAPI 中可以使用 Form 组件来接收表单数据(1)安装pip install python-multipart(2)使用from fastapi import FastAPI, Form app = FastAPI() @app.post("/user") async def add(id: str = Form(..., regex='[a-zA-Z]'), name: str = Form(..., min_length=2, max_length=6)): print(f'新增用户: id={id}, name={name}') return { "id": id, "name": name } if __name__ == '__main__': import uvicorn uvicorn.run("main:app", host="127.0.0.1", port=8088, reload=True) 5. 文件上传from typing import List from fastapi import FastAPI, File, UploadFile app = FastAPI() @app.post("/upload-file") async def upload_file(file: bytes = File()): print(f'file_len={len(file)}') return "上传成功" @app.post("/upload-files") async def upload_files(files: List[bytes] = File()): print(f'files_len={len(files)}') return "上传成功" # 适合大文件上传 @app.post("/upload-multi-files") async def upload_multi_files(files: List[UploadFile] = File()): print(f'files_len={len(files)}') return "上传成功" if __name__ == '__main__': import uvicorn uvicorn.run("main:app", host="127.0.0.1", port=8088, reload=True) 6. Request 对象在函数中声明 Request 类型的参数,FastAPI 会自动传递 Request 对象给这个参数,可以获取其中的 header, url, cookie, session 等信息from fastapi import FastAPI, Request app = FastAPI() @app.get("/request_info") async def request_info(request: Request): request_info_dict = { "method": request.method, "url": request.url, "params": request.query_params, "headers": request.headers, "cookies": request.cookies, "ip": request.client.host, "user-agent": request.headers.get("User-Agent") } print(f'request_info_dict={request_info_dict}') return request_info_dict if __name__ == '__main__': import uvicorn uvicorn.run("main:app", host="127.0.0.1", port=8088, reload=True) 7. 请求静态文件web开发中,常涉及静态文件等资源,如css、js、图片、icon等,可在项目中新建 static 文件夹,将静态资源放入该文件夹后做如下配置from fastapi import FastAPI from fastapi.staticfiles import StaticFiles app = FastAPI() app.mount("/static", StaticFiles(directory="static")) if __name__ == '__main__': import uvicorn uvicorn.run("main:app", host="127.0.0.1", port=8088, reload=True) 8. 响应参数(1)response_modelFastAPI 提供了 response_model 参数,声明 return 响应体的模型将输出数据转换为 response_model 中声明的数据类型验证数据结构和类型将输出数据限制为该 model 定义的添加到 OpenAPI 中在自动文档系统中使用以新增用户为例from typing import Optional from fastapi import FastAPI from pydantic import BaseModel, Field, validator app = FastAPI() class User(BaseModel): id: int name: str age: int = Field(default=0, gt=0, lt=100) no: int address: Optional[str] @validator('name') def name_validator(cls, val): assert len(val) >= 2, '用户名不能少于2个字' return val class UserVo(BaseModel): id: int name: str age: int = Field(default=0, gt=0, lt=100) no: int @app.post("/user", response_model=UserVo) async def add(user: User): print(f'新增用户: {user}') return user if __name__ == '__main__': import uvicorn uvicorn.run("main:app", host="127.0.0.1", port=8088, reload=True) (2)response_model_exclude_unsetfrom typing import Optional from fastapi import FastAPI from pydantic import BaseModel, Field, validator app = FastAPI() class User(BaseModel): id: int name: str age: int = Field(default=0, gt=0, lt=100) no: int address: Optional[str] = None @validator('name') def name_validator(cls, val): assert len(val) >= 2, '用户名不能少于2个字' return val @app.post("/response_model_exclude_unset_user", response_model=User, response_model_exclude_unset=True) async def response_model_exclude_unset_add(user: User): print(f'新增用户: {user}') return user if __name__ == '__main__': import uvicorn uvicorn.run("main:app", host="127.0.0.1", port=8088, reload=True) (3)response_model_exclude_defaults不返回为默认值的字段(4)response_model_exclude_none不返回为 None 的字段(5)INCLUDE和EXCLUDEINCLUDE:只返回 INCLUDE 声明了的字段EXCLUDE:返回 EXCLUDE 声明了的之外的字段(即排除指定字段)
-
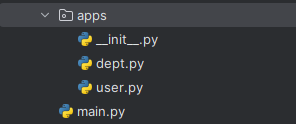
路径操作 1. 路径操作装饰器(1)FastApi支持的请求方式@app.get() @app.post() @app.put() @app.patch() @app.delete() @app.options() @app.head() @app.trace()(2)路径操作装饰器参数@app.post( "/user/{user_id}", response_model=User, status_code=status.HTTP_200_OK, tags=["用户模块"], summary="根据user_id查询用户信息", description="根据user_id查询用户信息", response_description= "用户信息", deprecated=False, )2. include_router项目结构__init.py__# __init__.py from .user import user from .dept import dept dept.pyfrom fastapi import APIRouter dept = APIRouter() @dept.get("/{dept_id}") async def get_dept(dept_id): return { "dept": dept_id } user.pyfrom fastapi import APIRouter user = APIRouter() @user.get("/{user_id}") async def get_user(user_id): return { "user": user_id } main.pyfrom fastapi import FastAPI from apps import user, dept app = FastAPI() app.include_router(user, prefix="/user", tags=["用户模块", ]) app.include_router(dept, prefix="/dept", tags=["部门模块", ]) if __name__ == '__main__': import uvicorn uvicorn.run("main:app", host="127.0.0.1", port=8088, reload=True) 启动项目后访问docs
-
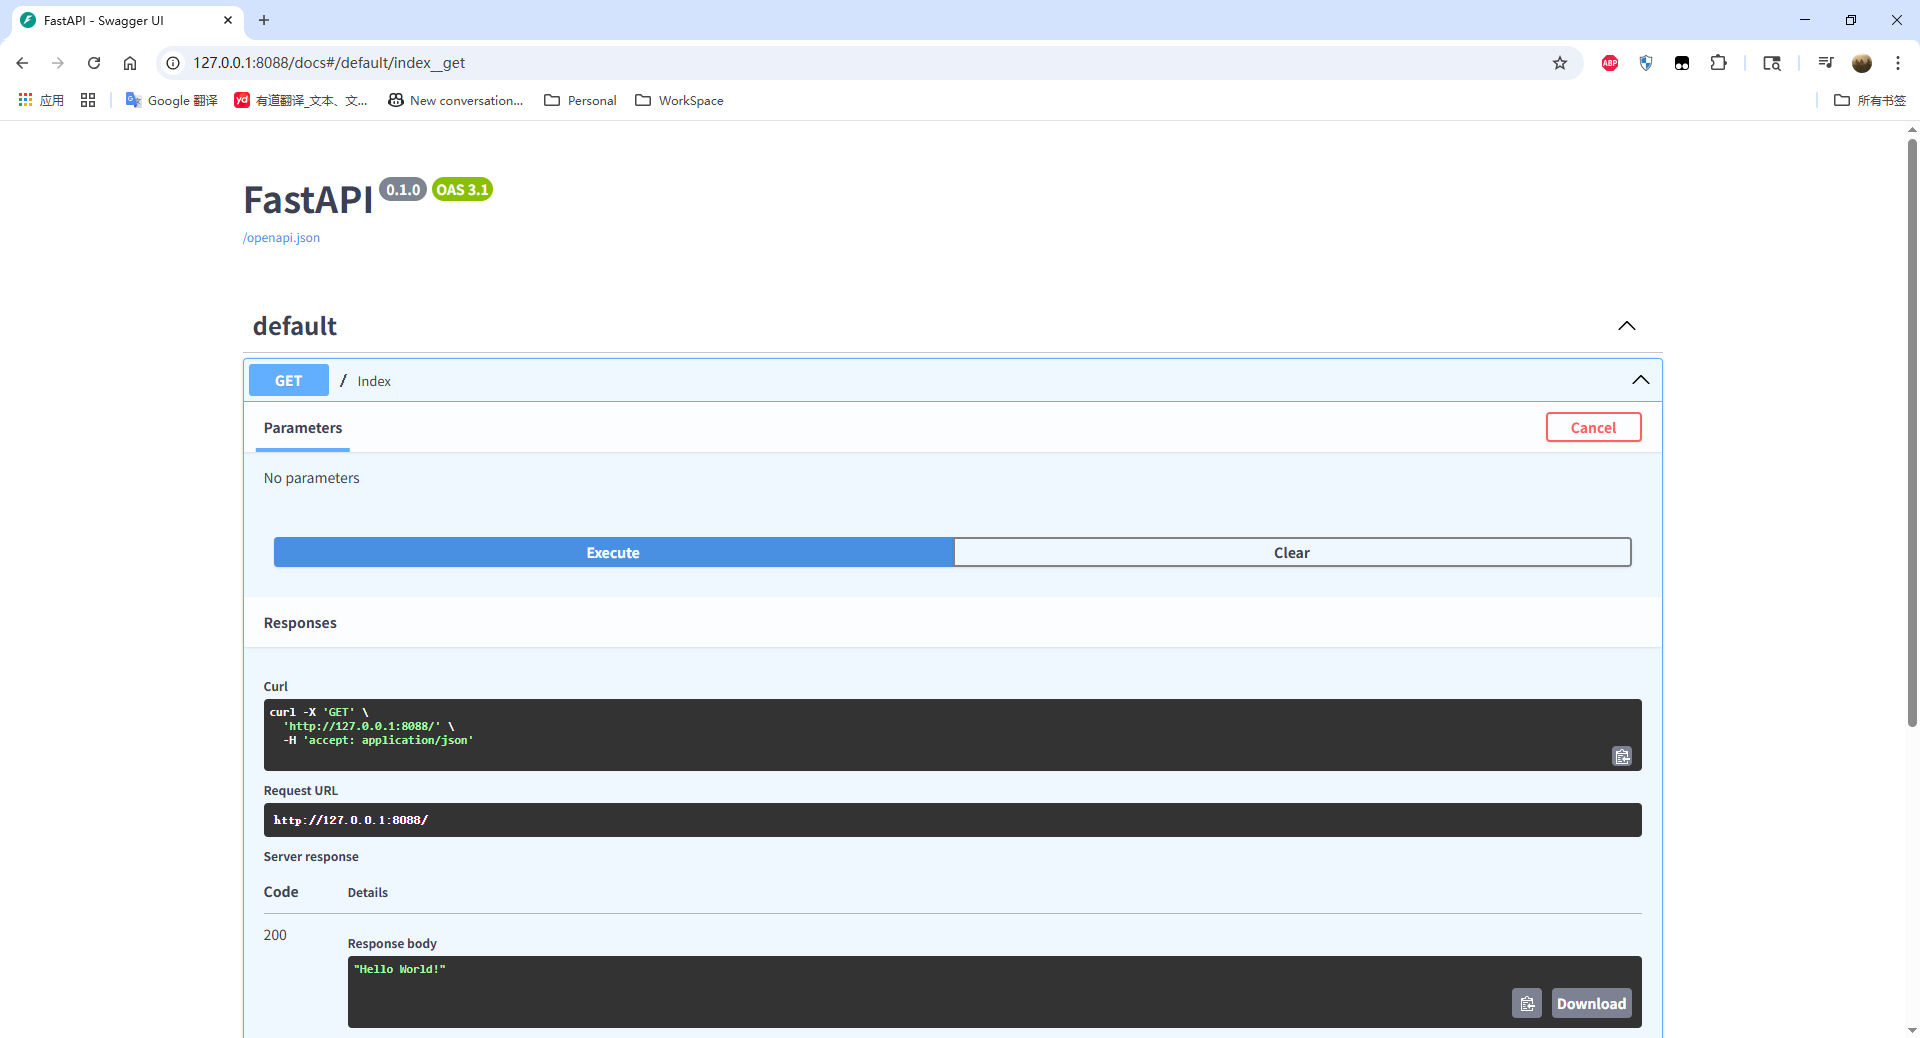
快速开始 参考 B站苑昊老师 FastApi 课程一、QuickStart1. 安装# fastapi pip install fastapi # uvicorn pip install uvicorn2. 测试 demo(1)main.pyfrom fastapi import FastAPI app = FastAPI() @app.get("/") async def index(): return "Hello World!"(2)启动# 通过命令行 uvicorn main:app --reload# 通过 main 函数 if __name__ == '__main__': import uvicorn uvicorn.run("main:app", host="127.0.0.1", port=8088, reload=True)(3)接口文档启动后通过 http://127.0.0.1:8088/docs 即可访问 swagger
-
面向对象 1. 类# 类 class Person(object): # object 基类 pass # 创建对象(类的实例化) student = Person() print(type(student)) # <class '__main__.Person'> print(isinstance(student, object)) print(isinstance(student, Person)) 2. 实例属性# 实例属性 class Person(object): def __init__(self, name, age, address): self.name = name self.age = age self.address = address student = Person('孙笑川', 33, '成都') student.job = '主播' print(student.__dict__) # 获取实例的所有属性 3. 类属性# 类属性 class Person(object): index = 0 # 类属性 def __init__(self, name, age, address): self.name = name self.age = age self.address = address Person.index += 1 if age < 0 or age > 100: raise Exception('年龄有误,请检查!') try: student = Person('孙笑川', 33, '成都') print(student.__dict__) print('第%d个用户' % Person.index) student1 = Person('刘波', 30, '湖北') print(student1.__dict__) print('第%d个用户' % Person.index) except Exception as e: print(e) 4. 实例方法# 实例方法 class Person(object): index = 0 # 类属性 def __init__(self, name, age, address): self.name = name self.age = age self.address = address Person.index += 1 # print('第%d个用户' % Person.index) # 实例方法 def say_hello(self): print('大家好,我是%s' % self.name) try: student = Person('孙笑川', 33, '成都') # print(student.__dict__) student.say_hello() student1 = Person('刘波', 30, '湖北') # print(student1.__dict__) except Exception as e: print(e) 5. 类方法# 类方法 class Person(object): index = 0 # 类属性 def __init__(self, name, age, address): self.name = name self.age = age self.address = address Person.index += 1 if age < 0 or age > 100: raise Exception('年龄有误,请检查!') # 实例方法 def say_hello(self): print('大家好,我是%s' % self.name) # 类方法 @classmethod def get_user_no(cls): print('第%d个用户' % cls.index) try: student = Person('孙笑川', 33, '成都') # print(student.__dict__) student.say_hello() student1 = Person('刘波', 30, '湖北') # print(student1.__dict__) Person.get_user_no() except Exception as e: print(e) 6. 静态方法# 静态方法 class Person(object): index = 0 # 类属性 def __init__(self, name, age, address): self.name = name self.age = age self.address = address Person.index += 1 if age < 0 or age > 100: raise Exception('年龄有误,请检查!') # 实例方法 def say_hello(self): print('大家好,我是%s' % self.name) # 类方法 @classmethod def get_user_no(cls): print('第%d个用户' % cls.index) # 静态方法 @staticmethod def is_valid(**kwargs): if kwargs['token'] == '123456': return True else: print('前置校验失败') return False try: check_key = {'token': '123456'} if Person.is_valid(**check_key): student = Person('孙笑川', 33, '成都') # print(student.__dict__) student.say_hello() student1 = Person('刘波', 30, '湖北') # print(student1.__dict__) Person.get_user_no() else: print('创建用户失败') except Exception as e: print(e) 7. 继承# 继承 class Person(object): index = 0 # 类属性 def __init__(self, name, age, address): self.name = name self.age = age self.address = address Person.index += 1 if age < 0 or age > 100: raise Exception('年龄有误,请检查!') # 实例方法 def say_hello(self): print('大家好,我是%s' % self.name) # 类方法 @classmethod def get_user_no(cls): print('第%d个用户' % cls.index) # 静态方法 @staticmethod def is_valid(**kwargs): if kwargs['token'] == '123456': return True else: print('前置校验失败') return False class People(Person): # 重写父类的 say_hello 方法 def say_hello(self): print('大家好,我是%s,我来自%s' % (self.name, self.address)) try: check_key = {'token': '123456'} if Person.is_valid(**check_key): student = Person('孙笑川', 33, '成都') # print(student.__dict__) student.say_hello() student1 = People('刘波', 30, '湖北') # print(student1.__dict__) student1.say_hello() else: print('创建用户失败') except Exception as e: print(e) 8. 多态# 多态 class Animal(object): def say(self): print('Animal Say...') class Dog(Animal): def say(self): print('汪汪汪...') class Cat(Animal): def say(self): print('喵喵喵...') animal = Animal() animal.say() dog = Dog() dog.say() cat = Cat() cat.say() 9. 封装# 封装 class Person(object): def __init__(self, name, age, address): # self._name = name # 受保护的变量 self.__name = name # 私有变量 self.__age = age self.__address = address if not isinstance(age, int) or age < 0 or age > 100: raise Exception('年龄有误,请检查!') """ 把函数当作变量使用 @property def 变量名(self): # 获取变量 get @变量名.setter def 变量名(self, 变量名): # 设置变量 set """ @property def name(self): return self.__name @name.setter def name(self, name): self.__name = name @property def age(self): return self.__age @age.setter def age(self, age): if not isinstance(age, int) or age < 0 or age > 100: raise Exception('年龄有误,请检查!') else: self.__age = age @property def address(self): return self.__address @address.setter def address(self, address): self.__address = address try: student = Person('孙笑川', 33, '成都') print(student.name) # 修改属性 student.name = '刘波' print(student.__dict__) except Exception as e: print(e)
-
文件及IO操作 1. 读取文件# 读取文件 import os # 绝对路径 # absolute_path = os.getcwd() # file_name = absolute_path + '/test.txt' # f = open(file_name, mode='r', encoding='utf-8') # 相对路径 f = open('test.txt', mode='r', encoding='utf-8') # content = f.read() # 读取全部 # content = f.readline() # 读取一行 content = f.readlines() # 按行读取 print(content) # 关闭 f.close() 2. 写文件# 写文件 f = open('test.txt', mode='w', encoding='utf-8') f.write('大家好\n') write_content = ['孙笑川\n', '刘波\n'] f.writelines(write_content) f.close() f = open('test.txt', mode='r', encoding='utf-8') read_content = f.read() print(read_content) f.close() 3. 追加写# 追加写 f = open('test.txt', mode='a', encoding='utf-8') f.write('你好\n') content = ['带带大师兄\n', '药水哥\n'] f.writelines(content) f.close() 4. with# with open() as f 操作文件 with open('test.txt', mode='r', encoding='utf-8') as f: print(f.read()) print('使用with语法糖读取文件内容完成')
-
模块 此处以 random、正则、socket 为例1. random# random import random # 随机小数 print(random.random()) # 1 - 10 之间的随机数 print(random.randint(1, 10)) 2. 正则# 正则 import re # \d 数字 result = re.match(r'\d+', '123abc') print(result) # 123 # \w 数字、字母、下划线 result = re.match(r'\w+', '1a2b3c!') print(result) # 1a2b3c # \s 空白字符串;\S 非空字符串 result = re.match(r'^\s+$', '1 2 3') print(result) # None result = re.match(r'^\S+$', '1 abc') print(result) # None # . 任意字符 result = re.match(r'.+$', 'abc 1q2') print(result) # abc 1q2 # [] 区间 result = re.match(r'^a[1a]', 'a123456') print(result) # a1 # | 或 result = re.match(r'^a|1|c$', 'a12345c') print(result) # a 3. socket3.1 server# socket import socket sk = socket.socket() sk.bind(('127.0.0.1', 8088)) sk.listen(5) conn, addr = sk.accept() print(conn) print(addr) while True: accept_data = conn.recv(1024) print('收到客户端发送的消息:', accept_data.decode('utf-8')) send_data = input('请输入要回复的消息:') conn.send(send_data.encode('utf-8'))3.2 client# socket import socket sk = socket.socket() sk.connect(('127.0.0.1', 8088)) while True: sand_data = input('请输入要发送的消息:') sk.send(sand_data.encode('utf-8')) accept_data = sk.recv(1024) print(accept_data.decode('utf-8'))