搜索到
171
篇与
的结果
-
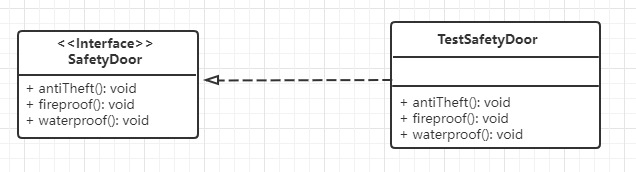
 接口隔离原则 定义:客户端不应该被迫依赖于它不使用的方法,即:一个类对另一个类的依赖应该建立在最小的接口上以安全门为例:存在的问题:如果要增加新的品牌的安全门,则违背了开闭原则SafetyDoorpublic interface SafetyDoor { /** * 防盗 */ void antiTheft(); /** * 防火 */ void fireproof(); /** * 防水 */ void waterproof(); }TestSafetyDoorpublic class TestSafetyDoor implements SafetyDoor { @Override public void antiTheft() { System.out.println("防盗"); } @Override public void fireproof() { System.out.println("防火"); } @Override public void waterproof() { System.out.println("防水"); } }Clientpublic class Client { public static void main(String[] args) { //存在的问题:如果要增加新的品牌的安全门,则违背了开闭原则 TestSafetyDoor testSafetyDoor = new TestSafetyDoor(); testSafetyDoor.antiTheft(); testSafetyDoor.fireproof(); testSafetyDoor.waterproof(); } }改进:抽象出安全门各个功能的接口,新增其他品牌的安全门时只需实现对应功能的接口AntiTheftpublic interface AntiTheft { /** * 防盗 */ void antiTheft(); }Fireproofpublic interface Fireproof { /** * 防火 */ void fireproof(); }Waterproofpublic interface Waterproof { /** * 防水 */ void waterproof(); }TestSafetyDoorpublic class TestSafetyDoor implements AntiTheft, Fireproof, Waterproof { @Override public void antiTheft() { System.out.println("防盗"); } @Override public void fireproof() { System.out.println("防火"); } @Override public void waterproof() { System.out.println("防水"); } }Test01SafetyDoorpublic class Test01SafetyDoor implements AntiTheft, Fireproof { @Override public void antiTheft() { System.out.println("防盗"); } @Override public void fireproof() { System.out.println("防火"); } }Clientpublic class Client { public static void main(String[] args) { //Test品牌安全门 TestSafetyDoor testSafetyDoor = new TestSafetyDoor(); testSafetyDoor.antiTheft(); testSafetyDoor.fireproof(); testSafetyDoor.waterproof(); System.out.println("================="); //Test品牌安全门 Test01SafetyDoor test01SafetyDoor = new Test01SafetyDoor(); test01SafetyDoor.antiTheft(); test01SafetyDoor.fireproof(); } }
 -
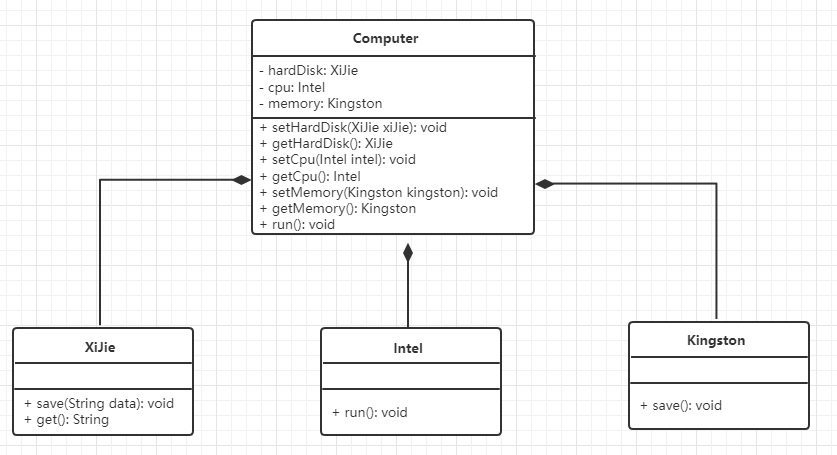
依赖倒置原则 定义:高层模块不应该依赖低层模块,两者都应该依赖其抽象;抽象不应该依赖细节,细节应该依赖抽象以组装电脑为例:存在的问题:现在的电脑只能使用给定的组件,如果要使用其他的,则违背了开闭原则XiJiepublic class XiJie { public void save(String data) { System.out.println("使用希捷硬盘存储数据:" + data); } public String get() { System.out.println("使用希捷硬盘读取数据"); return "数据"; } }Intelpublic class Intel { public void run() { System.out.println("使用Intel cpu"); } }Kingstonpublic class Kingston { public void save() { System.out.println("使用金士顿内存条"); } }Computerpublic class Computer { private XiJie hardDisk; private Intel cpu; private Kingston memory; public XiJie getHardDisk() { return hardDisk; } public void setHardDisk(XiJie hardDisk) { this.hardDisk = hardDisk; } public Intel getCpu() { return cpu; } public void setCpu(Intel cpu) { this.cpu = cpu; } public Kingston getMemory() { return memory; } public void setMemory(Kingston memory) { this.memory = memory; } public void run() { System.out.println("电脑运行了"); String data = hardDisk.get(); System.out.println("从硬盘上获取的数据是:" + data); cpu.run(); memory.save(); } }ComputerDemopublic class ComputerDemo { public static void main(String[] args) { //创建组件对象 XiJie hardDisk = new XiJie(); Intel cpu = new Intel(); Kingston memory = new Kingston(); Computer computer = new Computer(); //组装计算机 computer.setHardDisk(hardDisk); computer.setCpu(cpu); computer.setMemory(memory); //运行 //存在的问题:现在的电脑只能使用给定的组件,如果要使用其他的,则违背了开闭原则 computer.run(); } }改进:抽象出各个配件的接口,让Computer类依赖抽象,而不是依赖于各组件的具体实现类HardDiskpublic interface HardDisk { /** * 存储数据 * * @param data 数据 */ void save(String data); /** * 读取数据 * * @return */ String get(); }Cpupublic interface Cpu { /** * 运行 */ void run(); }Memorypublic interface Memory { /** * 保存 */ void save(); }XiJiepublic class XiJie implements HardDisk { @Override public void save(String data) { System.out.println("使用希捷硬盘存储数据:" + data); } @Override public String get() { System.out.println("使用希捷硬盘读取数据"); return "数据"; } }Intelpublic class Intel implements Cpu { @Override public void run() { System.out.println("使用Intel cpu"); } }AMDpublic class Amd implements Cpu { @Override public void run() { System.out.println("使用AMD cpu"); } }Kingstonpublic class Kingston implements Memory { @Override public void save() { System.out.println("使用金士顿内存条"); } }Computerpublic class Computer { private HardDisk hardDisk; private Cpu cpu; private Memory memory; public HardDisk getHardDisk() { return hardDisk; } public void setHardDisk(HardDisk hardDisk) { this.hardDisk = hardDisk; } public Cpu getCpu() { return cpu; } public void setCpu(Cpu cpu) { this.cpu = cpu; } public Memory getMemory() { return memory; } public void setMemory(Memory memory) { this.memory = memory; } public void run() { System.out.println("电脑运行了"); String data = hardDisk.get(); System.out.println("从硬盘上获取的数据是:" + data); cpu.run(); memory.save(); } }ComputerDemopublic class ComputerDemo { public static void main(String[] args) { //创建组件对象 HardDisk xiJie = new XiJie(); //Cpu intel = new Intel(); Cpu intel = new Amd(); Memory kingston = new Kingston(); //创建计算机对象 Computer computer = new Computer(); //组装计算机 computer.setHardDisk(xiJie); computer.setCpu(intel); computer.setMemory(kingston); //运行 computer.run(); } }
-
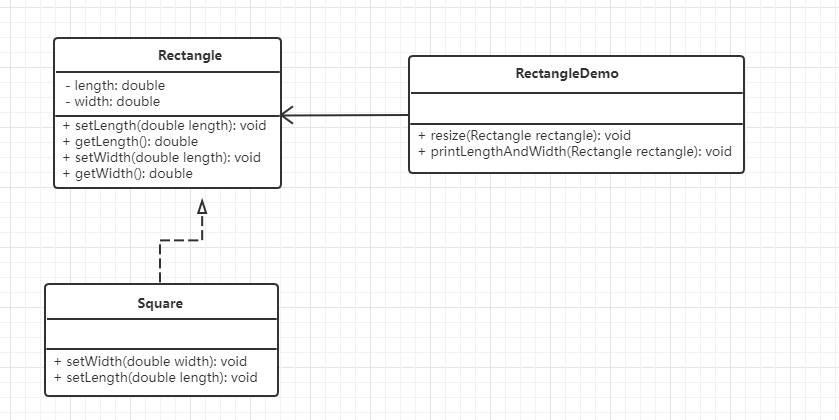
里氏替换原则 定义:子类可以扩展父类的功能,但不能改变父类原有的功能(子类继承父类时,除了添加新的方法和功能外,尽量不要重写父类的方法)以正方形不是长方形为例:在resize方法中,Rectangle类型的参数不能被Square类型的参数所代替,如果进行了替换,则不能得到预期的打印结果Rectanglepublic class Rectangle { private double length; private double width; public double getLength() { return length; } public void setLength(double length) { this.length = length; } public double getWidth() { return width; } public void setWidth(double width) { this.width = width; } }Squarepublic class Square extends Rectangle { @Override public void setLength(double length) { super.setLength(length); super.setWidth(length); } @Override public void setWidth(double width) { super.setWidth(width); super.setLength(width); } }RectangleDemopublic class RectangleDemo { public static void main(String[] args) { //创建长方形对象 Rectangle rectangle = new Rectangle(); rectangle.setLength(20); rectangle.setWidth(10); //扩宽 resize(rectangle); printLengthAndWidth(rectangle); System.out.println("===================="); //创建正方形 Square square = new Square(); square.setWidth(20); resize(square); //在resize方法中,Rectangle类型的参数不能被Square类型的参数所代替,如果进行了替换,则不能得到预期的打印结果 printLengthAndWidth(square); } public static void resize(Rectangle rectangle) { //如果长 > 宽,进行扩宽操作 while (rectangle.getLength() >= rectangle.getWidth()) { rectangle.setWidth(rectangle.getWidth() + 1); } } public static void printLengthAndWidth(Rectangle rectangle) { System.out.println("长:" + rectangle.getLength()); System.out.println("宽:" + rectangle.getWidth()); } }改进:抽象出四边形接口,长方形、正方形实现四边形接口Quadrilateralpublic interface Quadrilateral { /** * 获取长 * * @return */ double getLength(); /** * 获取宽 * * @return */ double getWidth(); }Rectanglepublic class Rectangle implements Quadrilateral { private double length; private double width; public void setLength(double length) { this.length = length; } public void setWidth(double width) { this.width = width; } @Override public double getLength() { return length; } @Override public double getWidth() { return width; } }Squarepublic class Square implements Quadrilateral { private double side; public double getSide() { return side; } public void setSide(double side) { this.side = side; } @Override public double getLength() { return side; } @Override public double getWidth() { return side; } }RectangleDemopublic class RectangleDemo { public static void main(String[] args) { //创建长方形对象 Rectangle rectangle = new Rectangle(); rectangle.setLength(20); rectangle.setWidth(10); resize(rectangle); printLengthAndWidth(rectangle); System.out.println("===================="); //创建正方形对象(此时正方形和长方形不存在父子关系) Square square = new Square(); square.setSide(10); printLengthAndWidth(square); } public static void resize(Rectangle rectangle) { //如果长 > 宽,进行扩宽操作 while (rectangle.getLength() >= rectangle.getWidth()) { rectangle.setWidth(rectangle.getWidth() + 1); } } public static void printLengthAndWidth(Quadrilateral quadrilateral) { System.out.println("长:" + quadrilateral.getLength()); System.out.println("宽:" + quadrilateral.getWidth()); } }
-
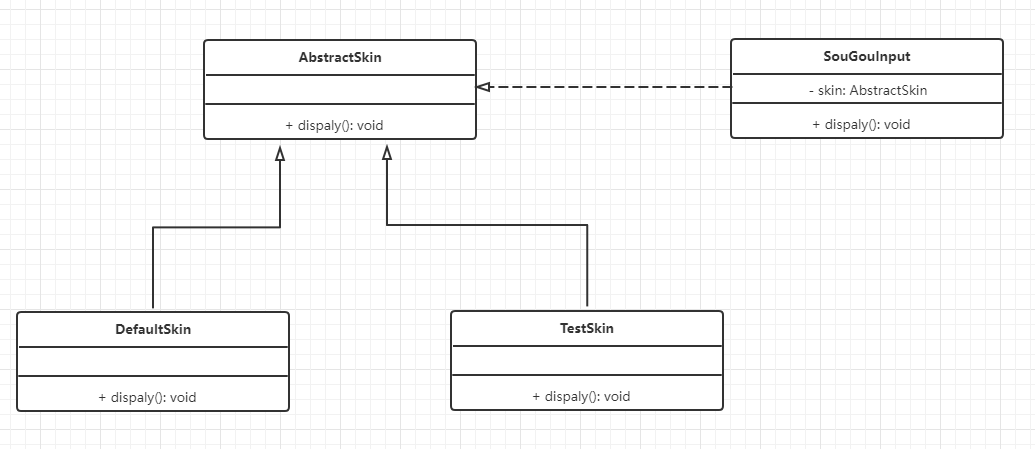
开闭原则 定义:对扩展开放,对修改关闭以输入法更换皮肤为例抽象皮肤类public abstract class AbstractSkin { /** * 显示方法 */ public abstract void display(); } 默认皮肤public class DefaultSkin extends AbstractSkin { @Override public void display() { System.out.println("默认皮肤"); } }自定义皮肤public class TestSkin extends AbstractSkin { @Override public void display() { System.out.println("测试皮肤"); } } 搜狗输入法public class SouGouInput { private AbstractSkin skin; public void setSkin(AbstractSkin skin) { this.skin = skin; } public void display() { skin.display(); } }测试public class Client { public static void main(String[] args) { //1.创建输入法对象 SouGouInput input = new SouGouInput(); //2.创建默认皮肤对象 //DefaultSkin skin = new DefaultSkin(); TestSkin skin = new TestSkin(); //3.将皮肤设置到输入法中 input.setSkin(skin); //4.显示皮肤 input.display(); } }
-
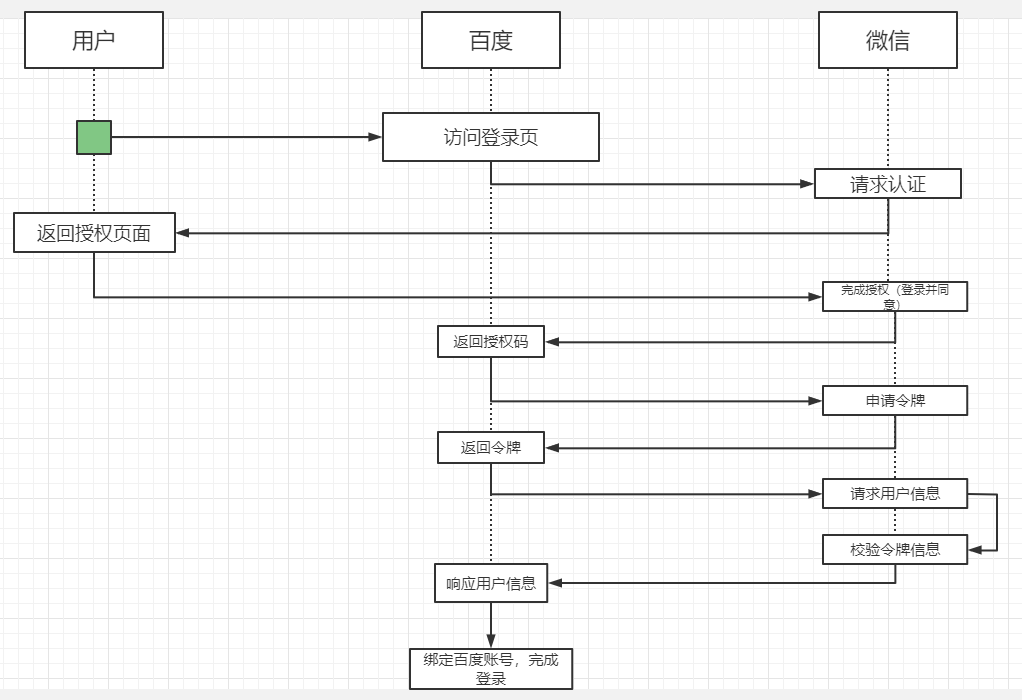
Spring Cloud OAuth2.0 一、介绍1. 概念OAuth开放授权是一个开放标准,允许用户授权第三方应用访问存储在另外的服务提供者上的信息,而不需要将用户名和密码提供给第三方应用或分享数据的内容,OAuth2.0是OAuth协议的延续版本,不向下兼容OAuth1.0.2. 流程示例允许将认证和授权的过程交由一个独立的第三方来进行担保,OAuth协议用来定义如何让第三方的担保有效且双方可信,以登录百度账号为例:官方示意图:OAuth2.0包含以下几个角色:客户端(示例中的浏览器、微信客户端)本身不存储资源,需要通过资源拥有者的授权去请求资源服务器的资源资源拥有者(示例中的用户)通常是用户,也可以是应用程序,即该资源的拥有者授权服务器(也称认证服务器)(示例中的微信)用于服务提供者对资源资源拥有者的身份进行认证,对访问资源进行授权,认证成功后会给客户端发放令牌(access_token),作为客户端访问资源服务器的凭证资源服务器(示例中的百度、微信)存储资源的服务器,示例中,微信通过OAuth协议让百度可以访问自己存储的用户信息,而百度则通过该协议让用户可以访问自己受保护的资源3. 补充clientDetails(client_id):客户信息,代表百度在微信中的唯一索引secret:密钥,百度获取微信信息时需要提供的一个加密字段scope:授权作用域百度可以获取到的微信的信息范围,如:登录范围的凭证无法获取用户信息范围的内容access_token:访问令牌,百度获取微信用户信息的凭证grant_type:授权类型,authorization_code(授权码模式), password(密码模式), client_credentials(客户端模式), implicit(简易模式、隐式授权), refresh_token(刷新令牌)userDetails(user_id):授权用户标识,示例中代表用户的微信号二、Demo实现OAuth2的服务包含授权服务(Authorization Server)和资源服务(Resource Server)。授权服务包含对接入端以及登入用户的合法性进行验证并颁发token等功能,对令牌的请求断点由SpringMVC控制器进行实现AuthorizationEndPoint服务用于认证请求,默认url:/oauth/authorizeTokenEndPoint用于访问令牌的请求,默认url:/oauth/tokenOAuth2AuthenticaionProcessingFilter用于对请求给出的身份令牌进行解析健全大致业务流程:客户请求授权服务器申请access_token客户携带申请到的access_token访问资源服务器中的资源信息资源服务器将检验access_token的合法性,验证合法后返回对应的资源信息1. 父工程搭建pom.xml<?xml version="1.0" encoding="UTF-8"?> <project xmlns="http://maven.apache.org/POM/4.0.0" xmlns:xsi="http://www.w3.org/2001/XMLSchema-instance" xsi:schemaLocation="http://maven.apache.org/POM/4.0.0 http://maven.apache.org/xsd/maven-4.0.0.xsd"> <modelVersion>4.0.0</modelVersion> <modules> <module>OAuth-Server</module> <module>OAuth-User</module> </modules> <parent> <groupId>org.springframework.boot</groupId> <artifactId>spring-boot-starter-parent</artifactId> <version>2.2.5.RELEASE</version> <relativePath/> </parent> <groupId>com.sw</groupId> <artifactId>Spring-Cloud-OAuth2</artifactId> <version>1.0.0-SNAPSHOT</version> <packaging>pom</packaging> <properties> <java.version>1.8</java.version> <project.build.sourceEncoding>UTF-8</project.build.sourceEncoding> <springboot.version>2.2.5.RELEASE</springboot.version> </properties> <dependencyManagement> <dependencies> <dependency> <groupId>org.springframework.boot</groupId> <artifactId>spring-boot-starter-web</artifactId> <version>${springboot.version}</version> </dependency> <dependency> <groupId>org.springframework.cloud</groupId> <artifactId>spring-cloud-starter-security</artifactId> <version>${springboot.version}</version> </dependency> <dependency> <groupId>org.springframework.cloud</groupId> <artifactId>spring-cloud-starter-oauth2</artifactId> <version>${springboot.version}</version> </dependency> <dependency> <groupId>org.springframework.security</groupId> <artifactId>spring-security-jwt</artifactId> <version>1.0.9.RELEASE</version> </dependency> <dependency> <groupId>org.springframework.boot</groupId> <artifactId>spring-boot-starter-data-redis</artifactId> <version>${springboot.version}</version> </dependency> <dependency> <groupId>org.springframework.boot</groupId> <artifactId>spring-boot-starter-actuator</artifactId> <version>${springboot.version}</version> </dependency> <dependency> <groupId>javax.interceptor</groupId> <artifactId>javax.interceptor-api</artifactId> <version>1.2.2</version> </dependency> <dependency> <groupId>mysql</groupId> <artifactId>mysql-connector-java</artifactId> <scope>8.0.18</scope> </dependency> <dependency> <groupId>org.projectlombok</groupId> <artifactId>lombok</artifactId> <version>1.18.20</version> </dependency> </dependencies> </dependencyManagement> </project>2. 授权服务pom.xml<?xml version="1.0" encoding="UTF-8"?> <project xmlns="http://maven.apache.org/POM/4.0.0" xmlns:xsi="http://www.w3.org/2001/XMLSchema-instance" xsi:schemaLocation="http://maven.apache.org/POM/4.0.0 http://maven.apache.org/xsd/maven-4.0.0.xsd"> <parent> <artifactId>Spring-Cloud-OAuth2</artifactId> <groupId>com.sw</groupId> <version>1.0.0-SNAPSHOT</version> </parent> <modelVersion>4.0.0</modelVersion> <artifactId>OAuth-Server</artifactId> <dependencies> <dependency> <groupId>org.springframework.boot</groupId> <artifactId>spring-boot-starter-web</artifactId> </dependency> <dependency> <groupId>org.springframework.cloud</groupId> <artifactId>spring-cloud-starter-security</artifactId> </dependency> <dependency> <groupId>org.springframework.cloud</groupId> <artifactId>spring-cloud-starter-oauth2</artifactId> </dependency> <dependency> <groupId>org.springframework.security</groupId> <artifactId>spring-security-jwt</artifactId> </dependency> </dependencies> </project>主启动类开启 @EnableAuthorizationServer 注解package com.sw.oauth.server; import org.springframework.boot.SpringApplication; import org.springframework.boot.autoconfigure.SpringBootApplication; import org.springframework.security.oauth2.config.annotation.web.configuration.EnableAuthorizationServer; /** * @author suaxi * @date 2022/2/14 22:01 */ @SpringBootApplication @EnableAuthorizationServer public class OAuthServerApplication { public static void main(String[] args) { SpringApplication.run(OAuthServerApplication.class, args); } } application.yamserver: port: 8088 spring: application: name: OAuth-Server配置AuthorizationConfigpackage com.sw.oauth.server.config; import org.springframework.beans.factory.annotation.Autowired; import org.springframework.context.annotation.Bean; import org.springframework.context.annotation.Configuration; import org.springframework.http.HttpMethod; import org.springframework.security.authentication.AuthenticationManager; import org.springframework.security.core.userdetails.UserDetailsService; import org.springframework.security.crypto.bcrypt.BCryptPasswordEncoder; import org.springframework.security.oauth2.config.annotation.configurers.ClientDetailsServiceConfigurer; import org.springframework.security.oauth2.config.annotation.web.configuration.AuthorizationServerConfigurerAdapter; import org.springframework.security.oauth2.config.annotation.web.configurers.AuthorizationServerEndpointsConfigurer; import org.springframework.security.oauth2.config.annotation.web.configurers.AuthorizationServerSecurityConfigurer; import org.springframework.security.oauth2.provider.ClientDetailsService; import org.springframework.security.oauth2.provider.code.AuthorizationCodeServices; import org.springframework.security.oauth2.provider.code.InMemoryAuthorizationCodeServices; import org.springframework.security.oauth2.provider.token.AuthorizationServerTokenServices; import org.springframework.security.oauth2.provider.token.DefaultTokenServices; import org.springframework.security.oauth2.provider.token.TokenStore; /** * @author suaxi * @date 2022/2/14 22:11 */ @Configuration public class AuthorizationConfig extends AuthorizationServerConfigurerAdapter { @Autowired private AuthorizationCodeServices authorizationCodeServices; @Autowired private AuthenticationManager authenticationManager; @Autowired private UserDetailsService userDetailsService; @Autowired private TokenStore tokenStore; @Autowired private ClientDetailsService clientDetailsService; /** * 3.令牌端点安全约束 * @param security * @throws Exception */ @Override public void configure(AuthorizationServerSecurityConfigurer security) throws Exception { security //oauth/token_key 公开 .tokenKeyAccess("permitAll()") //oauth/check_token 公开 .checkTokenAccess("permitAll()") //表单认证,申请令牌 .allowFormAuthenticationForClients(); } /** * 1.客户端详情 * @param clients * @throws Exception */ @Override public void configure(ClientDetailsServiceConfigurer clients) throws Exception { clients.inMemory() //clientId .withClient("c1") //客户端密钥 .secret(new BCryptPasswordEncoder().encode("secret")) //资源列表 .resourceIds("admin") //授权方式 .authorizedGrantTypes("authorization_code", "password", "client_credentials", "implicit", "refresh_token") //授权范围 .scopes("all") //跳转到授权页面 .autoApprove(false) //回调地址 .redirectUris("https://wangchouchou.com"); } /** * 2.令牌服务 * @param endpoints * @throws Exception */ @Override public void configure(AuthorizationServerEndpointsConfigurer endpoints) throws Exception { endpoints //认证管理器 .authenticationManager(authenticationManager) //密码模式的用户信息管理 .userDetailsService(userDetailsService) //授权码服务 .authorizationCodeServices(authorizationCodeServices) //令牌管理服务 .tokenServices(tokenServices()) .allowedTokenEndpointRequestMethods(HttpMethod.POST); } public AuthorizationServerTokenServices tokenServices() { DefaultTokenServices tokenServices = new DefaultTokenServices(); //客户端详情 tokenServices.setClientDetailsService(clientDetailsService); //允许令牌自动刷新 tokenServices.setSupportRefreshToken(true); //令牌存储策略 tokenServices.setTokenStore(tokenStore); //默认令牌有效期 tokenServices.setAccessTokenValiditySeconds(3600); //刷新令牌有效期 tokenServices.setRefreshTokenValiditySeconds(86400); return tokenServices; } /** * 授权码模式的授权码如何存取 * @return */ @Bean public AuthorizationCodeServices authorizationCodeServices() { return new InMemoryAuthorizationCodeServices(); } } ClientDetailsServiceConfigurer:配置客户端详情(ClientDetails)服务,客户端详情信息在这里进行初始化,此处以内存配置方式为例clientId:用于标识客户的idsecret:客户端安全码scope:客户端访问范围,如果为空,则代表拥有全部的访问范围authorizedGrantTypes:授权类型authorities:客户端拥有的权限redirectUris:回调地址,授权服务会往该地址推送客户端相关的信息AuthorizationServerEndpointsConfigurer:配置令牌(token)的访问端点和令牌服务(tokenService),它可以完成令牌服务和令牌服务各个端点配置authenticationManager:认证管理器,选择password认证模式时就需要指定authenticationManager对象来进行鉴权userDetailsService:用户主体管理服务,如果设置这个属性,需要实现UserDetailsService接口,也可以设置全局域(GlobalAuthenticationManagerConfigurer),如果配置这种方式,refresh_token刷新令牌方式的授权流程中会多一个检查步骤,来确保当前令牌是否仍然有效authorizationCodeServices:用于授权码模式implicitGrantService:用于设置隐式授权模式的状态tokenGranter:如果设置该属性,授权全部交由自己掌控,并会忽略以上已设置的属性AuthorizationServerSecurityConfigurer:配置令牌端点的安全约束,可以通过pathMapping()方法配置端点url的链接地址,替换oauth默认的授权地址,也可以跟换spring security默认的授权页面/oauth/authorize:授权端点/oauth/token:令牌端点/oauth/confirm_access:用户确认授权提交端点/oauth/error:授权服务错误信息端点/oauth/check_token:检查令牌/oauth/token_key:使用jwt令牌需要用到的提供公有密钥的端点配置TokenConfigpackage com.sw.oauth.server.config; import org.springframework.context.annotation.Bean; import org.springframework.context.annotation.Configuration; import org.springframework.security.oauth2.provider.token.TokenStore; import org.springframework.security.oauth2.provider.token.store.InMemoryTokenStore; /** * @author suaxi * @date 2022/2/14 22:24 */ @Configuration public class TokenConfig { @Bean public TokenStore tokenStore() { return new InMemoryTokenStore(); } } 实现AuthorizationServerTokenService需要继承DefaultTokenService,该类可以修改令牌的格式和存储,默认情况下,在创建令牌时使用随机字符串来填充,这个类完成了令牌管理的大部分事情,唯一需要依赖的是spring容器中的TokenStore接口,以此来定制令牌持久化;TokenStore有一个默认实现(InMemoryTokenStore),这个实现类将令牌保存到内存中,除此之外还有其他几个默认实现类:InMemoryTokenStore:默认采用方式,可在单节点运行(即并发压力不大的情况下,并且在失败时不会进行备份),也可以在并发的时候进行管理,因为数据保存在内存中,不进行持久化存储,易于调试JdbcTokenStore:基于JDBC的实现类,令牌会被保存到关系型数据库中,可在不同的服务器之间共享令牌信息RedisTokenStore:与jdbc方式类似JwtTokenStore(JSON Web Token):可以将令牌信息全部编码整合进令牌本身,优点是后端可以不用进行存储操作,缺点是撤销一个已经授权的令牌很困难,所以通常用来处理生命周期较短的令牌以及撤销刷新令牌,另一个缺点是令牌较长,包含的用户凭证信息,它不保存任何数据在转换令牌值和授权信息方面与DefaultTokenServices扮演一样的角色配置WebSecurityConfigpackage com.sw.oauth.server.config; import org.springframework.context.annotation.Bean; import org.springframework.context.annotation.Configuration; import org.springframework.security.authentication.AuthenticationManager; import org.springframework.security.config.annotation.method.configuration.EnableGlobalMethodSecurity; import org.springframework.security.config.annotation.web.builders.HttpSecurity; import org.springframework.security.config.annotation.web.configuration.WebSecurityConfigurerAdapter; import org.springframework.security.core.userdetails.User; import org.springframework.security.core.userdetails.UserDetailsService; import org.springframework.security.crypto.bcrypt.BCryptPasswordEncoder; import org.springframework.security.crypto.password.PasswordEncoder; import org.springframework.security.provisioning.InMemoryUserDetailsManager; /** * @author suaxi * @date 2022/2/14 22:25 */ @Configuration @EnableGlobalMethodSecurity(prePostEnabled = true, securedEnabled = true) public class WebSecurityConfig extends WebSecurityConfigurerAdapter { @Bean public PasswordEncoder passwordEncoder() { return new BCryptPasswordEncoder(); } @Bean @Override public AuthenticationManager authenticationManagerBean() throws Exception{ return super.authenticationManager(); } @Bean @Override public UserDetailsService userDetailsService() { InMemoryUserDetailsManager inMemoryUserDetailsManager = new InMemoryUserDetailsManager( User.withUsername("admin").password(passwordEncoder().encode("123456")).authorities("manager, worker").build(), User.withUsername("manager").password(passwordEncoder().encode("123456")).authorities("manager").build(), User.withUsername("worker").password(passwordEncoder().encode("123456")).authorities("worker").build() ); return inMemoryUserDetailsManager; } @Override protected void configure(HttpSecurity http) throws Exception { http.csrf().disable() .authorizeRequests() .anyRequest().authenticated() .and() .formLogin(); } } 3. 授权服务流程测试1. 客户端模式client_credentails客户端向授权服务器发送自己的身份信息,请求access_tokenlocalhost:8088/oauth/token参数列表:grant_type:授权类型,需填写client_credentialsclient_id:客户端标识client_secret:客户端密钥这种方式最方便但也是最不安全的,代表了授权服务器对客户端完全信任,一般用于授权服务器对客户端完全信任的场景。2. 密码模式password(1)资源拥有者将用户名、密码发送给客户端(2)客户端用资源拥有者的用户名、密码向授权服务器申请令牌localhost:8088/oauth/token参数列表:grant_type:授权类型,需填写passwordclient_id:客户端标识client_secret:客户端密钥username:用户名password:密码这种方式用户会把用户名、密码直接泄露给客户端,代表了资源拥有者和授权服务器对客户端的绝对互信,一般用于内部开发客户端的场景3.简化模式(隐式模式)implicit(1)用户访问客户端,客户端向授权服务器申请授权(2)授权服务器引导用户进入授权页面,待用户同意授权(3)用户同意授权(4)用户同意授权后,授权服务器向客户端返回令牌测试流程:(1)客户端引导用户,直接访问授权服务器的授权地址http://localhost:8088/oauth/authorize?client_id=c1&response_type=token&scope=all&redirect_uri=https://wangchouchou.com(2)用户登录之后跳转至授权页面(3)用户点击approve同意授权,提交之后,页面跳转至redirect_uri地址并携带令牌信息(该地址需授权服务器提前配置)一般情况下,redirect_uri会配置成客户端自己的一个响应地址,这个地址收到授权服务器推送过来的令牌之后,可将它保存至本地,在需要调用资源服务时,再拿出来携带上访问资源服务器。该模式下,access_token是以#gragement的方式返回的,oauth三方的数据已经进行了隔离,一般用于没有服务端的第三方单页面应用,可在js中直接相应access_token。4. 授权码模式 authorization_code相较于简化模式的流程,授权码模式在第四步时,授权服务器先给客户端返回一个授权码(authorization_code),客户端拿到之后,再向授权服务器申请令牌测试流程:(1)用户申请access_token时访问:http://localhost:8088/oauth/authorize?client_id=c1&response_type=code&scope=all&redirect_uri=https://wangchouchou.com首先会跳转到授权服务器登录页,用户进行登录(2)登录完成之后,转到授权页面(3)点击同意授权之后,携带授权码重定向至redirect_uri(4)申请令牌参数列表:grant_type:授权类型,需填写authorization_codeclient_id:客户端标识client_secret:客户端密钥code:授权码(只能用一次)redirect_uri:重定向地址5. 刷新令牌当令牌超时后,可以通过refresh_token申请新的令牌(refresh_token随access_token一起申请到)参数列表:grant_type:授权类型,需填写refresh_tokenclient_id:客户端标识client_secret:客户端密钥refresh_token:刷新令牌6. 验证令牌参数列表:token:令牌4. 资源服务pom.xml<?xml version="1.0" encoding="UTF-8"?> <project xmlns="http://maven.apache.org/POM/4.0.0" xmlns:xsi="http://www.w3.org/2001/XMLSchema-instance" xsi:schemaLocation="http://maven.apache.org/POM/4.0.0 http://maven.apache.org/xsd/maven-4.0.0.xsd"> <parent> <artifactId>Spring-Cloud-OAuth2</artifactId> <groupId>com.sw</groupId> <version>1.0.0-SNAPSHOT</version> </parent> <modelVersion>4.0.0</modelVersion> <artifactId>OAuth-User</artifactId> <dependencies> <dependency> <groupId>org.springframework.boot</groupId> <artifactId>spring-boot-starter-web</artifactId> </dependency> <dependency> <groupId>org.springframework.cloud</groupId> <artifactId>spring-cloud-starter-security</artifactId> </dependency> <dependency> <groupId>org.springframework.cloud</groupId> <artifactId>spring-cloud-starter-oauth2</artifactId> </dependency> <dependency> <groupId>org.springframework.security</groupId> <artifactId>spring-security-jwt</artifactId> </dependency> </dependencies> </project>主启动类打开@EnableResourceServer注解,会自动增加一个OAuth2AuthenticationProcessingFilter的过滤器链package com.sw.oauth.user; import org.springframework.boot.SpringApplication; import org.springframework.boot.autoconfigure.SpringBootApplication; import org.springframework.security.oauth2.config.annotation.web.configuration.EnableResourceServer; /** * @author suaxi * @date 2022/2/14 22:08 */ @SpringBootApplication @EnableResourceServer public class OAuthUserApplication { public static void main(String[] args) { SpringApplication.run(OAuthUserApplication.class, args); } } application.ymlserver: port: 8089 spring: application: name: OAuth-User资源服务器核心配置Spring Security也提供了ResourceServerSecurityConfigurer适配器来协助完成资源服务器的配置ResourceServerSecurityConfigurer中主要包含:tokenServices:ResourceServerTokenServices类的实例,用来实现令牌服务,即如何验证令牌tokenStore:TokenStore类的实例,指定令牌如何访问,与tokenServices配置可选resourceId:资源服务器id(可选),一般情况下推荐设置并在授权服务中进行验证tokenExtractor:用于提取请求中的令牌HttpSecurity配置与Spring Security类似:authorizeRequests()方法验证请求antMatchers()方法匹配访问路径access()方法配置需要的权限ResourceServerConfig配置package com.sw.oauth.user.config; import org.springframework.beans.factory.annotation.Autowired; import org.springframework.context.annotation.Configuration; import org.springframework.security.config.annotation.web.builders.HttpSecurity; import org.springframework.security.config.http.SessionCreationPolicy; import org.springframework.security.oauth2.config.annotation.web.configuration.ResourceServerConfigurerAdapter; import org.springframework.security.oauth2.config.annotation.web.configurers.ResourceServerSecurityConfigurer; import org.springframework.security.oauth2.provider.token.RemoteTokenServices; import org.springframework.security.oauth2.provider.token.ResourceServerTokenServices; import org.springframework.security.oauth2.provider.token.TokenStore; /** * @author suaxi * @date 2022/2/15 22:36 */ @Configuration public class ResourceServerConfig extends ResourceServerConfigurerAdapter { private static final String RESOURCE_ADMIN = "admin"; @Autowired private TokenStore tokenStore; @Override public void configure(ResourceServerSecurityConfigurer resources) throws Exception { resources //资源ID .resourceId(RESOURCE_ADMIN) //使用远程服务验证令牌(使用JWT令牌时无需远程验证服务) .tokenServices(tokenServices()) .tokenStore(tokenStore) //无状态模式(无需管理session,此处只验证access_token) .stateless(true); } @Override public void configure(HttpSecurity http) throws Exception { http.authorizeRequests() .antMatchers("/admin/**") .access("#oauth2.hasAnyScope('all')") .and() .csrf().disable() .sessionManagement().sessionCreationPolicy(SessionCreationPolicy.STATELESS); } /** * access_token远程验证策略 * @return */ public ResourceServerTokenServices tokenServices() { RemoteTokenServices tokenServices = new RemoteTokenServices(); tokenServices.setCheckTokenEndpointUrl("http://localhost:8088/oauth/check_token"); tokenServices.setClientId("c1"); tokenServices.setClientSecret("secret"); return tokenServices; } } 需注意ResourceServerSecurityConfigurer的tokenServices()方法,设置了一个token的管理服务,其中,如果资源服务和授权服务在同一应用程序上,那可以使用DefaultTokenServices,就不用考虑实现所有必要接口一致性的问题,反之,则必须要保证有能够匹配授权服务提供的ResourceServerTokenServices,这个类知道如何对令牌进行解码。令牌解析方法:使用DefaultTokenServices在资源服务器本地配置令牌存储、解码、解析方式;使用RemoteTokenServices,资源服务器通过http请求来解码令牌,每次请求都需要请求授权服务器端点/oauth/check_token,同时还需要授权服务器将该端点暴露出来,以便资源服务器进行访问,在资源服务器配置中需注意:@Override public void configure(AuthorizationServerSecurityConfigurer security) throws Exception { security //oauth/token_key 公开 .tokenKeyAccess("permitAll()") //oauth/check_token 公开 .checkTokenAccess("permitAll()") //表单认证,申请令牌 .allowFormAuthenticationForClients(); }资源服务器WebSecurityConfig配置package com.sw.oauth.user.config; import org.springframework.context.annotation.Configuration; import org.springframework.security.config.annotation.web.builders.HttpSecurity; import org.springframework.security.config.annotation.web.configuration.WebSecurityConfigurerAdapter; /** * @author suaxi * @date 2022/2/15 22:52 */ @Configuration public class WebSecurityConfig extends WebSecurityConfigurerAdapter { @Override protected void configure(HttpSecurity http) throws Exception { http.csrf().disable() .authorizeRequests() .antMatchers("/admin/**") .hasAnyAuthority("admin") .anyRequest().authenticated(); } } controllerpackage com.sw.oauth.user.controller; import org.springframework.web.bind.annotation.GetMapping; import org.springframework.web.bind.annotation.RequestMapping; import org.springframework.web.bind.annotation.RestController; /** * @author suaxi * @date 2022/2/15 22:43 */ @RestController @RequestMapping("/admin") public class AdminController { @GetMapping("/test") public String test() { return "test"; } } 接口测试:直接访问:header携带令牌访问:在该测试过程中,资源服务器未配置TokenStore对象,它并不知道access_token的意义;需要使用RemoteTokenServices将令牌拿到授权服务器上进行验证才能得到客户信息,当请求量逐步增大之后,会加重系统的网络负担以及运行效率,而JWT令牌需解决以上提到的问题。三、 JWT令牌1. 概念JWT(JSON Web Token),是一个开放的行业标准(RFC 7519),它定义了一种简单的、自包含的协议格式,用于在通信双方传递json对象,传递的信息经过数字签名,可以被验证和信任,可以使用HMAC、RSA等算法。在OAuth中使用JWT,令牌本身就包含了客户的详细信息,资源服务器就不用再依赖授权服务器就可以完成令牌解析。官网:https://jwt.io/RFC 7519协议:https://datatracker.ietf.org/doc/rfc7519/优点基于json,方便解析自定义令牌内容,可扩展通过非对称加密算法及数字签名防止被篡改,安全性高资源服务器克不依赖于授权服务器完成令牌解析缺点:令牌较长,占用的空间过多令牌结构由Header.Payload.Signature三部分组成,中间由(.)分割Header:头部包括令牌的类型以及使用的hash算法(HMAC、SHA256、RSA){ "alg": "HS256", "typ": "JWT" }使用Base64编码之后得到JWT令牌的第一部分Payload:负载(Base64编码):存放有效信息,如:iss(签发者),exp(过期时间戳),sub(面向的用户)等,也可以自定义字段该部分不建议存放敏感信息,可以通过解码还原出原始内容。Signature:该部分防止JWT内容被篡改,使用Base64将前两部分编码,使用(.)连接组成字符串,最后使用header中声明的算法进行签名2. 配置JWT令牌服务1. 授权服务配置TokenConfig配置package com.sw.oauth.server.config; import org.springframework.context.annotation.Bean; import org.springframework.context.annotation.Configuration; import org.springframework.security.oauth2.provider.token.TokenStore; import org.springframework.security.oauth2.provider.token.store.InMemoryTokenStore; import org.springframework.security.oauth2.provider.token.store.JwtAccessTokenConverter; import org.springframework.security.oauth2.provider.token.store.JwtTokenStore; /** * @author suaxi * @date 2022/2/14 22:24 */ @Configuration public class TokenConfig { private static final String SIGN_KEY = "server"; // @Bean // public TokenStore tokenStore() { // return new InMemoryTokenStore(); // } @Bean public TokenStore tokenStore() { return new JwtTokenStore(accessTokenConverter()); } @Bean public JwtAccessTokenConverter accessTokenConverter() { JwtAccessTokenConverter accessTokenConverter = new JwtAccessTokenConverter(); accessTokenConverter.setSigningKey(SIGN_KEY); return accessTokenConverter; } } AuthorizationConfig配置@Autowired private JwtAccessTokenConverter accessTokenConverter; public AuthorizationServerTokenServices tokenServices() { DefaultTokenServices tokenServices = new DefaultTokenServices(); //客户端详情 tokenServices.setClientDetailsService(clientDetailsService); //允许令牌自动刷新 tokenServices.setSupportRefreshToken(true); //令牌存储策略 tokenServices.setTokenStore(tokenStore); //使用JWT令牌 tokenServices.setTokenEnhancer(accessTokenConverter); //默认令牌有效期 tokenServices.setAccessTokenValiditySeconds(3600); //刷新令牌有效期 tokenServices.setRefreshTokenValiditySeconds(86400); return tokenServices; }2. 测试申请令牌:验证令牌:3. 资源服务器配置将授权服务器中的TokenConfig拷贝至资源服务器config目录下在ResourceServerConfig中屏蔽ResourceServerTokenServices package com.sw.oauth.user.config; import org.springframework.beans.factory.annotation.Autowired; import org.springframework.context.annotation.Configuration; import org.springframework.security.config.annotation.web.builders.HttpSecurity; import org.springframework.security.config.http.SessionCreationPolicy; import org.springframework.security.oauth2.config.annotation.web.configuration.ResourceServerConfigurerAdapter; import org.springframework.security.oauth2.config.annotation.web.configurers.ResourceServerSecurityConfigurer; import org.springframework.security.oauth2.provider.token.RemoteTokenServices; import org.springframework.security.oauth2.provider.token.ResourceServerTokenServices; import org.springframework.security.oauth2.provider.token.TokenStore; /** * @author suaxi * @date 2022/2/15 22:36 */ @Configuration public class ResourceServerConfig extends ResourceServerConfigurerAdapter { private static final String RESOURCE_ADMIN = "admin"; @Autowired private TokenStore tokenStore; @Override public void configure(ResourceServerSecurityConfigurer resources) throws Exception { resources //资源ID .resourceId(RESOURCE_ADMIN) //使用远程服务验证令牌(使用JWT令牌时无需远程验证服务) // .tokenServices(tokenServices()) .tokenStore(tokenStore) //无状态模式(无需管理session,此处只验证access_token) .stateless(true); } @Override public void configure(HttpSecurity http) throws Exception { http.authorizeRequests() .antMatchers("/admin/**") .access("#oauth2.hasAnyScope('all')") .and() .csrf().disable() .sessionManagement().sessionCreationPolicy(SessionCreationPolicy.STATELESS); } /** * access_token远程验证策略 * @return */ // public ResourceServerTokenServices tokenServices() { // RemoteTokenServices tokenServices = new RemoteTokenServices(); // tokenServices.setCheckTokenEndpointUrl("http://localhost:8088/oauth/check_token"); // tokenServices.setClientId("c1"); // tokenServices.setClientSecret("secret"); // return tokenServices; // } } 4. 测试Github demo地址:https://github.com/suaxi/Spring-Cloud-OAuth2
-
链接转二维码 pom依赖<dependency> <groupId>com.google.zxing</groupId> <artifactId>core</artifactId> <version>3.3.0</version> </dependency>实现Demopackage com.example.demo.util; import com.google.zxing.BarcodeFormat; import com.google.zxing.EncodeHintType; import com.google.zxing.MultiFormatWriter; import com.google.zxing.common.BitMatrix; import lombok.extern.slf4j.Slf4j; import org.springframework.util.ResourceUtils; import javax.imageio.ImageIO; import java.awt.image.BufferedImage; import java.io.File; import java.io.FileNotFoundException; import java.io.IOException; import java.io.OutputStream; import java.text.SimpleDateFormat; import java.util.Date; import java.util.HashMap; import java.util.Map; /** * @author suaxi * @date 2021/12/13 9:48 */ @Slf4j public class QRCodeUtil { public static void main(String[] args) throws FileNotFoundException { String url = "https://wangchouchou.com"; //String path = FileSystemView.getFileSystemView().getHomeDirectory() + File.separator + "testQrcode"; String realPath = ResourceUtils.getURL("classpath:").getPath() + "static/QRCode/"; String fileName = new SimpleDateFormat("yyyyMMddHHmmss").format(new Date()) + ".jpg"; createQRCode(url, realPath, fileName); } public static String createQRCode(String url, String path, String fileName) { try { Map<EncodeHintType, Object> map = new HashMap<>(); map.put(EncodeHintType.CHARACTER_SET, "UTF-8"); BitMatrix bitMatrix = new MultiFormatWriter().encode(url, BarcodeFormat.QR_CODE, 400, 400, map); File file = new File(path, fileName); if (file.exists() || (file.getParentFile().exists() || file.getParentFile().mkdirs()) && file.createNewFile()) { writeToFile(bitMatrix, "jpg", file); log.info(url + "转二维码成功"); } } catch (Exception e) { e.printStackTrace(); } return null; } private static void writeToFile(BitMatrix bitMatrix, String format, File file) throws IOException { BufferedImage image = toBufferedImage(bitMatrix); if (!ImageIO.write(image, format, file)) { throw new IOException("Could not write an image of format " + format + " to " + file); } } private static void writeStream(BitMatrix bitMatrix, String format, OutputStream outputStream) throws IOException { BufferedImage image = toBufferedImage(bitMatrix); if (!ImageIO.write(image, format, outputStream)) { throw new IOException("Could not write an image of format " + format + " to " + format); } } private static final int BLACK = 0xFF000000; private static final int WHITE = 0xFFFFFFFF; private static BufferedImage toBufferedImage(BitMatrix bitMatrix) { int width = bitMatrix.getWidth(); int height = bitMatrix.getHeight(); BufferedImage image = new BufferedImage(width, height, BufferedImage.TYPE_INT_RGB); for (int x = 0; x < width; x++) { for (int y = 0; y < height; y++) { image.setRGB(x, y, bitMatrix.get(x, y) ? BLACK : WHITE); } } return image; } }
-
类的加载 加载将class字节码文件加载到内存中,并将这些静态数据转换为方法区的运行时数据结构,然后生成一个代表这个类的java.lang.Class对象链接将Java类的二进制代码合并到JVM的运行状态之中的过程验证:确保加载的类信息符合JVM规范准备:正式为类变量(static)分配内存并设置类变量默认初始值的阶段,这些内存都将在方法区中进行分配解析:虚拟机常量池内的符号引用(常量名)替换为直接引用(地址)的过程初始化执行类构造器<clinit>()方法的过程,类构造器<clinit>()方法是由编译器自动收集类中所有类变量的赋值动作和静态代码块中的赋值语句产生的。(类构造器构造类的信息,不是构造该类对象的构造器)当初始化一个类的时候,如果发现其父类还没有进行初始化,则需要先触发其父类的初始化虚拟机会保证一个类的<clinit>()方法在多线程环境中被正确加锁和同步
-
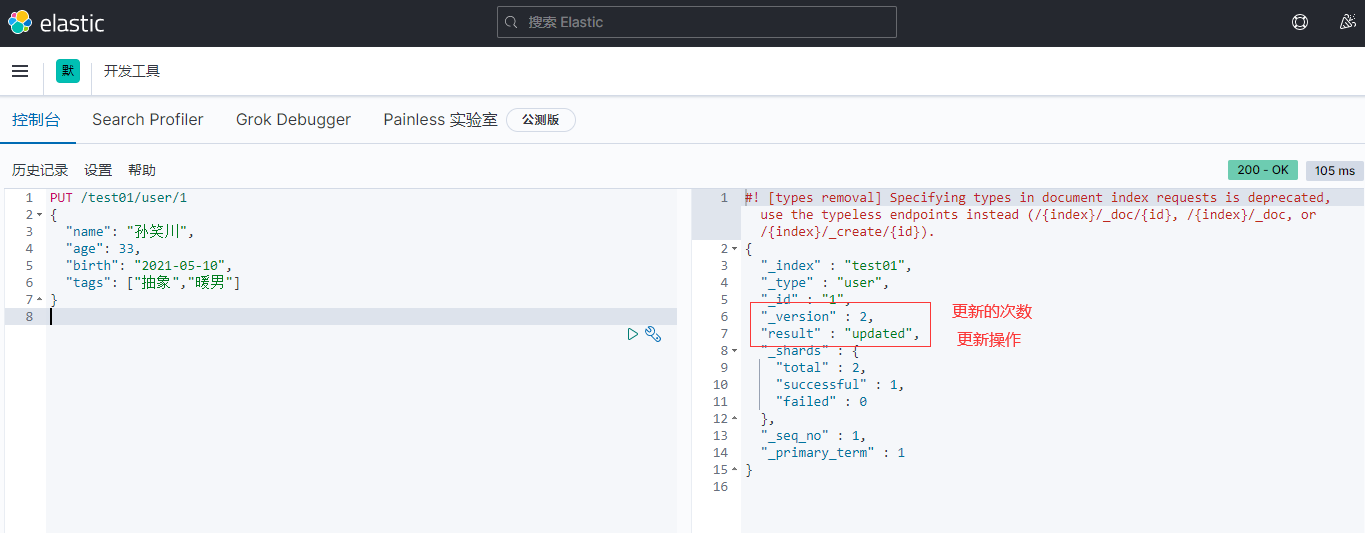
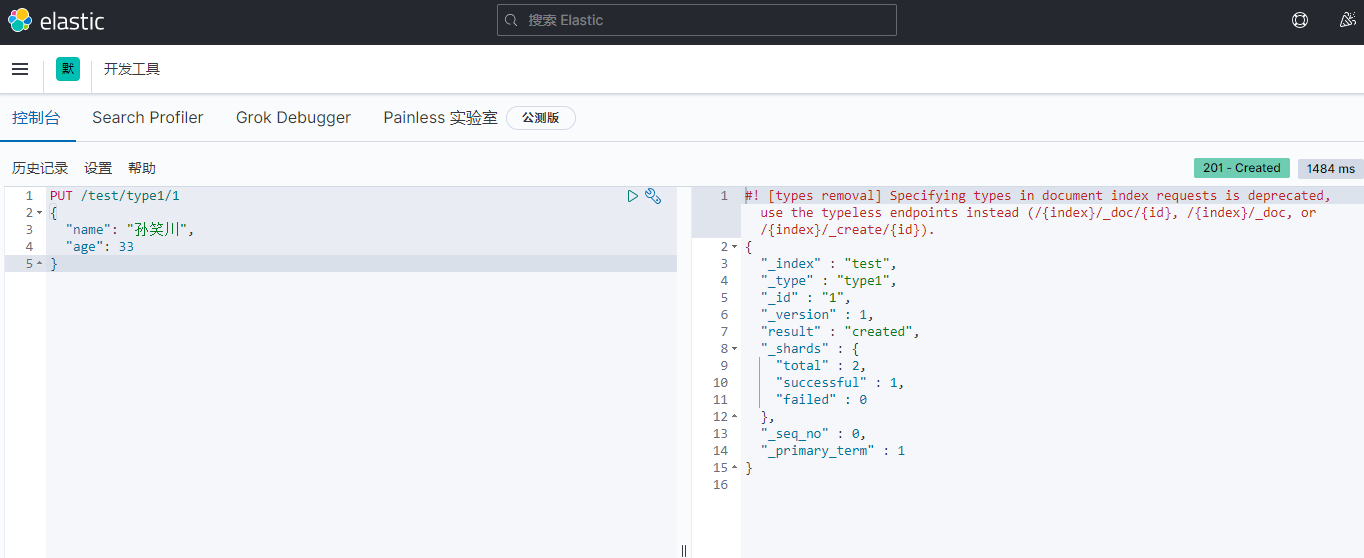
关于文档的基本操作 基本操作1、添加数据PUT /test01/user/1 { "name": "孙笑川", "age": 33, "birth": "2021-05-10", "tags": ["抽象","带师兄"] }2、获取数据GET /test01/user/13、更新数据 PUT4、POST 更新(推荐使用)5、搜索简单搜索复杂搜索select(排序,分页,高亮,模糊查询,精准查询)//查询参数体使用json构建 GET test01/user/_search { "query": { "match": { "name": "孙笑川" } } }结果过滤:排序:GET test01/user/_search { "query": { "match": { "name": "孙笑川" } }, "sort": [ { "age": { "order": "asc" } } ] }分页: //from等同于pageNum //size等同于pageSize GET test01/user/_search { "query": { "match": { "name": "孙笑川" } }, "sort": [ { "age": { "order": "asc" } } ], "from": 0, "size": 5 }布尔值多条件查询:must (and) 所有的条件都要匹配 where id = 1 and age = 10should (or) 条件匹配 where id = 1 or age = 10must_not (not)过滤器 filtergt # 大于 gte # 大于等于 lt # 小于 lte # 小于等于匹配多个条件精确查询term 通过倒排索引指定的词条进行精确查询分词term 直接精确查询match 查询时会使用分词器解析(先分析文档,再通过分析的文档进行查询)两个类型 text(会被分词器解析) keyword(不会被分词器解析)PUT test02 { "mappings": { "properties": { "name": { "type": "text" }, "desc": { "type": "keyword" } } } } PUT test02/_doc/1 { "name": "text keyword字段类型测试", "desc": "text keyword字段类型测试 desc" } PUT test02/_doc/2 { "name": "text keyword字段类型测试", "desc": "text keyword字段类型测试 desc02" } GET _analyze { "analyzer": "keyword", "text": "text keyword字段类型测试" } GET _analyze { "analyzer": "standard", "text": "text keyword字段类型测试" } GET test02/_search { "query": { "term": { "name": "测" } } } GET test02/_search { "query": { "term": { "desc": "text keyword字段类型测试 desc" } } } PUT test02/_doc/3 { "t1": "11", "t2": "2021-05-11" } PUT test02/_doc/4 { "t1": "22", "t2": "2021-05-11" } GET test02/_search { "query": { "bool": { "should": [ { "term": { "t1": "11" } }, { "term": { "t1": "22" } } ] } } }多个值匹配的精确查询高亮查询自定义高亮格式
-
-