搜索到
171
篇与
的结果
-
 异步任务 异步任务1、Servicepackage com.sw.service; import org.springframework.scheduling.annotation.Async; import org.springframework.stereotype.Service; /** * @Author suaxi * @Date 2020/12/26 15:57 */ @Service public class AsyncService { //告诉Spring这是一个异步任务 @Async public void hello(){ try { Thread.sleep(3000); } catch (InterruptedException e) { e.printStackTrace(); } System.out.println("数据正在加载..."); } } 2、Controllerpackage com.sw.controller; import com.sw.service.AsyncService; import org.springframework.beans.factory.annotation.Autowired; import org.springframework.web.bind.annotation.RequestMapping; import org.springframework.web.bind.annotation.RestController; /** * @Author suaxi * @Date 2020/12/26 15:58 */ @RestController public class AsyncController { @Autowired private AsyncService asyncService; @RequestMapping("/test") public String hello(){ asyncService.hello(); return "Ok"; } } 3、SpringBoot启动类开启异步任务的注解package com.sw; import org.springframework.boot.SpringApplication; import org.springframework.boot.autoconfigure.SpringBootApplication; import org.springframework.scheduling.annotation.EnableAsync; import org.springframework.scheduling.annotation.EnableScheduling; @EnableAsync //开启异步任务注解 @SpringBootApplication public class Springboot09AsynctaskApplication { public static void main(String[] args) { SpringApplication.run(Springboot09AsynctaskApplication.class, args); } } 当用户执行/test请求时,前端页面及时返回结果,同时异步任务延迟三秒在控制台打印输出结果
 -
Swagger SwaggerSwagger 是一个规范和完整的框架,用于生成、描述、调用和可视化 RESTful 风格的 Web 服务。1、导入依赖<dependency> <groupId>io.springfox</groupId> <artifactId>springfox-swagger2</artifactId> <version>2.9.2</version> </dependency> <dependency> <groupId>io.springfox</groupId> <artifactId>springfox-swagger-ui</artifactId> <version>2.9.2</version> </dependency>2、SwaggerConfig配置package com.sw.swagger.config; import org.springframework.context.annotation.Bean; import org.springframework.context.annotation.Configuration; import org.springframework.core.env.Environment; import org.springframework.core.env.Profiles; import springfox.documentation.builders.PathSelectors; import springfox.documentation.builders.RequestHandlerSelectors; import springfox.documentation.service.ApiInfo; import springfox.documentation.service.Contact; import springfox.documentation.spi.DocumentationType; import springfox.documentation.spring.web.plugins.Docket; import springfox.documentation.swagger2.annotations.EnableSwagger2; import java.util.ArrayList; /** * @Author suaxi * @Date 2020/12/26 11:03 */ @Configuration @EnableSwagger2 public class SwaggerConfig { //配置Swagger的Docket @Bean public Docket docket(Environment environment) { //配置哪种环境下需要启用Swagger Profiles profiles = Profiles.of("dev", "test"); //监听配置文件 boolean flag = environment.acceptsProfiles(profiles); //链式编程 return new Docket(DocumentationType.SWAGGER_2) .apiInfo(apiInfo()) .enable(flag) //配置是否启动Swagger,默认为true,如需关闭须手动设置为false .select() //RequestHandlerSelectors 配置扫描接口的方式 //basePackage() 指定要扫描的包 //any() 扫描全部 //none() 不扫描 //withClassAnnotation(Controller.class) 扫描类注解(参数是一个注解的反射对象) //withMethodAnnotation(RequestMapping.class) 扫描方法上的注解 .apis(RequestHandlerSelectors.basePackage("com.sw.swagger.controller")) //paths() 过滤的路径 .paths(PathSelectors.ant("/**")) .build(); } //配置Swagger apiInfo private ApiInfo apiInfo(){ //作者信息 Contact contact = new Contact("suaix","http://wangchouchou.com","281463547@qq.com"); return new ApiInfo( "Swagger StudyDemo", "SwaggerStudy", "1.0", "http://wangchouchou.com", contact, "Apache 2.0", "http://www.apache.org/licenses/LICENSE-2.0", new ArrayList()); } } Docket配置//配置Swagger的Docket @Bean public Docket docket(Environment environment) { //配置哪种环境下需要启用Swagger Profiles profiles = Profiles.of("dev", "test"); //监听配置文件 boolean flag = environment.acceptsProfiles(profiles); //链式编程 return new Docket(DocumentationType.SWAGGER_2) .apiInfo(apiInfo()) .enable(flag) //配置是否启动Swagger,默认为true,如需关闭须手动设置为false .select() //RequestHandlerSelectors 配置扫描接口的方式 //basePackage() 指定要扫描的包 //any() 扫描全部 //none() 不扫描 //withClassAnnotation(Controller.class) 扫描类注解(参数是一个注解的反射对象) //withMethodAnnotation(RequestMapping.class) 扫描方法上的注解 .apis(RequestHandlerSelectors.basePackage("com.sw.swagger.controller")) //paths() 过滤的路径 .paths(PathSelectors.ant("/**")) .build(); }配置什么环境下需要使用Swagger通过监听配置文件实现//配置那种环境下需要启用Swagger Profiles profiles = Profiles.of("dev", "test"); //监听配置文件 boolean flag = environment.acceptsProfiles(profiles); 3、配置文档分组.groupName("Demo")如何配置实现多个分组?配置多个Docket实例即可4、实体类package com.sw.swagger.pojo; import io.swagger.annotations.Api; import io.swagger.annotations.ApiModel; import io.swagger.annotations.ApiModelProperty; /** * @Author suaxi * @Date 2020/12/26 14:39 */ //@Api("用户实体类") @ApiModel("用户实体类") public class User { @ApiModelProperty("用户名") public String username; @ApiModelProperty("密码") public String password; } 5、Controllerpackage com.sw.swagger.controller; import com.sw.swagger.pojo.User; import io.swagger.annotations.ApiOperation; import io.swagger.annotations.ApiParam; import org.springframework.web.bind.annotation.GetMapping; import org.springframework.web.bind.annotation.PostMapping; import org.springframework.web.bind.annotation.RestController; /** * @Author suaxi * @Date 2020/12/26 10:59 */ @RestController public class HelloController { @ApiOperation("POST测试") @PostMapping("/hello") public String helloTest(@ApiParam("用户名") String username){ return "swagger-springboot"; } @ApiOperation("返回User对象") @PostMapping("/u") public User user(){ return new User(); } @ApiOperation("Hello控制类") @GetMapping("/h") public String hello(){ return "swagger-springboot"; } } 小结:1、通过Swagger可以给一些难以理解的属性或接口添加注释信息2、接口文档实时更新3、在线测试
-
Shiro Shiro1、导入依赖<dependency> <groupId>org.apache.shiro</groupId> <artifactId>shiro-spring</artifactId> <version>1.4.1</version> </dependency>2、Config配置UserRealm:package com.sw.config; import com.sw.pojo.User; import com.sw.service.UserService; import org.apache.shiro.SecurityUtils; import org.apache.shiro.authc.*; import org.apache.shiro.authz.AuthorizationInfo; import org.apache.shiro.authz.SimpleAuthorizationInfo; import org.apache.shiro.realm.AuthorizingRealm; import org.apache.shiro.session.Session; import org.apache.shiro.subject.PrincipalCollection; import org.apache.shiro.subject.Subject; import org.springframework.beans.factory.annotation.Autowired; /** * @Author suaxi * @Date 2020/12/24 16:56 */ //自定义UserRealm public class UserRealm extends AuthorizingRealm { @Autowired private UserService userService; @Override protected AuthorizationInfo doGetAuthorizationInfo(PrincipalCollection principalCollection) { System.out.println("执行了===》授权doGetAuthorizationInfo"); SimpleAuthorizationInfo info = new SimpleAuthorizationInfo(); info.addStringPermission("user:add"); //获得当前登录的对象 Subject subject = SecurityUtils.getSubject(); User currentUser = (User) subject.getPrincipal(); //拿到user对象 //设置当前用户的权限 info.addStringPermission(currentUser.getPerms()); return info; } @Override protected AuthenticationInfo doGetAuthenticationInfo(AuthenticationToken token) throws AuthenticationException { System.out.println("执行了===》认证doGetAuthorizationInfo"); UsernamePasswordToken userToken = (UsernamePasswordToken) token; //从数据库查询用户信息 User user = userService.findUserByName(userToken.getUsername()); if (user==null){ //用户为空 return null; //抛出 UnknownAccountException 异常 } //设置session Subject subject = SecurityUtils.getSubject(); Session session = subject.getSession(); session.setAttribute("loginUser",user); //密码认证由shiro做 return new SimpleAuthenticationInfo(user,user.getPassword(),""); } } ShiroConfig:package com.sw.config; import at.pollux.thymeleaf.shiro.dialect.ShiroDialect; import org.apache.shiro.spring.web.ShiroFilterFactoryBean; import org.apache.shiro.web.mgt.DefaultWebSecurityManager; import org.springframework.beans.factory.annotation.Qualifier; import org.springframework.context.annotation.Bean; import org.springframework.context.annotation.Configuration; import java.util.LinkedHashMap; import java.util.Map; /** * @Author suaxi * @Date 2020/12/24 16:54 */ @Configuration public class ShiroConfig { //3、ShiroFilterFactoryBean @Bean public ShiroFilterFactoryBean getShiroFilterFactoryBean(@Qualifier("securityManager")DefaultWebSecurityManager defaultWebSecurityManager){ ShiroFilterFactoryBean bean = new ShiroFilterFactoryBean(); //设置安全管理器 bean.setSecurityManager(defaultWebSecurityManager); //添加shiro的内置过滤器 /* anon:无需认证 authc:必须认证 user:必须有 “记住我” 功能才可以访问 perms:拥有对某个资源的权限才能访问 role:拥有某个角色权限才能访问 */ Map<String, String> filterMap = new LinkedHashMap<>(); filterMap.put("/user/update","perms[user:update]"); filterMap.put("/user/add","perms[user:add]"); filterMap.put("/logout","logout"); //注销 filterMap.put("/user/*","authc"); bean.setFilterChainDefinitionMap(filterMap); //设置登录请求 bean.setLoginUrl("/toLogin"); //未授权页面 bean.setUnauthorizedUrl("/noauth"); return bean; } //2、DefaultWebSecurityManager @Bean(name = "securityManager") public DefaultWebSecurityManager getDefaultWebSecurityManager(@Qualifier("userRealm")UserRealm userRealm){ DefaultWebSecurityManager securityManager = new DefaultWebSecurityManager(); //关联UserRealm securityManager.setRealm(userRealm); return securityManager; } //1、创建Realm对象 @Bean public UserRealm userRealm(){ return new UserRealm(); } //整合ShiroDialect shiro-thymeleaf @Bean public ShiroDialect getShiroDialect(){ return new ShiroDialect(); } }
-
SpringSecurity SpringSecurity1、导入依赖<dependency> <groupId>org.springframework.boot</groupId> <artifactId>spring-boot-starter-security</artifactId> </dependency>2、Config配置package com.sw.config; import org.springframework.security.config.annotation.authentication.builders.AuthenticationManagerBuilder; import org.springframework.security.config.annotation.web.builders.HttpSecurity; import org.springframework.security.config.annotation.web.configuration.EnableWebSecurity; import org.springframework.security.config.annotation.web.configuration.WebSecurityConfigurerAdapter; import org.springframework.security.crypto.bcrypt.BCryptPasswordEncoder; /** * @Author suaxi * @Date 2020/12/24 14:45 */ @EnableWebSecurity public class SercurityConfig extends WebSecurityConfigurerAdapter { //授权 @Override protected void configure(HttpSecurity http) throws Exception { //首页所有人可以访问,功能页需要权限才能访问 //请求授权规则 http.authorizeRequests() .antMatchers("/").permitAll() .antMatchers("/level1/*").hasRole("vip1") .antMatchers("/level2/*").hasRole("vip2") .antMatchers("/level3/*").hasRole("vip3"); //没有权限,默认跳转到登录页 //自定义登录页 http.formLogin().loginPage("/toLogin").loginProcessingUrl("/login"); http.csrf().disable(); //注销 http.logout().logoutSuccessUrl("/"); //开启记住我 //自定义rememberMe http.rememberMe().rememberMeParameter("remember"); } //认证 @Override protected void configure(AuthenticationManagerBuilder auth) throws Exception { //在内存中虚拟用户 auth.inMemoryAuthentication().passwordEncoder(new BCryptPasswordEncoder()) .withUser("1").password(new BCryptPasswordEncoder().encode("1")).roles("vip1") .and() .withUser("2").password(new BCryptPasswordEncoder().encode("1")).roles("vip2") .and() .withUser("3").password(new BCryptPasswordEncoder().encode("1")).roles("vip3") .and() .withUser("root").password(new BCryptPasswordEncoder().encode("1")).roles("vip1","vip2","vip3"); } }
-
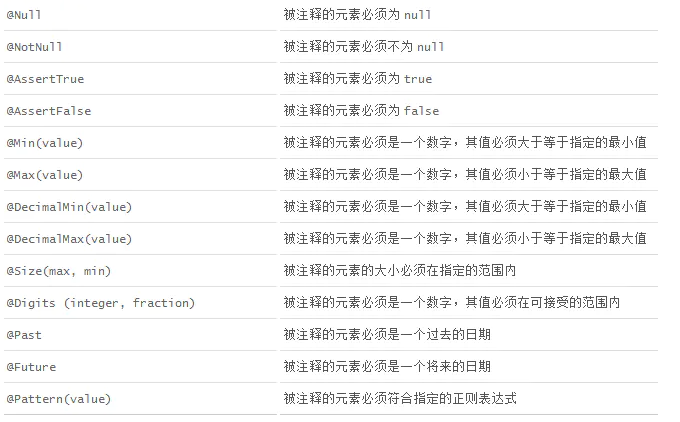
yaml配置 yaml配置文件application.properties语法结构:key=valueapplication.yaml语法结构:key:空格 valueyamlYAML是"YAML Ain't a Markup Language"(YAML不是一种标记语言)的递归缩写。基本语法:# k=v name: test #对象 student: name: test age: 3 #行内写法 student1: {name: test,age: 3} #数组 students: -test1 -test2 -test3 students1: [test1,test2,test3]注入配置文件1、导入配置文件的依赖<dependency> <groupId>org.springframework.boot</groupId> <artifactId>spring-boot-configuration-processor</artifactId> <optional>true</optional> </dependency>2、yaml配置文件person: name: test age: 3 happy: false birth: 2020/12/22 map: {k: v,k1: v1} list: -code -girl dog: name: test age: 33、实体类package com.sw.pojo; import lombok.AllArgsConstructor; import lombok.Data; import lombok.NoArgsConstructor; import org.springframework.boot.context.properties.ConfigurationProperties; import org.springframework.stereotype.Component; import java.util.Date; import java.util.List; import java.util.Map; /** * @Author suaxi * @Date 2020/12/22 10:38 */ @Data @AllArgsConstructor @NoArgsConstructor @Component //注册Bean @ConfigurationProperties(prefix = "person") public class Person { private String name; private int age; private Boolean happy; private Date birth; private Map<String,Object> map; private List<Object> list; private Dog dog; } @ConfigurationProperties的作用:将配置文件中配置的每一个属性的值,映射到这个组件中,参数prefix = "person",将配置文件中person下的所有属性一一对应补充:通过properties注入属性@PropertySource(value = "classpath:application.properties")properties与yaml对比 @ConfigurationProperties@value功能批量注入配置文件中的属性需单个一一指定松散绑定是否SPEL表达式否是JSR303校验是否复杂类型封装是否松散绑定:yaml中写的是last-name,实体类中写的是lastName,值依然能注入,yaml中 - 后面的第一个字母默认大写JSR303校验:JSR是Java Specification Requests的缩写,意思是Java 规范提案。使用时须在实体类前加上注解 @Validated //JSR303校验
-
SpringBoot自动装配原理 SpringBoot自动装配原理pom.xmlSpring-boot-dependencies:核心依赖在父工程中导入依赖时不用指定版本,因为有版本仓库启动器:SpringBoot的启动场景例:spring-boot-starter-web,会自动导入web环境所有的依赖SpringBoot会将所有的功能场景,都变成一个个的启动器主程序:package com.sw.helloworld; import org.springframework.boot.SpringApplication; import org.springframework.boot.autoconfigure.SpringBootApplication; @SpringBootApplication //标注这是一个SpringBoot应用 public class HelloworldApplication { public static void main(String[] args) { //启动SpringBoot SpringApplication.run(HelloworldApplication.class, args); } } 1、SpringBoot在启动的时候从类路径下的META-INF/spring.factories中获取AutoConfiguration指定的值2、将这些值作为自动配置类导入容器,自动配置类生效3、J2EE的整体解决方案和自动配置都在SpringBoot-autoConfig的jar包中4、它会将需要的组件以全类名的方式返回,这些组件就会被添加到容器中5、他会给容器中导入非常多的配置类,也就是导入并配置这个场景所需要的组件@SpringApplication(启动类注解) ---> @EnableAutoConfiguration(自动配置注解) ---> @Import(AutoConfigurationSelector.class)(自动导入配置文件的选择器) ---> getCandidateConfigurations()(获取所有候选配置) ---> 通过spring.factories获取配置类的位置 ---> @ConditionOnClass判断 ---> 条件成立(不加载该配置类) ---> 条件不成立(获取配置类,在上层方法中循环封装为properties来使用)xxxAutoConfiguration:自动配置类(给容器中添加组件)xxxProperties:封装配置文件中的相关属性(application.yaml)SpringApplication:1、推断应用的类型是普通项目还是web项目2、查找并加载所有可用初始化器,设置到initializers属性中3、找出所有的应用程序监听器,设置到listeners属性中4、推断并设置main方法的定义类,找到运行的主类
-
JSON JSONJSON(JavaScript Object Notation,JS标记对象)是一种轻量级的数据交换格式。1、jackson导入依赖<dependency> <groupId>com.fasterxml.jackson.core</groupId> <artifactId>jackson-databind</artifactId> <version>2.12.0</version> </dependency>Utils工具类package com.sw.utils; import com.fasterxml.jackson.core.JsonProcessingException; import com.fasterxml.jackson.databind.ObjectMapper; import com.fasterxml.jackson.databind.SerializationFeature; import java.text.SimpleDateFormat; /** * @Author suaxi * @Date 2020/12/17 16:08 */ public class JsonUtils { public static String getJson(Object object){ return getJson(object,"yyyy-MM-dd HH:mm:ss"); } public static String getJson(Object object,String dateFormate){ ObjectMapper mapper = new ObjectMapper(); //不使用时间戳 mapper.configure(SerializationFeature.WRITE_DATES_AS_TIMESTAMPS,false); //自定义时间格式 SimpleDateFormat sdf = new SimpleDateFormat(dateFormate); mapper.setDateFormat(sdf); try { return mapper.writeValueAsString(object); } catch (JsonProcessingException e) { e.printStackTrace(); } return null; } } Controllerpackage com.sw.controller; import com.alibaba.fastjson.JSON; import com.fasterxml.jackson.core.JsonProcessingException; import com.fasterxml.jackson.databind.ObjectMapper; import com.sw.pojo.User; import com.sw.utils.JsonUtils; import org.springframework.stereotype.Controller; import org.springframework.web.bind.annotation.RequestMapping; import org.springframework.web.bind.annotation.ResponseBody; import org.springframework.web.bind.annotation.RestController; import java.util.ArrayList; import java.util.Date; import java.util.List; /** * @Author suaxi * @Date 2020/12/17 15:38 */ //@Controller @RestController public class UserController { @RequestMapping("/j1") //@ResponseBody //不会走视图解析器,直接返回一个字符串 public String test01() throws JsonProcessingException { //jackson ObjectMapper ObjectMapper mapper = new ObjectMapper(); User user = new User("孙笑川", 33, "男"); String s = mapper.writeValueAsString(user); return s; } @RequestMapping("/j2") public String test02() throws JsonProcessingException { List<User> userList = new ArrayList<User>(); User user1 = new User("孙笑川1", 33, "男"); User user2 = new User("孙笑川2", 33, "男"); User user3 = new User("孙笑川3", 33, "男"); userList.add(user1); userList.add(user3); userList.add(user2); return JsonUtils.getJson(userList); } @RequestMapping("/j3") public String test03() throws JsonProcessingException { return JsonUtils.getJson(new Date()); } } 2、fastjson<dependency> <groupId>com.alibaba</groupId> <artifactId>fastjson</artifactId> <version>1.2.75</version> </dependency>Controllerpackage com.sw.controller; import com.alibaba.fastjson.JSON; import com.sw.pojo.User; import org.springframework.web.bind.annotation.RequestMapping; import org.springframework.web.bind.annotation.RestController; import java.util.ArrayList; import java.util.List; /** * @Author suaxi * @Date 2020/12/17 15:38 */ //@Controller @RestController public class UserController { @RequestMapping("/j4") public String test04(){ List<User> userList = new ArrayList<User>(); User user1 = new User("孙笑川1", 33, "男"); User user2 = new User("孙笑川2", 33, "男"); User user3 = new User("孙笑川3", 33, "男"); userList.add(user1); userList.add(user3); userList.add(user2); String s = JSON.toJSONString(userList); return s; } }
-
RestFul风格 RestFul风格RestFul就是一个资源定位及资源操作的风格,它不是标准也不是协议,基于这个风格设计的软件可以更简洁,更有层次,更易于实现缓存等机制。传统资源操作方式:http://127.0.0.1/project/findUser.do?id=1 查询 GEThttp://127.0.0.1/project/addUser.do 新增 POSThttp://127.0.0.1/project/modifyUser.do 更新 POSThttp://127.0.0.1/project/deleteUser.do?id=1 删除 GET或POST使用RestFul风格:http://127.0.0.1/project/1 查询 GEThttp://127.0.0.1/project 新增 POSThttp://127.0.0.1/project 更新 POSThttp://127.0.0.1/project/1 删除 GET或POST常用的资源操作:POST、DELETE、PUT、GETpackage com.sw.controller; import org.springframework.stereotype.Controller; import org.springframework.ui.Model; import org.springframework.web.bind.annotation.PathVariable; import org.springframework.web.bind.annotation.PostMapping; import org.springframework.web.bind.annotation.RequestMapping; import org.springframework.web.bind.annotation.RequestMethod; /** * @Author suaxi * @Date 2020/12/17 11:25 */ @Controller public class RestFulController { //传统风格 http://localhost:8088/add01?a=1&b=1 @RequestMapping(value = "/add01/{a}/{b}",method = RequestMethod.GET) public String test01(@PathVariable int a,@PathVariable int b, Model m){ int result = a + b; m.addAttribute("msg","结果1为:"+result); return "hello"; } //简化 http://localhost:8088/add02/1/2 @PostMapping("/add02/{a}/{b}") public String test02(@PathVariable int a,@PathVariable int b, Model m){ int result = a + b; m.addAttribute("msg","结果2为:"+result); return "hello"; } } 注:@PathVariable 让方法参数的值对应绑定到一个URI模板变量上
-
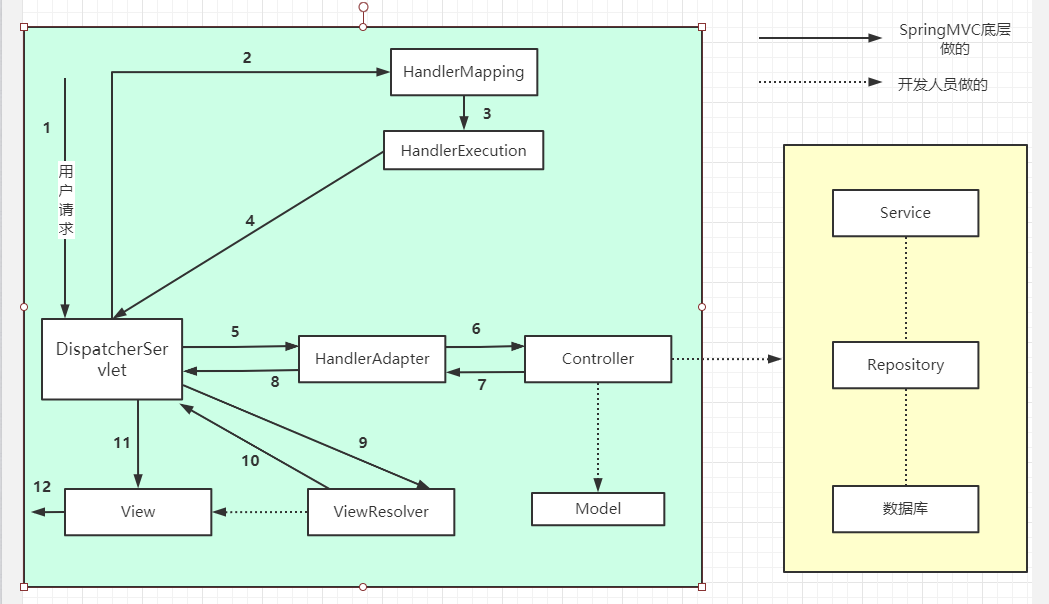
SpringMVC执行原理 SpringMVC执行原理流程分析:DispatcherServlet表示前置控制器,是整个SpringMVC的控制中心。用户发出请求,DispatcherServlet接收并拦截请求HandlerMapping为处理器映射,DispatcherServlet调用HandlerMapping,根据请求url查找HandlerHandlerExecution为具体的Handler,其作用是根据url查找控制器HandlerExecution将解析后的信息传递给DispatcherServletHandlerAdapter表示处理适配器,按照特定的规则去执行HandlerHandler让具体的Controller执行Controller将具体的执行信息返回给HandlerAdapter(ModelAndView)HandlerAdapter将视图逻辑名或模型传递给DispatcherServletDispatcherServlet调用视图解析器(ViewResolver)解析HandlerAdapter传递的逻辑视图名视图解析器将解析的逻辑视图名传给DispatcherServletDispatcherServlet根据视图解析器解析的结果,调用具体的视图返回用户请求,呈现视图给用户
-
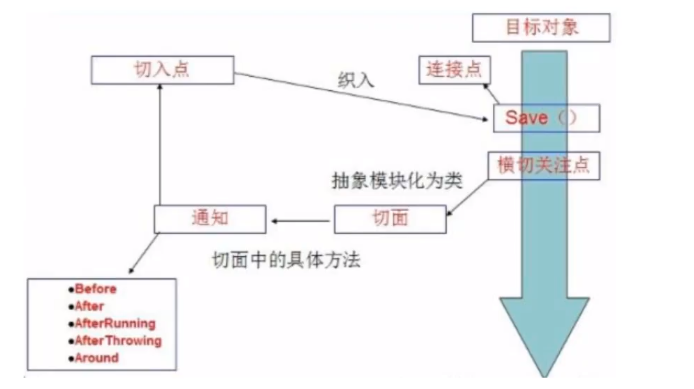
AOP AOPAOP(Aspect Oriented Programing),面向切面编程,通过预编译方式和运行期动态代理实现程序功能的统一维护的一种技术。AOP是OOP的延续,利用AOP可以对业务逻辑的各个部分进行隔离,从而使业务逻辑各部分之间的耦合降低,提高程序的可重用性。1、Aop在Spring中的作用==提供声明式事务;允许用户自定义切面==横切关注点:跨越应用程序多个模块的方法或功能,即:与业务逻辑无关,但需要关注的部分就是横切关注点,如:日志、缓存、事务等切面(Aspect):横切关注点被模块化的都特殊对象,具体为一个类通知(Advice):切面必须要完成的工作,类中的一个方法目标(Target):被通知对象代理(Proxy):向目标对象应用通知之后创建的对象切入点(PointCut):需要执行切面通知的”地点“连接点(JoinPoint):与切入点匹配的执行点在SpringAop中,通过Advice定义横切逻辑,Spring中支持5中类型的Advice:通知类型连接点实现接口前置通知方法前org.springframework.aop.MethodBeforeAdvice后置通知方法后org.springframework.aop.AfterReturningAdvice环绕通知方法前后org.springframework.aop.MethodInterceptor异常抛出通知方法抛出异常org.springframework.aop.ThrowsAdvice引介通知类中增加新的方法属性org.springframework.aop.IntroductionInterceptor2、使用Spring实现AOP在pom.xml中导入依赖<dependencies> <dependency> <groupId>org.aspectj</groupId> <artifactId>aspectjweaver</artifactId> <version>1.9.4</version> </dependency> </dependencies>3、使用Spring实现Aop方式一:使用Spring的API接口方式二:自定义实现AOP【定义切面】方式三:使用注解<?xml version="1.0" encoding="UTF-8"?> <beans xmlns="http://www.springframework.org/schema/beans" xmlns:xsi="http://www.w3.org/2001/XMLSchema-instance" xmlns:aop="http://www.springframework.org/schema/aop" xsi:schemaLocation="http://www.springframework.org/schema/beans https://www.springframework.org/schema/beans/spring-beans.xsd http://www.springframework.org/schema/aop https://www.springframework.org/schema/aop/spring-aop.xsd"> <!--注册bean--> <bean id="userService" class="com.sw.service.UserServiceImpl"/> <bean id="log" class="com.sw.log.Log"/> <bean id="afterLog" class="com.sw.log.AfterLog"/> <!--方式一:使用原生Spring API配置--> <!--配置aop:需导入AOP约束--> <aop:config> <!--切入点:execution(要执行的位置)--> <aop:pointcut id="pointcut" expression="execution(* com.sw.service.UserServiceImpl.*(..))"/> <!--执行环绕增强--> <aop:advisor advice-ref="log" pointcut-ref="pointcut"/> <aop:advisor advice-ref="afterLog" pointcut-ref="pointcut"/> </aop:config> <!--方式二:自定义--> <bean id="diy" class="com.sw.diy.DiyLog"/> <aop:config> <!--自定义切面,ref:要引用的类--> <aop:aspect ref="diy"> <!--切入点--> <aop:pointcut id="pointcut" expression="execution(* com.sw.service.UserServiceImpl.*(..))"/> <!--通知--> <aop:before method="before" pointcut-ref="pointcut"/> <aop:after method="after" pointcut-ref="pointcut"/> </aop:aspect> </aop:config> <!--方式三:通过注解--> <bean id="annotationPointCut" class="com.sw.diy.AnnotationPointCut"/> <!--开启注解 JDK:expose-proxy="false"(默认) cglib:expose-proxy="true" --> <aop:aspectj-autoproxy /> </beans>