搜索到
486
篇与
的结果
-
 Redis基本数据类型String String127.0.0.1:6379> set name sunxiaochuan OK 127.0.0.1:6379> get name "sunxiaochuan" 127.0.0.1:6379> append name ",chouxiang" #追加字符串,如果当前字符串不存在,就相当于set key (integer) 22 127.0.0.1:6379> get name "sunxiaochuan,chouxiang" 127.0.0.1:6379> strlen name #获取字符串长度 (integer) 22 #自增 i++ #步长 i+= 127.0.0.1:6379> incr views #自增1 (integer) 1 127.0.0.1:6379> incr views (integer) 2 127.0.0.1:6379> decr views (integer) 1 127.0.0.1:6379> decr views (integer) 0 127.0.0.1:6379> decr views (integer) -1 127.0.0.1:6379> decrby views 5 #设置步长 (integer) -6 127.0.0.1:6379> incrby views 10 (integer) 4 127.0.0.1:6379> #字符串范围 range 127.0.0.1:6379> set test "hello world" OK 127.0.0.1:6379> get test "hello world" 127.0.0.1:6379> getrange test 0 5 #截取字符串[0,5] "hello " 127.0.0.1:6379> 127.0.0.1:6379> getrange test 0 -1 #获取全部字符串 "hello world" 127.0.0.1:6379> #替换 127.0.0.1:6379> set name sunxiaochuan OK 127.0.0.1:6379> get name "sunxiaochuan" 127.0.0.1:6379> setrange name 1 abc #替换指定位置开始的字符串 (integer) 12 127.0.0.1:6379> get name "sabciaochuan" 127.0.0.1:6379> #setex(set with expire) #设置过期时间 #setnx(set if not exist) #如果不存在,设置值为xxx 127.0.0.1:6379> setex name 10 "liubo" #设置name的值为liubo,10秒后过期 OK 127.0.0.1:6379> ttl name (integer) 7 127.0.0.1:6379> get name (nil) 127.0.0.1:6379> setnx name01 "sun" #如果name01不存在,则创建 (integer) 1 127.0.0.1:6379> keys * 1) "name01" 127.0.0.1:6379> setnx name01 "liu" #name01已存在,再次创建时失败 (integer) 0 127.0.0.1:6379> get name01 "sun" 127.0.0.1:6379> 127.0.0.1:6379> mset A a B b C c #同时设置多个值 OK 127.0.0.1:6379> keys * 1) "B" 2) "A" 3) "C" 127.0.0.1:6379> mget A B C #同时获取多个值 1) "a" 2) "b" 3) "c" 127.0.0.1:6379> msetnx A a D d #msetnx是一个原子性操作,要么都成功,要么都失败 (integer) 0 127.0.0.1:6379> get D (nil) 127.0.0.1:6379> #对象 #设置一个id为1的对象,json字符串来保存属性,方式一 127.0.0.1:6379> set user:1 {name:ceshi,age:3} #方式二 user:{id}:{filed} 127.0.0.1:6379> mset user:1:name ceshi user:1:age 3 OK 127.0.0.1:6379> mget user:1:name user:1:age 1) "ceshi" 2) "3" 127.0.0.1:6379> #getset 先get再set 127.0.0.1:6379> getset name sunxiaochuan #如果不存在值,返回null (nil) 127.0.0.1:6379> get name "sunxiaochuan" 127.0.0.1:6379> getset name liubo #如果存在值,获取原来的值,并设置新的值 "sunxiaochuan" 127.0.0.1:6379> get name "liubo" 127.0.0.1:6379> String除了以上用法,还可以用于计数器,多单位数量统计等。
 -
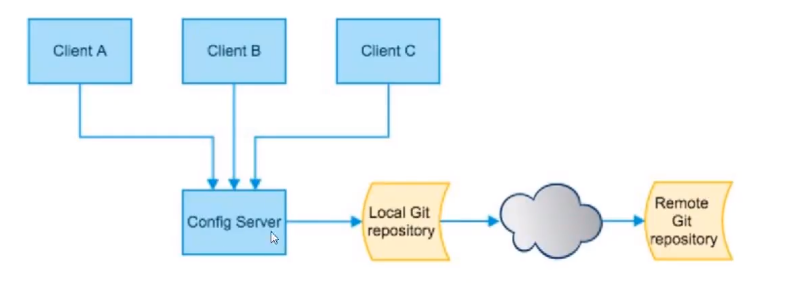
Spring Cloud Config分布式配置中心 Spring Cloud ConfigSpring Cloud Config为微服务架构中的微服务提供集中化的外部配置支持,配置服务器为各个不同微服务应用的所有环节提供了一个中心化的外部配置。Spring Cloud Config分为客户端和服务端:服务端:分布式配置中心,它是一个独立的微服务应用,用来连接配置服务器,并为客户端提供获取配置信息,加密,解密信息等访问接口客户端:通过指定的配置中心来管理应用资源,以及与业务相关的配置内容,并在启动的时候从配置中心获取和加载配置信息。配置服务器默认采用git来存储配置信息,这样有助于对环境配置进行版本管理。作用:集中管理配置文件不同环境,不同配置,动态化的配置更新,分环境部署,如:开发、测试、生产等环境运行期间可以动态调整配置,不再需要在每个服务部署的机器上编写配置文件,服务会向配置中心统一拉取配置自己的信息当配置发生变动时,服务节点不需要重启,动态应用新的配置配置信息以REST接口的形式暴露图片来源:狂神说Java具体实例1、服务端pom依赖:<dependencies> <dependency> <groupId>org.springframework.boot</groupId> <artifactId>spring-boot-starter-web</artifactId> </dependency> <dependency> <groupId>org.springframework.cloud</groupId> <artifactId>spring-cloud-config-server</artifactId> <version>2.1.1.RELEASE</version> </dependency> <!--actuator监控信息--> <dependency> <groupId>org.springframework.boot</groupId> <artifactId>spring-boot-starter-actuator</artifactId> </dependency> </dependencies>application.yml配置:server: port: 3344 spring: application: name: springcloud-config-server #连接远程仓库 cloud: config: server: git: uri: https://github.com/suaxi/SpringCloud-config.gitSpringBoot启动类开启ConfigServer注解:package com.sw.springcloud; import org.springframework.boot.SpringApplication; import org.springframework.boot.autoconfigure.SpringBootApplication; import org.springframework.cloud.config.server.EnableConfigServer; /** * @Author suaxi * @Date 2020/12/30 14:49 */ @SpringBootApplication @EnableConfigServer public class Config_Server_3344 { public static void main(String[] args) { SpringApplication.run(Config_Server_3344.class,args); } } 2、客户端pom依赖:<dependencies> <dependency> <groupId>org.springframework.boot</groupId> <artifactId>spring-boot-starter-web</artifactId> </dependency> <dependency> <groupId>org.springframework.cloud</groupId> <artifactId>spring-cloud-starter-config</artifactId> <version>2.1.1.RELEASE</version> </dependency> <!--actuator监控信息--> <dependency> <groupId>org.springframework.boot</groupId> <artifactId>spring-boot-starter-actuator</artifactId> </dependency> </dependencies>bootstrap.yml配置:#系统级别的配置 spring: cloud: config: name: config-client #需要从远程仓库读取的资源名称 profile: dev #版本 label: master #分支 uri: http://localhost:3344 #获取配置信息的地址(Config配置服务端)application.yml配置:#用户级别的配置 spring: application: name: springcloud-config-client-3355Controller(配置REST接口)package com.sw.springcloud.controller; import org.springframework.beans.factory.annotation.Value; import org.springframework.web.bind.annotation.RequestMapping; import org.springframework.web.bind.annotation.RestController; /** * @Author suaxi * @Date 2020/12/30 15:29 */ @RestController public class ConfigClientController { @Value("${spring.application.name}") private String applicationName; @Value("${eureka.client.service-url.defaultZone}") private String eurekaServer; @Value("${server.port}") private String port; @RequestMapping("/config") public String getConfig(){ return "applicationName:"+applicationName+ "eurekaServer:"+eurekaServer+ "port:"+port; } } 3、Eureka服务注册中心pom依赖:<dependencies> <dependency> <groupId>org.springframework.cloud</groupId> <artifactId>spring-cloud-starter-eureka-server</artifactId> <version>1.4.7.RELEASE</version> </dependency> <!--config--> <dependency> <groupId>org.springframework.cloud</groupId> <artifactId>spring-cloud-starter-config</artifactId> <version>2.1.1.RELEASE</version> </dependency> </dependencies>bootstrap.yml配置:与config配置中心的客户端一致,都是从Config服务端获取配置信息spring: cloud: config: name: config-eureka label: master profile: dev uri: http://localhost:3344application.yml配置:spring: application: name: springcloud-config-eureka-7001SpringBoot启动类:package com.sw.springcloud; import org.springframework.boot.SpringApplication; import org.springframework.boot.autoconfigure.SpringBootApplication; import org.springframework.cloud.netflix.eureka.server.EnableEurekaServer; /** * @Author suaxi * @Date 2020/12/29 11:02 */ @SpringBootApplication @EnableEurekaServer //服务端 public class EurekaConfigServer_7001 { public static void main(String[] args) { SpringApplication.run(EurekaConfigServer_7001.class,args); } } 4、Eureka服务提供者pom依赖:<dependencies> <!--需要拿到实体类,配置api module--> <dependency> <groupId>com.sw</groupId> <artifactId>springcloud-api</artifactId> <version>1.0-SNAPSHOT</version> </dependency> <dependency> <groupId>junit</groupId> <artifactId>junit</artifactId> </dependency> <dependency> <groupId>mysql</groupId> <artifactId>mysql-connector-java</artifactId> </dependency> <dependency> <groupId>com.alibaba</groupId> <artifactId>druid</artifactId> </dependency> <dependency> <groupId>ch.qos.logback</groupId> <artifactId>logback-core</artifactId> </dependency> <dependency> <groupId>org.mybatis.spring.boot</groupId> <artifactId>mybatis-spring-boot-starter</artifactId> </dependency> <dependency> <groupId>org.springframework.boot</groupId> <artifactId>spring-boot-test</artifactId> <scope>test</scope> </dependency> <dependency> <groupId>org.springframework.boot</groupId> <artifactId>spring-boot-starter-web</artifactId> </dependency> <dependency> <groupId>org.springframework.boot</groupId> <artifactId>spring-boot-starter-jetty</artifactId> </dependency> <dependency> <groupId>org.springframework.cloud</groupId> <artifactId>spring-cloud-starter-eureka</artifactId> <version>1.4.7.RELEASE</version> </dependency> <!--actuator监控信息--> <dependency> <groupId>org.springframework.boot</groupId> <artifactId>spring-boot-starter-actuator</artifactId> </dependency> <dependency> <groupId>org.springframework.cloud</groupId> <artifactId>spring-cloud-starter-hystrix</artifactId> <version>1.4.7.RELEASE</version> </dependency> <!--config--> <dependency> <groupId>org.springframework.cloud</groupId> <artifactId>spring-cloud-starter-config</artifactId> <version>2.1.1.RELEASE</version> </dependency> </dependencies>bootstrap.yml配置:与以上两个的配置一致,都是从Config服务端获取配置信息spring: cloud: config: name: config-dept label: master profile: dev uri: http://localhost:3344application.yml配置:spring: application: name: springcloud-config-dept-8088服务提供者对比之前的配置(application.yml):通过Config分布式配置中心,将配置文件放到git统一管理,现只需从Config-server获取即可server: port: 8088 #mybatis配置 mybatis: type-aliases-package: com.sw.springcloud.pojo config-location: classpath:mybatis/mybatis-config.xml mapper-locations: classpath:mybatis/mapper/*.xml #Spring配置 spring: application: name: springcloud-provider-dept datasource: type: com.alibaba.druid.pool.DruidDataSource driver-class-name: com.mysql.cj.jdbc.Driver url: jdbc:mysql://localhost:3306/db01?useUnicode=true&character=UFT-8 username: root password: 123456 #配置Eureka,配置服务注册到哪里 eureka: client: service-url: defaultZone: http://eureka7001.com:7001/eureka/,http://eureka7002.com:7002/eureka/,http://eureka7003.com:7003/eureka/ instance: instance-id: springcloud-provider_dept8088 #修改Eureka默认描述信息 prefer-ip-address: true #显示服务的真实ip地址,替换原先的localhost #info配置 info: app.name: springcloud-demo company.name: suaxi 配置文件交由git统一管理
-
Zuul路由网关 Zuul路由网关Zuul包含对请求的路由和过滤两个功能:路由功能:负责将外部请求转发到具体的微服务实例上,实现外部访问入口统一过滤:对请求的处理过程进行干预,是实现请求校验,服务聚合等功能的基础注:Zuul服务也会注册到Eureka服务注册中心1、导入依赖<dependencies> <!--zuul--> <dependency> <groupId>org.springframework.cloud</groupId> <artifactId>spring-cloud-starter-zuul</artifactId> <version>1.4.7.RELEASE</version> </dependency> <!--hystrix--> <dependency> <groupId>org.springframework.cloud</groupId> <artifactId>spring-cloud-starter-hystrix</artifactId> <version>1.4.7.RELEASE</version> </dependency> <dependency> <groupId>org.springframework.cloud</groupId> <artifactId>spring-cloud-starter-hystrix-dashboard</artifactId> <version>1.4.7.RELEASE</version> </dependency> <!--Ribbon--> <dependency> <groupId>org.springframework.cloud</groupId> <artifactId>spring-cloud-starter-ribbon</artifactId> <version>1.4.7.RELEASE</version> </dependency> <!--Eureka--> <dependency> <groupId>org.springframework.cloud</groupId> <artifactId>spring-cloud-starter-eureka</artifactId> <version>1.4.7.RELEASE</version> </dependency> <dependency> <groupId>com.sw</groupId> <artifactId>springcloud-api</artifactId> <version>1.0-SNAPSHOT</version> </dependency> <dependency> <groupId>org.springframework.boot</groupId> <artifactId>spring-boot-starter-web</artifactId> </dependency> </dependencies>2、application.yml配置server: port: 8888 spring: application: name: springcloud-zuul eureka: client: service-url: defaultZone: http://eureka7001.com:7001/eureka/,http://eureka7002.com:7002/eureka/,http://eureka7003.com:7003/eureka/ instance: instance-id: zuul8888.com prefer-ip-address: true info: app.name: springcloud-demo company.name: suaxi zuul: routes: mydept.serviceID: springcloud-provider-dept mydept.path: /mydept/** ignored-services: "*" #ignored-services: springcloud-provider-dept禁止使用原来的微服务名访问 #设置为 * 表示禁止使用全部的微服务ID进行访问3、SpringBoot启动类开启Zuul注解一般使用@EnableZuulProxypackage com.sw.springcloud; import org.springframework.boot.SpringApplication; import org.springframework.boot.autoconfigure.SpringBootApplication; import org.springframework.cloud.netflix.zuul.EnableZuulProxy; /** * @Author suaxi * @Date 2020/12/30 10:50 */ @SpringBootApplication @EnableZuulProxy //开启Zuul路由网关 public class ZuulApplication_8888 { public static void main(String[] args) { SpringApplication.run(ZuulApplication_8888.class,args); //http://www.xxx.com:8888/mydept/dept/get/1 } } 开启Zuul路由网关后,可通过:域名+端口号 访问微服务项目
-
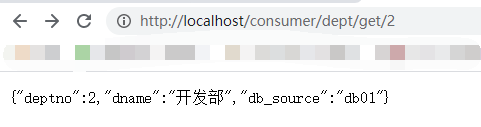
Hystrix服务降级 Hystrix服务降级A、B、C三台服务器,A在某一时间段的负载很重,急需扩容,而此时间段B、C负载很小或没有访问量,需关闭其中的服务器,拿去给A扩容,以降低负载,同时设置fallback回调,让这个时间段需要访问B、C服务器的用户得到“服务暂时不可用或关闭”的信息,这个过程可以简单的比喻为服务降级。1、API接口设置fallback回调pojopackage com.sw.springcloud.pojo; import lombok.Data; import lombok.NoArgsConstructor; import lombok.experimental.Accessors; import java.io.Serializable; /** * @Author suaxi * @Date 2020/12/28 21:07 */ @Data @NoArgsConstructor @Accessors(chain = true) //链式编程 public class Dept implements Serializable { private Long deptno; private String dname; private String db_source; //数据存在哪个数据库 public Dept(String dname) { this.dname = dname; } } service接口package com.sw.springcloud.service; import com.sw.springcloud.pojo.Dept; import org.springframework.cloud.openfeign.FeignClient; import org.springframework.stereotype.Component; import org.springframework.web.bind.annotation.GetMapping; import org.springframework.web.bind.annotation.PathVariable; import org.springframework.web.bind.annotation.PostMapping; import java.util.List; /** * @Author suaxi * @Date 2020/12/29 20:02 */ @Component @FeignClient(value = "SPRINGCLOUD-PROVIDER-DEPT",fallbackFactory = DeptClientServiceFallbackFactory.class) public interface DeptClientService { @GetMapping("/dept/get/{id}") public Dept findById(@PathVariable("id")Long id); @GetMapping("/dept/list") public List<Dept> findAll(); @PostMapping("/dept/add") public boolean addDept(Dept dept); } FallbackFactoryService服务降级设置package com.sw.springcloud.service; import com.sw.springcloud.pojo.Dept; import feign.hystrix.FallbackFactory; import org.springframework.stereotype.Component; import java.util.List; /** * @Author suaxi * @Date 2020/12/30 9:33 * 服务降级 */ @Component public class DeptClientServiceFallbackFactory implements FallbackFactory { @Override public Object create(Throwable throwable) { return new DeptClientService() { @Override public Dept findById(Long id) { return new Dept() .setDeptno(id) .setDname("未查询到数据,该服务现已被关闭") .setDb_source("没有数据库信息"); } @Override public List<Dept> findAll() { return null; } @Override public boolean addDept(Dept dept) { return false; } }; } /* 服务熔断:服务端,某个服务超时或异常,引起熔断(类似于保险丝) 服务降级:客户端,从系统整体负载考虑,当某个服务熔断或关闭之后,服务将不再被调用 此时在客户端可以设置一个回调FallbackFactory,返回一个默认的缺省值,可以 提升用户体验,但服务质量随之下降 */ } 2、消费者端设置appliction.yml配置服务降级server: port: 80 eureka: client: register-with-eureka: false #不向注册中心注册自己(消费者端) service-url: defaultZone: http://eureka7001.com:7001/eureka/,http://eureka7002.com:7002/eureka/,http://eureka7003.com:7003/eureka/ #开启降级feign.hystrix feign: hystrix: enabled: true将RestTemplate注册到Spring容器中package com.sw.springcloud.config; import org.springframework.cloud.client.loadbalancer.LoadBalanced; import org.springframework.context.annotation.Bean; import org.springframework.context.annotation.Configuration; import org.springframework.web.client.RestTemplate; /** * @Author suaxi * @Date 2020/12/28 22:15 */ @Configuration public class ConfigBean { @Bean @LoadBalanced //注册Ribbon public RestTemplate getRestTemplate(){ return new RestTemplate(); } } SpringBoot启动类package com.sw.springcloud; import org.springframework.boot.SpringApplication; import org.springframework.boot.autoconfigure.SpringBootApplication; import org.springframework.cloud.netflix.eureka.EnableEurekaClient; import org.springframework.cloud.openfeign.EnableFeignClients; import org.springframework.context.annotation.ComponentScan; /** * @Author suaxi * @Date 2020/12/28 22:29 */ @SpringBootApplication @EnableEurekaClient @EnableFeignClients(basePackages = {"com.sw.springcloud"}) public class FeignDeptConsumer_80 { public static void main(String[] args) { SpringApplication.run(FeignDeptConsumer_80.class,args); } } 用户正常访问服务:微服务节点出现问题,服务降级:
-
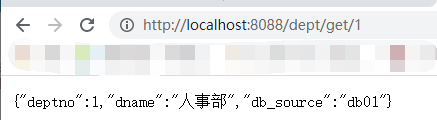
Hystrix服务熔断 Hystrix服务熔断服务熔断:熔断机制是对应雪崩效应的一种微服务链路保护机制。当某个微服务不可用或响应时间太长,会进行服务的降级,进而熔断该节点微服务的调用,快速返回“错误的响应信息”,当该节点的调用恢复正常之后注册中心将其恢复至调用链路。Spring Cloud的熔断机制通过Hystrix实现,它会监控微服务间的调用状况,当失败的调用到一定阈值(缺省5秒内20次调用失败),就会启动熔断机制。具体实例:1、导入依赖<dependencies> <!--需要拿到实体类,配置api module--> <dependency> <groupId>com.sw</groupId> <artifactId>springcloud-api</artifactId> <version>1.0-SNAPSHOT</version> </dependency> <dependency> <groupId>junit</groupId> <artifactId>junit</artifactId> </dependency> <dependency> <groupId>mysql</groupId> <artifactId>mysql-connector-java</artifactId> </dependency> <dependency> <groupId>com.alibaba</groupId> <artifactId>druid</artifactId> </dependency> <dependency> <groupId>ch.qos.logback</groupId> <artifactId>logback-core</artifactId> </dependency> <dependency> <groupId>org.mybatis.spring.boot</groupId> <artifactId>mybatis-spring-boot-starter</artifactId> </dependency> <dependency> <groupId>org.springframework.boot</groupId> <artifactId>spring-boot-test</artifactId> <scope>test</scope> </dependency> <dependency> <groupId>org.springframework.boot</groupId> <artifactId>spring-boot-starter-web</artifactId> </dependency> <dependency> <groupId>org.springframework.boot</groupId> <artifactId>spring-boot-starter-jetty</artifactId> </dependency> <dependency> <groupId>org.springframework.cloud</groupId> <artifactId>spring-cloud-starter-eureka</artifactId> <version>1.4.7.RELEASE</version> </dependency> <!--actuator监控信息--> <dependency> <groupId>org.springframework.boot</groupId> <artifactId>spring-boot-starter-actuator</artifactId> </dependency> <!--Hystrix--> <dependency> <groupId>org.springframework.cloud</groupId> <artifactId>spring-cloud-starter-hystrix</artifactId> <version>1.4.7.RELEASE</version> </dependency> </dependencies>2、daopackage com.sw.springcloud.dao; import com.sw.springcloud.pojo.Dept; import org.apache.ibatis.annotations.Mapper; import org.springframework.stereotype.Repository; import java.util.List; /** * @Author suaxi * @Date 2020/12/28 21:34 */ @Mapper @Repository public interface DeptDao { public boolean addDept(Dept dept); public Dept findDept(Long id); public List<Dept> findAll(); } 3、Service接口package com.sw.springcloud.service; import com.sw.springcloud.pojo.Dept; import java.util.List; /** * @Author suaxi * @Date 2020/12/28 21:34 */ public interface DeptService { public boolean addDept(Dept dept); public Dept findDept(Long id); public List<Dept> findAll(); } Service实现:package com.sw.springcloud.service; import com.sw.springcloud.dao.DeptDao; import com.sw.springcloud.pojo.Dept; import org.springframework.beans.factory.annotation.Autowired; import org.springframework.stereotype.Service; import java.util.List; /** * @Author suaxi * @Date 2020/12/28 21:42 */ @Service public class DeptServiceImpl implements DeptService{ @Autowired private DeptDao deptDao; @Override public boolean addDept(Dept dept) { return deptDao.addDept(dept); } @Override public Dept findDept(Long id) { return deptDao.findDept(id); } @Override public List<Dept> findAll() { return deptDao.findAll(); } } 4、controller注:hystrix熔断需开启注解@HystrixCommand(fallbackMethod = "hystrixGet"),且提供熔断后的备选方法package com.sw.springcloud.controller; import com.netflix.hystrix.contrib.javanica.annotation.HystrixCommand; import com.sw.springcloud.pojo.Dept; import com.sw.springcloud.service.DeptService; import org.springframework.beans.factory.annotation.Autowired; import org.springframework.cloud.client.ServiceInstance; import org.springframework.cloud.client.discovery.DiscoveryClient; import org.springframework.web.bind.annotation.GetMapping; import org.springframework.web.bind.annotation.PathVariable; import org.springframework.web.bind.annotation.PostMapping; import org.springframework.web.bind.annotation.RestController; import java.util.List; /** * @Author suaxi * @Date 2020/12/28 21:44 * 提供RestFul服务 */ @RestController public class DeptController { @Autowired private DeptService deptService; @GetMapping("/dept/get/{id}") @HystrixCommand(fallbackMethod = "hystrixGet") public Dept get(@PathVariable("id")Long id){ Dept dept = deptService.findDept(id); if (dept==null){ throw new RuntimeException("不存在id为"+id+"的用户,或者信息无法找到"); } return dept; } //熔断后的备选方法 public Dept hystrixGet(@PathVariable("id")Long id){ Dept dept = deptService.findDept(id); return new Dept() .setDeptno(id) .setDname("不存在id为"+id+"的用户,或者信息无法找到,null-->@Hystrix") .setDb_source("No message in MySQL"); } } 5、SpringBoot启动类开启Hystrix注解支持package com.sw.springcloud; import org.springframework.boot.SpringApplication; import org.springframework.boot.autoconfigure.SpringBootApplication; import org.springframework.cloud.client.circuitbreaker.EnableCircuitBreaker; import org.springframework.cloud.client.discovery.EnableDiscoveryClient; import org.springframework.cloud.netflix.eureka.EnableEurekaClient; /** * @Author suaxi * @Date 2020/12/28 21:49 */ @SpringBootApplication @EnableEurekaClient //服务启动后自动注册到Eureka中 @EnableDiscoveryClient //开启服务发现 @EnableCircuitBreaker //开启熔断器支持 public class DeptProviserHystrix_8088 { public static void main(String[] args) { SpringApplication.run(DeptProviserHystrix_8088.class,args); } } 6、appliction.yml配置(此处以单个节点配置为例,实际开发中的微服务节点不止一个)server: port: 8088 #mybatis配置 mybatis: type-aliases-package: com.sw.springcloud.pojo config-location: classpath:mybatis/mybatis-config.xml mapper-locations: classpath:mybatis/mapper/*.xml #Spring配置 spring: application: name: springcloud-provider-dept datasource: type: com.alibaba.druid.pool.DruidDataSource driver-class-name: com.mysql.cj.jdbc.Driver url: jdbc:mysql://localhost:3306/db01?useUnicode=true&character=UFT-8 username: root password: 123456 #配置Eureka,配置服务注册到哪里 eureka: client: service-url: defaultZone: http://eureka7001.com:7001/eureka/,http://eureka7002.com:7002/eureka/,http://eureka7003.com:7003/eureka/ instance: instance-id: springcloud-provider_dept-hystrix_8088 #修改Eureka默认描述信息 #info配置 info: app.name: springcloud-demo company.name: suaxi 当整个微服务调用出现问题时,前端反馈给用户的信息不是错误代码,而是熔断后的备选方法中定义的信息(即快速返回出现错误的响应信息)。用户正常查询信息:查询数据库中不存在的信息,即服务调用出现异常:
-
Feign负载均衡 Feign负载均衡Feign是声明式的web service客户端,Spring Cloud集成了Ribbon和Eureka,可以在使用Feign时提供负载均衡的http客户端。相较于Ribbon,Feign通过创建接口和注解使用,即可完成对服务提供方的接口绑定,简化了使用Spring Cloud Ribbon时,自动封装服务调用客户端的开发量。具体实例:1、导入依赖<dependencies> <!--feign--> <dependency> <groupId>org.springframework.cloud</groupId> <artifactId>spring-cloud-starter-feign</artifactId> <version>1.4.7.RELEASE</version> </dependency> <!--Ribbon--> <dependency> <groupId>org.springframework.cloud</groupId> <artifactId>spring-cloud-starter-ribbon</artifactId> <version>1.4.7.RELEASE</version> </dependency> <!--Eureka--> <dependency> <groupId>org.springframework.cloud</groupId> <artifactId>spring-cloud-starter-eureka</artifactId> <version>1.4.7.RELEASE</version> </dependency> <dependency> <groupId>com.sw</groupId> <artifactId>springcloud-api</artifactId> <version>1.0-SNAPSHOT</version> </dependency> <dependency> <groupId>org.springframework.boot</groupId> <artifactId>spring-boot-starter-web</artifactId> </dependency> </dependencies>2、Controllerpackage com.sw.springcloud.controller; import com.sw.springcloud.pojo.Dept; import com.sw.springcloud.service.DeptClientService; import org.springframework.beans.factory.annotation.Autowired; import org.springframework.web.bind.annotation.PathVariable; import org.springframework.web.bind.annotation.RequestMapping; import org.springframework.web.bind.annotation.RestController; import org.springframework.web.client.RestTemplate; import java.util.List; /** * @Author suaxi * @Date 2020/12/28 22:16 */ @RestController public class DeptConsumerController { @Autowired private DeptClientService client; @RequestMapping(value = "/consumer/dept/add",produces = {"application/json;charset=UTF-8"}) public boolean add(Dept dept){ return this.client.addDept(dept); } @RequestMapping(value = "/consumer/dept/get/{id}",produces = {"application/json;charset=UTF-8"}) public Dept get(@PathVariable("id")Long id){ return this.client.findById(id); } @RequestMapping(value = "/consumer/dept/list",produces = {"application/json;charset=UTF-8"}) public List<Dept> list(){ return this.client.findAll(); } } 3、注册到Spring容器中package com.sw.springcloud.config; import org.springframework.cloud.client.loadbalancer.LoadBalanced; import org.springframework.context.annotation.Bean; import org.springframework.context.annotation.Configuration; import org.springframework.web.client.RestTemplate; /** * @Author suaxi * @Date 2020/12/28 22:15 */ @Configuration public class ConfigBean { @Bean @LoadBalanced //注册Ribbon public RestTemplate getRestTemplate(){ return new RestTemplate(); } } 4、SpringBoot启动类开启Feign注解package com.sw.springcloud; import org.springframework.boot.SpringApplication; import org.springframework.boot.autoconfigure.SpringBootApplication; import org.springframework.cloud.netflix.eureka.EnableEurekaClient; import org.springframework.cloud.openfeign.EnableFeignClients; import org.springframework.context.annotation.ComponentScan; /** * @Author suaxi * @Date 2020/12/28 22:29 */ @SpringBootApplication @EnableEurekaClient @EnableFeignClients(basePackages = {"com.sw.springcloud"}) public class FeignDeptConsumer_80 { public static void main(String[] args) { SpringApplication.run(FeignDeptConsumer_80.class,args); } }
-
Ribbon RibbonSpring Cloud Ribbon是基于NetFlix Ribbon实现的客户端负载均衡工具主要功能是提供客户端的软件负载均衡算法,将NetFlix的中间层服务连接在一起。在配置文件中列出LoadBalancer后面的所有机器,Ribbon会自动帮助你基于某些规则(轮询、随机数轮询、随机连接等)去连接这些服务。自定义算法:package com.sw.myrule; import com.netflix.client.config.IClientConfig; import com.netflix.loadbalancer.AbstractLoadBalancerRule; import com.netflix.loadbalancer.ILoadBalancer; import com.netflix.loadbalancer.Server; import java.util.List; import java.util.concurrent.ThreadLocalRandom; /** * @Author suaxi * @Date 2020/12/29 16:44 */ public class MyRandomRule extends AbstractLoadBalancerRule { //自定义算法:每个服务访问5次之后,换下一个 private int total = 0; //被调用的次数 private int currentIndex = 0; //当前是谁在提供服务 public Server choose(ILoadBalancer lb, Object key) { if (lb == null) { return null; } Server server = null; while (server == null) { if (Thread.interrupted()) { return null; } List<Server> upList = lb.getReachableServers(); //获取活着的服务 List<Server> allList = lb.getAllServers(); //获取所有服务 int serverCount = allList.size(); if (serverCount == 0) { return null; } // int index = chooseRandomInt(serverCount); //生成区间随机数 // server = upList.get(index); //从活着的服务中,随机获取一个 if (total<5){ server = upList.get(currentIndex); total++; }else { total = 0; currentIndex++; if (currentIndex>upList.size()){ currentIndex = 0; //当提供服务的人的执行次数大于活着的服务数量时,重置为0 } server = upList.get(currentIndex); //从或者的服务中来获取指定的服务 } if (server == null) { Thread.yield(); continue; } if (server.isAlive()) { return (server); } server = null; Thread.yield(); } return server; } protected int chooseRandomInt(int serverCount) { return ThreadLocalRandom.current().nextInt(serverCount); } @Override public Server choose(Object key) { return choose(getLoadBalancer(), key); } @Override public void initWithNiwsConfig(IClientConfig clientConfig) { // TODO Auto-generated method stub } } 注册到Spring容器中package com.sw.myrule; import com.netflix.loadbalancer.IRule; import com.netflix.loadbalancer.RoundRobinRule; import org.springframework.context.annotation.Bean; import org.springframework.context.annotation.Configuration; /** * @Author suaxi * @Date 2020/12/29 16:12 */ @Configuration public class TestRule { @Bean public IRule myRule(){ return new MyRandomRule(); } } package com.sw.springcloud.config; import org.springframework.cloud.client.loadbalancer.LoadBalanced; import org.springframework.context.annotation.Bean; import org.springframework.context.annotation.Configuration; import org.springframework.web.client.RestTemplate; /** * @Author suaxi * @Date 2020/12/28 22:15 */ @Configuration public class ConfigBean { //配置负载均衡实现RestTemplate //IRule //RoundRobinRule 轮询 //RandomRule 随机数 //AvailabilityFilteringRule 先过滤不可用的服务,对剩下的进行轮询 //RetryRule 先按照轮询获取服务,如果获取服务失败,则会在指定的时间内进行重试 @Bean @LoadBalanced //注册Ribbon public RestTemplate getRestTemplate(){ return new RestTemplate(); } } 开启自定义Ribbon注解package com.sw.springcloud; import com.sw.myrule.TestRule; import org.springframework.boot.SpringApplication; import org.springframework.boot.autoconfigure.SpringBootApplication; import org.springframework.cloud.netflix.eureka.EnableEurekaClient; import org.springframework.cloud.netflix.ribbon.RibbonClient; /** * @Author suaxi * @Date 2020/12/28 22:29 */ @SpringBootApplication @EnableEurekaClient //在微服务启动的时候加载自定义的Ribbon类 @RibbonClient(name = "SPRINGCLOUD-PROVIDER-DEPT",configuration = TestRule.class) public class DeptConsumer_80 { public static void main(String[] args) { SpringApplication.run(DeptConsumer_80.class,args); } }
-
Eureka Eureka1、什么是Eureka?Eureka是Netflix开发的服务发现框架,本身是一个基于REST的服务,主要用于定位运行在AWS域中的中间层服务,以达到负载均衡和中间层服务故障转移的目的。SpringCloud将它集成在其子项目spring-cloud-netflix中,以实现SpringCloud的服务发现功能。2、Eureka包含两个组件:Eureka Server和Eureka Client。Eureka Server提供注册服务Eureka Client是一个Java客户端,用于简化与Eureka Server的交互3、Eureka自我保护机制某时刻一个为服务不可用了,Eureka不会立刻清理该服务,依旧会对该服务的信息进行保存。一般情况下,EurekaServer与微服务实例之间存在心跳机制,节点默认90秒未收到微服务的心跳则会注销该实例;当EurekaServer在短时间内丢失过多的客户端,此时这个节点就会进入自我保护模式,保护服务注册表中的信息,不会注销任何微服务,直至故障恢复当节点收到的心跳重新恢复到阈值以上时,会自动退出自我保护机制在application.yml配置中可以添加eureka.server.enable-self-preservation = false禁用自我保护机制(不推荐)4、CAP理论C(Consistency):强一致性 A(Availability):可用性 P(Parition tolerance):分区容错性==一个分布式系统不可能同时满足一致性==NoSQL数据库分为CA、CP、AP三大类原则:CA:满足一致性、可用性,通常可扩展性较差CP:满足一致性,分区容错性的系统,通常性能不是特别高AP:满足可用性、分区容错性的系统,通常对一致性要求较低5、Zookeeper与EurekaZookeeper:(CP)当主节点因为网络故障或其他原因与节点失去联系时,剩余节点会进行leader选举,这个选举过程耗时较长,且在选举期间,整个集群都处于不可用状态Eureka:(AP)eureka各个节点都是平等的,只要有一个节点还在,就能保持服务注册与发现的可用性;如果在15分钟内超过85%的节点都没有正常的心跳,eureka就会认为客户端与注册中心出现了故障,会出现以下几种状况:不再从注册列表移除长时间没有收到心跳而应该过期的服务仍能接收新的服务注册与发现请求,但不会同步到其他节点上,以保证当前节点的可用性当网络稳定,故障恢复时,同步信息到其他EurekaServer节点
-
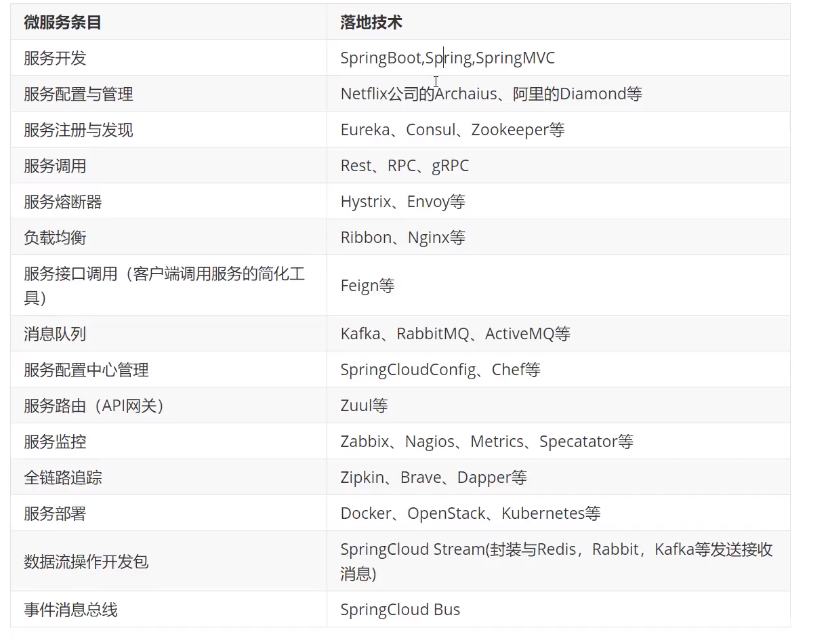
微服务 微服务1、什么是微服务?将传统的一站式应用,拆分为单个的服务,彻底去耦合,每一个微服务提供单个业务功能的服务,能够自行单独启动和销毁,拥有自己独立的数据库。2、微服务与微服务架构微服务强调服务的大小,它关注的是某一个点,即解决具体问题/提供对应服务的一个服务应用,类似于IDEA一个项目中的单个Moudel微服务架构强调架构模式,它提倡将单一应用程序划分成一组小的服务,服务之间互相协调,互相配合,且每个服务围绕着具体的业务进行构建,并且能被独立的部署到生产环境中。对具体的一个服务而言,应根据业务上下文,选择合适的语言,工具对其进行构建。3、现有的微服务解决方案(举例)Spring Cloud Netflix(一站式解决方案)API网关,Zuul组件Feign服务注册与发现:EurekaHystrix熔断机制Apache Dubbo Zookeeper第三方组件APIDubbo服务注册与发现:Zookeeper借助Hystrix熔断机制Spring Cloud Alibaba全家桶4、微服务优缺点优点:单一职责每个服务足够内聚,足够小,聚焦一个指定的业务功能或需求能够被2-5人的小团队单独开发耦合低,在开发或部署阶段都是独立的多语言开发易于和第三方集成,微服务允许容易且灵活的方式集成自动部署,通过持续集成工具,例如:jenkins、Hudson、bamboo微服务更多的是关注业务逻辑层面的代码,不会和前端混合每个微服务都有自己的存储能力,可以有自己的数据库,也可以有统一的数据库易于开发人员的理解,修改和维护……缺点:分布式系统较复杂多服务维护难度大、成本高系统部署依赖服务间通信成本数据一致性系统集成测试性能监控……微服务技术栈
-
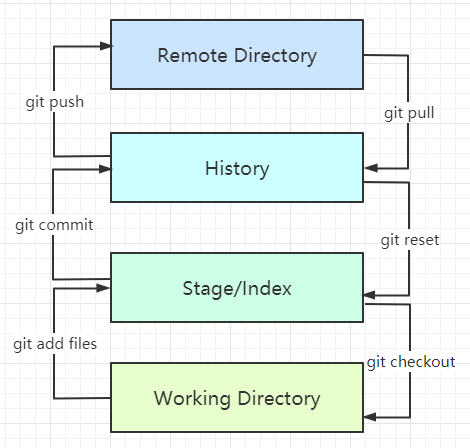
Git Git1、设置用户名、邮箱git config --global user.name "suaxi" #用户名 git config --global user.email xxx@qq.com #邮箱2、Git基本理论Git本地有三个工作区域:工作目录(Working Directory),暂存区(Stage/Index),资源区(Repository或Git Directory),另外还有远程仓库(Remote Directory)WorkSpace:工作区,平时存放代码的地方Index/Stage:暂存区(待提交更新区),临时存放改动过的文件,在提交进入repo之前,所有的更新都放在暂存区Repository:仓库区,安全存放数据的位置,这里有提交的所有历史版本,其中,HEAD指向提交到仓库的最新版本Remote:远程仓库,例如:GitHub、Gitee.git:存放git管理信息的目录,初始化仓库的时候自动创建Local Repo:本地仓库,存放在本地的版本库Stash:工作状态保存栈,用于保存/恢复WorkSpace中的临时状态3、搭建仓库1、初始化本地仓库#在需要创建仓库的文件夹执行 git init2、克隆远程仓库git clone https://github.com/xxx/xxx.git4、文件的四种状态Untracked:未跟踪,此文件在文件夹中,但并没有加入到git仓库,不参与版本控制,可以通过git add将状态变为stagedUnmodify:文件已经入库,未修改,版本库中的文件快照内容与文件夹完全一致。如果他被修改,状态变为Modified,如果使用git rm移除版本库,则变为Untracked文件Modified:文件已修改,但未进行其他操作。通过git add可以进入staged状态,也可以使用git checkout丢弃修改过的,返回到Unmodify状态,注:git checkout从库中取出文件,覆盖当前修改Staged:暂存状态,通过git commit可以将修改同步到库中,这时库中的文件与本地文件状态一致,状态为Unmodify。执行git reset HEAD filename可以取消暂存状态,此时文件状态为Modified查看文件状态#查看指定文件状态 git status filename #查看所有文件状态 git status #添加文件到暂存区 git add . #提交暂存区中的文件到本地仓库(必须加上注释) git commit -m "用户自定义的注释信息" 忽略文件IDEA新建项目时,会自动生成.gitignore文件,其中包含了项目打包或上传时需要忽略的文件#例: *.txt #忽略所有.txt结尾的文件 !test.txt #忽略test.txt除外的文件HELP.md target/ !.mvn/wrapper/maven-wrapper.jar !**/src/main/** !**/src/test/** ### STS ### .apt_generated .classpath .factorypath .project .settings .springBeans .sts4-cache ### IntelliJ IDEA ### .idea *.iws *.iml *.ipr ### NetBeans ### /nbproject/private/ /nbbuild/ /dist/ /nbdist/ /.nb-gradle/ build/ ### VS Code ### .vscode/ 5、Git分支#查看所有分支 git branch -r #新建一个分支(心在完成后依然停留在当前的文件目录下) git branch branch-name #新建一个分支并切换到新建的分支目录下 git branch -b branch-name #和并指定分支到当前分支 git merge branch-name #删除分支(注意与新建并切换分支区分) git branch -d branch-name #删除远程分支 git push origin --delete branch-name git branch -dr https://github.com/xxx/branch-name