
搜索到
463
篇与
的结果
-
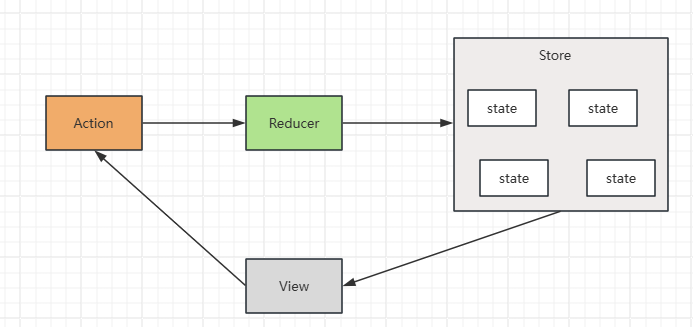
 React - Redux 1. 概念Redux 是 React 最常用的集中式状态管理工具,与 Vue 中的 Vuex、Pina 类似,可以独立于框架运行2. 快速上手计数器 demo定义 reducer 函数使用 createStore 方法传入 reducer 函数,生成 store 实例对象使用 store 实例的 subscribe 方法订阅数据的变化使用 store 实例的 dispatch 方法提交 action 对象,以此触发数据的变化(告诉 reducer 对数据的修改)使用 store 实例的 getState 方法获取最新的状态数据,更新视图<!doctype html> <html lang="en"> <head> <meta charset="UTF-8" /> <title>Redux Quick Start Demo</title> </head> <body> <button id="decrBtn">-</button> <span id="countSpan">0</span> <button id="incrBtn">+</button> </body> <script type="module"> import { legacy_createStore as createStore } from 'https://unpkg.com/redux@5.0.1/dist/redux.browser.mjs' // 1. 定义 reducer 函数 function reducer(state = { count: 0 }, action) { if (action.type === 'INCREMENT') { return { count: state.count + 1 } } if (action.type === 'DECREMENT') { return { count: state.count - 1 } } return state } // 2. 创建 store 实例对象 const store = createStore(reducer) // 3. 订阅数据变化 store.subscribe(() => { console.log('count update', store.getState()) // 5. 获取最新数据,更新状态 document.getElementById('countBtn').innerText = store.getState() }) // 4. 通过 dispatch 提交 action 更改状态 const decrBtn = document.getElementById('decrBtn') decrBtn.addEventListener('click', () => { store.dispatch({ type: 'DECREMENT' }) }) const incrBtn = document.getElementById('incrBtn') incrBtn.addEventListener('click', () => { store.dispatch({ type: 'INCREMENT' }) }) </script> </html> 管理数据的流程:state:存放管理的数据状态action:描述怎么修改数据reducer:(函数)根据 action 的表述生成一个新的 state3. 在 React 中使用 Redux(1)Redux Toolkit(RTK)RTK 是官方推荐的编写 Redux 逻辑的方式之一,是一套工具的集合,其作用如下:简化 store 配置内置 immer,支持可变式状态修改内置 thunk,便于异步的创建和使用(2)react-redux连接 Redux 和 React 组件的中间件(3)redux-demo包含:cli 脚手架 redux 计数器案例、提交 action 传参、异步状态操作https://github.com/suaxi/develop-relevant-notes/tree/main/front-end/React18/code/redux-demo
 -
React - 自定义Hook实现 1. 概念自定义 Hook 是以 use 开头的函数,通过它可以实现逻辑的封装和复用2. 案例未使用自定义 Hookimport { useState } from 'react' function App() { const [show, setShow] = useState(true) const toggle = () => { setShow(false) } return ( <div className="App"> {show && <div>this is App</div>} <button onClick={toggle}>按钮</button> </div> ) } export default App 使用自定义 Hookimport { useState } from 'react' function useToggle() { const [show, setShow] = useState(true) const toggle = () => { setShow(!show) } return { show, toggle } } function App() { const { show, toggle } = useToggle() return ( <div className="App"> {show && <div>this is App</div>} <button onClick={toggle}>按钮</button> </div> ) } export default App 3. 使用规则(1)只能在组件中或其他自定义 Hook 函数中调用(2)只能在组件得顶层调用,不能嵌套在 if、for、其他函数中
-
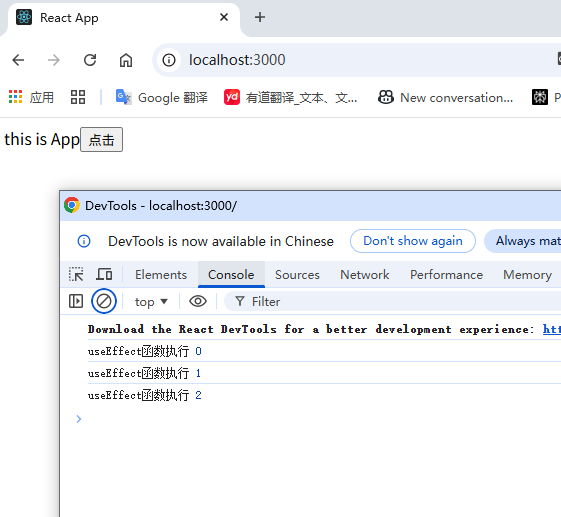
React - useEffect 1. 概念useEffect 是 React 的一个 Hook 函数,用于在 React 组件中创建不是由事件引起而是由渲染本身引起的操作,如:ajax请求,更改 DOM 等2. 基础使用语法:useEffect(() => {}, [])参数一:函数(副作用函数),可在函数内部放置要执行的操作参数二:数组(可选),数组中放置的是依赖项,不同依赖项会影响第一个参数(函数)的执行,当数组为空时,副作用函数只会在组件渲染完毕后执行一次import { useEffect, useState } from 'react' const URL = 'https://geek.itheima.net/v1_0/channels' function App() { const [list, setList] = useState([]) useEffect(() => { async function getChannels() { const res = await fetch(URL) const jsonRes = await res.json() console.log(jsonRes) setList(jsonRes.data.channels) } getChannels() }, []) return ( <div className="App"> this is App <ul> {list.map((item) => ( <li key={item.id}>{item.name}</li> ))} </ul> </div> ) } export default App 3. 依赖项参数说明依赖项副作用函数执行时机无组件初始渲染 + 组件更新时执行空数组只在组件渲染完毕后执行一次特定依赖项组件初始渲染 + 特定依赖项变化时执行(1)没有依赖项import { useEffect, useState } from 'react' function App() { const [count, setCount] = useState(0) useEffect(() => { console.log('useEffect函数执行', count) }) return ( <div className="App"> this is App <button onClick={() => setCount(count + 1)}>点击</button> </div> ) } export default App (2)空数组依赖import { useEffect, useState } from 'react' function App() { const [count, setCount] = useState(0) useEffect(() => { console.log('useEffect函数执行', count) }, []) return ( <div className="App"> this is App <button onClick={() => setCount(count + 1)}>点击</button> </div> ) } export default App (3)特定依赖项import { useEffect, useState } from 'react' function App() { const [count, setCount] = useState(0) useEffect(() => { console.log('useEffect函数执行', count) }, [count]) return ( <div className="App"> this is App <button onClick={() => setCount(count + 1)}>点击</button> </div> ) } export default App 4. 清除副作用概念:在 useEffect 中编写的由渲染本身引起的对接组件外部的操作,就称为副作用操作,如:useEffect 中设置了一个定时器,在组件卸载时想清除定时器,这个过程就是清理副作用语法:useEffect(() => { // 业务逻辑 return () => { // 清除副作用 } }, [])执行时机:一般情况下在组件卸载时执行import { useEffect, useState } from 'react' function Son() { useEffect(() => { const timer = setInterval(() => { console.log('执行定时器') }, 1000) return () => { clearInterval(timer) } }, []) return <div>Son Compent</div> } function App() { const [show, setShow] = useState(true) return ( <div className="App"> this is App {show && <Son />} <button onClick={() => setShow(false)}>卸载Son组件</button> </div> ) } export default App
-
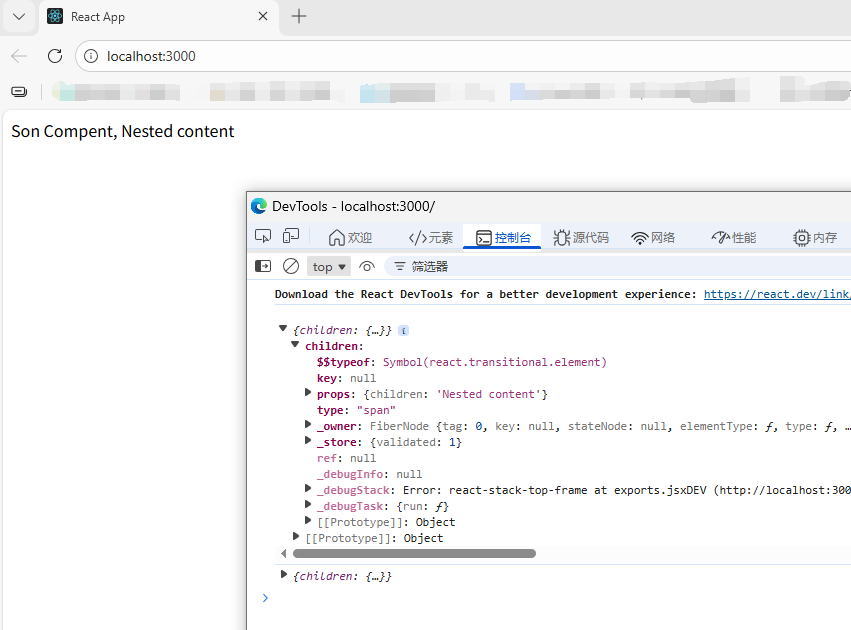
React - 组件间通信 1. 概念组件之间的数据传递2. 父传子(1)实现步骤:父组件传递数据:在子组件标签上绑定属性子组件接收数据:子组件通过 props 参数接收数据function Son(props) { return <div>{props.name}</div> } function App() { const name = '孙笑川' return ( <div className="App"> <Son name={name} /> </div> ) } export default App (2)props 说明props 可传递任意类型的数据数字、字符串、布尔值、数组、对象、函数、JSXprops 是只读对象子组件只能读取 props 中的数据,不能直接修改(即父组件的数据只能由父组件修改)3. props children当我们把内容嵌套在子组件标签中时,父组件会自动在名为 children 的 prop属性中接收该内容function Son(props) { console.log(props) return <div>Son Compent, {props.children}</div> } function App() { return ( <div className="App"> <Son> <span>Nested content</span> </Son> </div> ) } export default App 4. 子传父在子组件中调用父组件中的函数并传递参数import { useState } from 'react' function Son({ getMsg }) { const data = '孙笑川' return ( <div> Son Compent <button onClick={() => getMsg(data)}>点一下</button> </div> ) } function App() { const [msg, setMsg] = useState('') const getMsg = (msg) => { setMsg(msg) console.log('son compent transmit data:', msg) } return ( <div className="App"> This is React Demo, {msg} <Son getMsg={getMsg} /> </div> ) } export default App 5. 兄弟组件通信借助“状态提示”机制,通过父组件进行兄弟组件间的数据传递A 组件子传父父组件父传子给 B 组件import { useState } from 'react' function A({ getAData }) { const data = 'a compent data' return ( <div> <p>Son A Compent</p> <button onClick={() => getAData(data)}>A Compent</button> </div> ) } function B(props) { return <p>Son B Compent, {props.data}</p> } function App() { const [data, setData] = useState('') const getAData = (data) => { setData(data) console.log(data) } return ( <div className="App"> <A getAData={getAData} /> <B data={data} /> </div> ) } export default App 6. 使用 Context 机制跨层级组件通信实现步骤:使用 createContext 方法创建 Ctx 上下文对象在顶层组件(App)中通过 Ctx.provider 组件提供数据在底层组件中通过 useContext 钩子函数获取消费数据import { createContext, useContext } from 'react' const Ctx = createContext() function A() { return ( <div> <p>Son A Compent</p> </div> ) } function B() { const data = useContext(Ctx) return <p>Son B Compent, {data}</p> } function App() { const data = 'App data' return ( <div className="App"> <Ctx value={data}> this is App <A /> <B /> </Ctx> </div> ) } export default App
-
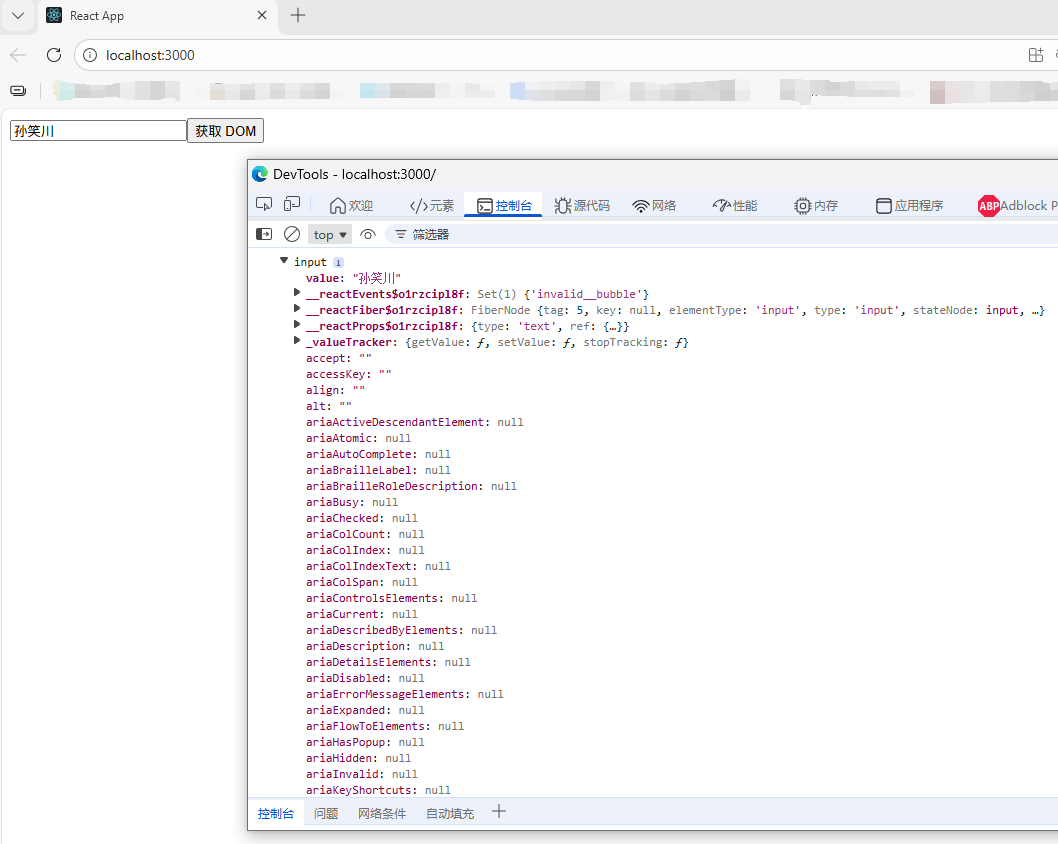
React - classnames 优化类名控制、受控表单绑定、获取 DOM classnames 优化类名控制该库可以通过条件动态控制 class 类名的显示,github:https://github.com/JedWatson/classnames1. 安装npm install classnames2. 使用import classNames from 'classnames' <li className="nav-sort"> {tabs.map((item) => ( <span key={item.type} className={classNames('nav-item', { active: type === item.type })} onClick={() => tabChangeHandler(item.type)} > {item.text} </span> ))} </li>受控表单绑定概念:使用 useState 控制表单的状态import { useState } from 'react' function App() { // 1. 通过 value 属性绑定 react 状态 const [inputVal, setInputVal] = useState('') // 2. 绑定 onChange 事件,通过事件参数(即输入框最新的值)反向修改 react 状态 return ( <div className="App"> <input type="text" value={inputVal} onChange={(e) => setInputVal(e.target.value)} ></input> </div> ) } export default App 获取 DOM通过 useRef 钩子函数实现:使用 useRef 创建 ref 对象在 DOM 可用时,通过创建的 xxxRef.current 拿到 DOM 对象import { useRef } from 'react' function App() { const inputRef = useRef(null) // 组件渲染完毕后获取 DOM const getDom = () => { console.dir(inputRef.current) } return ( <div className="App"> <input type="text" ref={inputRef}></input> <button onClick={getDom}>获取 DOM</button> </div> ) } export default App
-
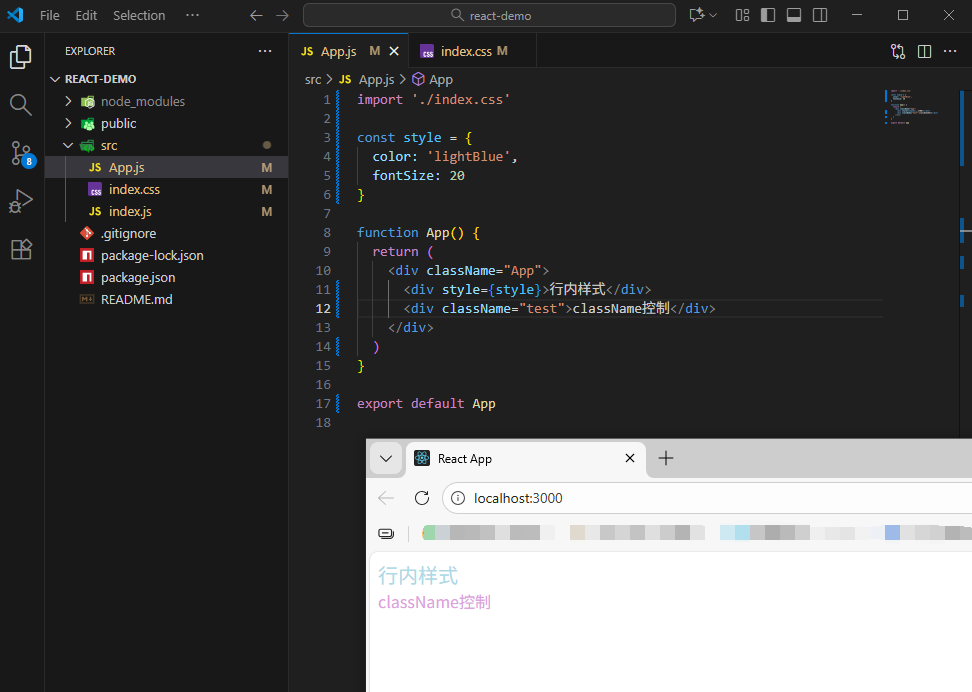
React - 组件的样式处理 1. 内联样式(不推荐)<div style={{ color='red' }}>测试</div>2. class 类名控制.App { color: red }import './index.css' function App() { return ( <div className="App">测试</div> ) } export default App 3. 示例.test { color: plum; }import './index.css' const style = { color: 'lightBlue', fontSize: 20 } function App() { return ( <div className="App"> <div style={style}>行内样式</div> <div className="test">行内样式</div> </div> ) } export default App
-
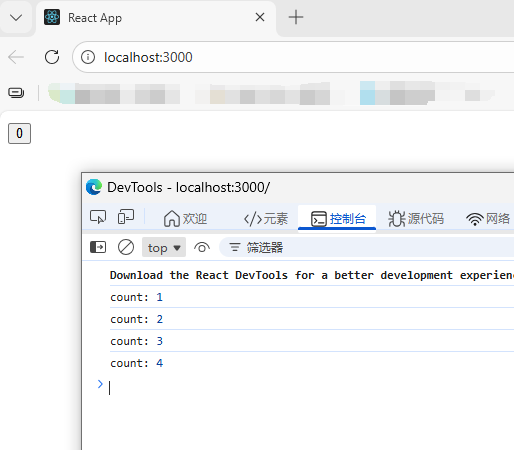
React - useState 1. 基础使用useState 是 React 中的一个 Hook 函数,它允许我们向组件添加一个状态变量,从而控制/影响组件的渲染结果,注:状态变量一旦发生变化,组件的视图 UI 也会同步变化(数据驱动视图)// useState import { useState } from 'react' function App() { // 1. 调用 useState 添加状态变量 // count 状态变量 // setCount 修改状态变量的方法 const [count, setCount] = useState(0) // 2. 点击事件回调 const clickHandler = () => { setCount(count + 1) } return ( <div className="App"> <button onClick={clickHandler}>{count}</button> </div> ) } export default App 2. 修改状态的规则(1)状态不可变在 React 中,状态被认为是只读的,应秉持“替换它而不是修改它”的原则,直接修改状态不会触发视图的更新import { useState } from 'react' function App() { let [count, setCount] = useState(0) const clickHandler = () => { // setCount(count + 1) // 直接修改,值变化了,但不会触发视图的更新 count++ console.log('count:', count) } return ( <div className="App"> <button onClick={clickHandler}>{count}</button> </div> ) } export default App (2)修改对象状态对于对象类型的状态变量,应该始终传给 set 方法一个全新的对象来进行修改import { useState } from 'react' function App() { // 修改对象 const [form, setForm] = useState({ name: '孙笑川', age: 33 }) const changeForm = () => { setForm({ ...form, name: '药水哥', age: '30' }) } return ( <div className="App"> <p>姓名:{form.name}</p> <p>年龄:{form.age}</p> <button onClick={changeForm}>修改对象</button> </div> ) } export default App
-