搜索到
486
篇与
的结果
-
 NIO基础 - 网络编程 4. 网络编程4.1 阻塞模式单线程模式下,阻塞方法之间存在互相影响ServerSocketChannel.accept() 方法会在没有连接建立时阻塞SocketChannel.read() 在没有可读数据时阻塞Severpackage com.sw.netty._04.block; import lombok.extern.slf4j.Slf4j; import java.io.IOException; import java.net.InetSocketAddress; import java.nio.ByteBuffer; import java.nio.channels.ServerSocketChannel; import java.nio.channels.SocketChannel; import java.util.ArrayList; import java.util.List; import static utils.ByteBufferUtil.debugAll; @Slf4j public class Server { public static void main(String[] args) throws IOException { ByteBuffer bf = ByteBuffer.allocate(16); ServerSocketChannel ssc = ServerSocketChannel.open(); ssc.bind(new InetSocketAddress(8088)); List<SocketChannel> channelList = new ArrayList<>(); while (true) { log.info("connecting..."); SocketChannel channel = ssc.accept(); log.info("connected - [{}]", channel); channelList.add(channel); for (SocketChannel sc : channelList) { log.info("before read - [{}]", channel); sc.read(bf); bf.flip(); debugAll(bf); bf.clear(); log.info("after read - [{}]", channel); } } } } Clientpackage com.sw.netty._04.block; import lombok.extern.slf4j.Slf4j; import java.io.IOException; import java.net.InetSocketAddress; import java.nio.channels.SocketChannel; @Slf4j public class Client { public static void main(String[] args) throws IOException { SocketChannel sc = SocketChannel.open(); sc.connect(new InetSocketAddress("localhost", 8088)); log.info("waiting..."); } } 4.2 非阻塞模式非阻塞模式下,相关方法的线程不会阻塞ServerSocketChannel.accept() 方法会在没有连接建立时返回 null,继续运行SocketChannel.read() 在没有可读数据时返回 0写数据时,数据写入 Channel 后,线程即可继续运行,无需等待 Channel 通过网络把数据发送出去或发送完但非阻塞模式下,即使没有新的连接建立、可读数据,线程仍在运行;且数据复的制过程线程是阻塞的Severpackage com.sw.netty._04.nonBlock; import lombok.extern.slf4j.Slf4j; import java.io.IOException; import java.net.InetSocketAddress; import java.nio.ByteBuffer; import java.nio.channels.ServerSocketChannel; import java.nio.channels.SocketChannel; import java.util.ArrayList; import java.util.List; import static utils.ByteBufferUtil.debugAll; @Slf4j public class Server { public static void main(String[] args) throws IOException { ByteBuffer bf = ByteBuffer.allocate(16); ServerSocketChannel ssc = ServerSocketChannel.open(); // 切换为非阻塞模式 ssc.configureBlocking(false); ssc.bind(new InetSocketAddress(8088)); List<SocketChannel> channelList = new ArrayList<>(); while (true) { SocketChannel channel = ssc.accept(); if (channel != null) { log.info("connected - [{}]", channel); // 切换为非阻塞模式 channel.configureBlocking(false); channelList.add(channel); } for (SocketChannel sc : channelList) { if (sc.read(bf) > 0) { bf.flip(); debugAll(bf); bf.clear(); log.info("after read - [{}]", channel); } } } } } Clientpackage com.sw.netty._04.nonBlock; import lombok.extern.slf4j.Slf4j; import java.io.IOException; import java.net.InetSocketAddress; import java.nio.channels.SocketChannel; @Slf4j public class Client { public static void main(String[] args) throws IOException { SocketChannel sc = SocketChannel.open(); sc.connect(new InetSocketAddress("localhost", 8088)); log.info("waiting..."); } } 4.3 多路复用概念:单线程配合 Selector 完成对多个 Channel 可读、可写事件的监听仅针对网络 IO、文件 IO 操作无法使用多路复用Selector 的作用:有可连接事件时建立连接有可读事件时执行读取操作有可写事件时执行写入操作注:Channel 不一定时时可写,当 Channel 可写时,则会触发 Selector 的可写事件4.4 Selector与 Selector 协作的线程可以监听多个 Channel,当事件发生时才去处理对应的事件,此时的线程可被充分利用,同时也节约的线程的数量,减少了线程间的上下文切换(1)创建Selector selector = Selector.open();(2)绑定 Channel 事件(注册)Selector selector = Selector.open(); ServerSocketChannel ssc = ServerSocketChannel.open(); // 切换为非阻塞模式 ssc.configureBlocking(false); // 注册 Channel SelectionKey sscKey = ssc.register(selector, 0, null);注:Channel 必须以非阻塞模式运行绑定的事件类型如下:accept:有连接请求时触发connection:(客户端)连接建立后触发read:读事件write:写事件(3)监听 Channel 事件// 方式一:阻塞直到绑定事件发生 int count = selector.select(); // 方式二:阻塞到超时时间(ms)或绑定事件发生 int count = selector.select(long timeout); // 方式三:selector 立即返回,后续流程根据返回值检查是否有事件发生 int count = selector.selectNow();(4)selector 何时不阻塞发生对应事件时:accept 事件 - 客户端发起连接请求read 事件 - 客户端发送数据、正常/异常关闭(当客户端发送的数据过大,服务端无法一次处理完时,会触发多次读取事件)write 事件 - channel 当前状态可写出数据调用 selector.wakeup()调用 selector.close()selector 所在的线程中断4.5 处理 accept 事件package com.sw.netty._04.selector; import lombok.extern.slf4j.Slf4j; import java.io.IOException; import java.net.InetSocketAddress; import java.nio.ByteBuffer; import java.nio.channels.*; import java.util.ArrayList; import java.util.Iterator; import java.util.List; import static utils.ByteBufferUtil.debugAll; @Slf4j public class Server { public static void main(String[] args) throws IOException { // 1. Selector Selector selector = Selector.open(); ByteBuffer bf = ByteBuffer.allocate(16); ServerSocketChannel ssc = ServerSocketChannel.open(); // 切换为非阻塞模式 ssc.configureBlocking(false); // 2. 注册 Channel /** * 通过 SelectionKey,可以知道发生的事件和发生事件的 Channel * 事件类型: * accept:有连接请求时触发 * connection:(客户端)连接建立后触发 * read:读事件 * write:写事件 */ SelectionKey sscKey = ssc.register(selector, 0, null); // sscKey 只关注 accept 事件 sscKey.interestOps(SelectionKey.OP_ACCEPT); log.info("register channel key-[{}]", sscKey); ssc.bind(new InetSocketAddress(8088)); while (true) { // 3. select 方法,没有事件发生或事件取消时,线程阻塞,否则反之 selector.select(); // 4. 处理事件 Iterator<SelectionKey> iterator = selector.selectedKeys().iterator(); while (iterator.hasNext()) { SelectionKey key = iterator.next(); // 处理完事件后,需要显式删除对应的key(事件处理完了,但 Selector 不会删除对应的key) iterator.remove(); // 5. 区分事件类型 if (key.isAcceptable()) { log.info("Deal Accept Event"); ServerSocketChannel channel = (ServerSocketChannel) key.channel(); SocketChannel sc = channel.accept(); sc.configureBlocking(false); SelectionKey scKey = sc.register(selector, 0, null); scKey.interestOps(SelectionKey.OP_READ); } } } } } 注:当事件发生后,要么处理,要么取消,如果什么都不做,下次该事件还会触发4.6 处理 read 事件(1)演示 Demopackage com.sw.netty._04.selector; import lombok.extern.slf4j.Slf4j; import java.io.IOException; import java.net.InetSocketAddress; import java.nio.ByteBuffer; import java.nio.channels.*; import java.util.ArrayList; import java.util.Iterator; import java.util.List; import static utils.ByteBufferUtil.debugAll; @Slf4j public class Server { public static void main(String[] args) throws IOException { // 1. Selector Selector selector = Selector.open(); ByteBuffer bf = ByteBuffer.allocate(16); ServerSocketChannel ssc = ServerSocketChannel.open(); // 切换为非阻塞模式 ssc.configureBlocking(false); // 2. 注册 Channel /** * 通过 SelectionKey,可以知道发生的事件和发生事件的 Channel * 事件类型: * accept:有连接请求时触发 * connection:(客户端)连接建立后触发 * read:读事件 * write:写事件 */ SelectionKey sscKey = ssc.register(selector, 0, null); // sscKey 只关注 accept 事件 sscKey.interestOps(SelectionKey.OP_ACCEPT); log.info("register channel key-[{}]", sscKey); ssc.bind(new InetSocketAddress(8088)); while (true) { // 3. select 方法,没有事件发生或事件取消时,线程阻塞,否则反之 selector.select(); // 4. 处理事件 Iterator<SelectionKey> iterator = selector.selectedKeys().iterator(); while (iterator.hasNext()) { SelectionKey key = iterator.next(); // 处理完事件后,需要显式删除对应的key(事件处理完了,但 Selector 不会删除对应的key) iterator.remove(); // 5. 区分事件类型 if (key.isAcceptable()) { log.info("Deal Accept Event"); ServerSocketChannel channel = (ServerSocketChannel) key.channel(); SocketChannel sc = channel.accept(); sc.configureBlocking(false); SelectionKey scKey = sc.register(selector, 0, null); scKey.interestOps(SelectionKey.OP_READ); } if (key.isReadable()) { try { log.info("Deal Read Event"); SocketChannel channel = (SocketChannel) key.channel(); ByteBuffer readBf = ByteBuffer.allocate(16); if (-1 != channel.read(readBf)) { readBf.flip(); debugAll(readBf); } else { // 处理客户端读事件结束,正常断开 log.info("Client - [{}] close", key); key.cancel(); } } catch (IOException e) { // 对发生异常的事件取消注册(从 Selector key 集合中移除) // 如:客户端关闭主动断开连接 key.cancel(); e.printStackTrace(); } } } } } } (2)iterator.remove() 解释当 selector 事件发生后,会将对应的 key 存入 selectedKeys 集合,但在事件处理完后并不会删除对应的 key,需要显式删除处理,如:第一次触发 accept 事件,处理完后,下一次循环再进来,key.isAcceptable() 判断为真,进入对应的判断后 channel.accept() 值为空(此时并不是 accept 事件),触发空指针异常(3)cancel 的作用取消注册在 selector 上的 channel,并从 SelectionKeys 集合中删除对应的事件 key4.7 处理消息边界固定消息长度(数据包大小一样),但是在一定程度上会浪费带宽按分隔符拆分,效率低TLV 格式,即:Type 类型、Length 长度、Value 数据,在消息类型和长度已知的情况下,就可以方便的获取消息的大小,以此分配 buffer;需要提前分配 buffer,如果内容过大,会对 server 的吞吐量造成影响HTTP 1.0 TLV 格式HTTP 2.0 LTV 格式(1)此处以按分隔符拆分为例:Serverpackage com.sw.netty._04.msgBoundary; import lombok.extern.slf4j.Slf4j; import java.io.IOException; import java.net.InetSocketAddress; import java.nio.ByteBuffer; import java.nio.channels.SelectionKey; import java.nio.channels.Selector; import java.nio.channels.ServerSocketChannel; import java.nio.channels.SocketChannel; import java.util.Iterator; import static utils.ByteBufferUtil.debugAll; @Slf4j public class Server { public static void main(String[] args) throws IOException { // 1. Selector Selector selector = Selector.open(); ByteBuffer bf = ByteBuffer.allocate(16); ServerSocketChannel ssc = ServerSocketChannel.open(); // 切换为非阻塞模式 ssc.configureBlocking(false); // 2. 注册 Channel /** * 通过 SelectionKey,可以知道发生的事件和发生事件的 Channel * 事件类型: * accept:有连接请求时触发 * connection:(客户端)连接建立后触发 * read:读事件 * write:写事件 */ SelectionKey sscKey = ssc.register(selector, 0, null); // sscKey 只关注 accept 事件 sscKey.interestOps(SelectionKey.OP_ACCEPT); log.info("register channel key-[{}]", sscKey); ssc.bind(new InetSocketAddress(8088)); while (true) { // 3. select 方法,没有事件发生或事件取消时,线程阻塞,否则反之 selector.select(); // 4. 处理事件 Iterator<SelectionKey> iterator = selector.selectedKeys().iterator(); while (iterator.hasNext()) { SelectionKey key = iterator.next(); // 处理完事件后,需要显式删除对应的key(事件处理完了,但 Selector 不会删除对应的key) iterator.remove(); // 5. 区分事件类型 if (key.isAcceptable()) { log.info("Deal Accept Event"); ServerSocketChannel channel = (ServerSocketChannel) key.channel(); SocketChannel sc = channel.accept(); sc.configureBlocking(false); ByteBuffer readBf = ByteBuffer.allocate(16); // 将 readBf 作为附件关联到事件 key 上 // 将 readBf 的生命周期提升到与 SelectionKey 平级 SelectionKey scKey = sc.register(selector, 0, readBf); scKey.interestOps(SelectionKey.OP_READ); } if (key.isReadable()) { try { log.info("Deal Read Event"); SocketChannel channel = (SocketChannel) key.channel(); ByteBuffer readBf = (ByteBuffer) key.attachment(); if (-1 != channel.read(readBf)) { split(readBf); // 当传输的内容超过 readbf 初始容量时,需进行扩容 if (readBf.position() == readBf.limit()) { ByteBuffer newReadBf = ByteBuffer.allocate(readBf.capacity() * 2); readBf.flip(); newReadBf.put(readBf); key.attach(newReadBf); } } else { // 处理客户端读事件结束,正常断开 log.info("Client - [{}] close", key); key.cancel(); } } catch (IOException e) { // 对发生异常的事件取消注册(从 Selector key 集合中移除) // 如:客户端关闭主动断开连接 key.cancel(); e.printStackTrace(); } } } } } private static void split(ByteBuffer source) { source.flip(); for (int i = 0; i < source.limit(); i++) { if ('\n' == source.get(i)) { int length = i + 1 - source.position(); ByteBuffer target = ByteBuffer.allocate(length); // 从 source 读,向 target 写 for (int j = 0; j < length; j++) { target.put(source.get()); } debugAll(target); } } // 此处不使用 clear,需使用 compact 将剩余未读的部分向前移动 source.compact(); } } Clientpackage com.sw.netty._04.msgBoundary; import lombok.extern.slf4j.Slf4j; import java.io.IOException; import java.net.InetSocketAddress; import java.nio.channels.SocketChannel; import java.nio.charset.Charset; @Slf4j public class Client { public static void main(String[] args) throws IOException { SocketChannel sc = SocketChannel.open(); sc.connect(new InetSocketAddress("localhost", 8088)); sc.write(Charset.defaultCharset().encode("012\n0123456789abcdefyao\n")); sc.write(Charset.defaultCharset().encode("0123456789abcdefsunxiaochuan\nyaoshuige\n")); sc.close(); } } 4.8 ByteBuffer 大小分配每个 Channel 都需要记录可能被切分的消息,因为 ByteBuffer 不能被多个 Channel 共享,需要独立维护ByteBuffer 不能太大,需要可变:思路一:先分配一个小的 buffer,不够的时候再进行扩容,优点是消息连续存储,缺点是数据拷贝存在一定的性能损耗思路二:用数组维护 buffer,可以避免数据拷贝产生的性能损耗,但消息存储不连续4.9 处理 write 事件此处以写入内容过多问题(一次性发送数据)为例:Serverpackage com.sw.netty._04.writeableEvents; import java.io.IOException; import java.net.InetSocketAddress; import java.nio.ByteBuffer; import java.nio.channels.SelectionKey; import java.nio.channels.Selector; import java.nio.channels.ServerSocketChannel; import java.nio.channels.SocketChannel; import java.nio.charset.Charset; import java.util.Iterator; import java.util.UUID; public class Server { public static void main(String[] args) throws IOException { ServerSocketChannel ssc = ServerSocketChannel.open(); ssc.configureBlocking(false); Selector selector = Selector.open(); ssc.register(selector, SelectionKey.OP_ACCEPT); ssc.bind(new InetSocketAddress(8088)); while (true) { selector.select(); Iterator<SelectionKey> iterator = selector.selectedKeys().iterator(); while (iterator.hasNext()) { SelectionKey key = iterator.next(); iterator.remove(); if (key.isAcceptable()) { SocketChannel sc = ssc.accept(); sc.configureBlocking(false); // 1. 向客户端发送大量数据 StringBuilder sb = new StringBuilder(); for (int i = 0; i < 999999; i++) { sb.append(UUID.randomUUID().toString().replace("-", "")); } ByteBuffer bf = Charset.defaultCharset().encode(sb.toString()); while (bf.hasRemaining()) { int write = sc.write(bf); System.out.println("发送:" + write + " 字节数据"); } } } } } } Clientpackage com.sw.netty._04.writeableEvents; import java.io.IOException; import java.net.InetSocketAddress; import java.nio.ByteBuffer; import java.nio.channels.SocketChannel; public class Client { public static void main(String[] args) throws IOException { SocketChannel sc = SocketChannel.open(); sc.connect(new InetSocketAddress("localhost", 8088)); int count = 0; while (true) { ByteBuffer bf = ByteBuffer.allocate(1024 * 1024); count += sc.read(bf); System.out.println("接收到:" + count + " 字节数据"); } } } 改进优化:Serverpackage com.sw.netty._04.writeableEvents; import java.io.IOException; import java.net.InetSocketAddress; import java.nio.ByteBuffer; import java.nio.channels.SelectionKey; import java.nio.channels.Selector; import java.nio.channels.ServerSocketChannel; import java.nio.channels.SocketChannel; import java.nio.charset.Charset; import java.util.Iterator; import java.util.UUID; public class Server { public static void main(String[] args) throws IOException { ServerSocketChannel ssc = ServerSocketChannel.open(); ssc.configureBlocking(false); Selector selector = Selector.open(); ssc.register(selector, SelectionKey.OP_ACCEPT); ssc.bind(new InetSocketAddress(8088)); while (true) { selector.select(); Iterator<SelectionKey> iterator = selector.selectedKeys().iterator(); while (iterator.hasNext()) { SelectionKey key = iterator.next(); iterator.remove(); if (key.isAcceptable()) { SocketChannel sc = ssc.accept(); sc.configureBlocking(false); SelectionKey scKey = sc.register(selector, 0, null); scKey.interestOps(SelectionKey.OP_READ); // 1. 向客户端发送大量数据 StringBuilder sb = new StringBuilder(); for (int i = 0; i < 999999; i++) { sb.append(UUID.randomUUID().toString().replace("-", "")); } ByteBuffer bf = Charset.defaultCharset().encode(sb.toString()); int write = sc.write(bf); System.out.println("OP_READ - 发送:" + write + " 字节数据"); // 2. 判断是否有剩余内容 if (bf.hasRemaining()) { // 3. 关注可写事件(在原关注事件的基础上,需额外关注写事件) scKey.interestOps(scKey.interestOps() + SelectionKey.OP_WRITE); // scKey.interestOps(scKey.interestOps() | SelectionKey.OP_WRITE); // 4. 将未写完的数据挂载到 scKey 上 scKey.attach(bf); } } if (key.isWritable()) { ByteBuffer bf = (ByteBuffer) key.attachment(); SocketChannel sc = (SocketChannel) key.channel(); int write = sc.write(bf); System.out.println("OP_WRITE - 发送:" + write + " 字节数据"); // 5. 关闭资源 if (!bf.hasRemaining()) { // 清除挂载的 buffer key.attach(null); // 清除关注的事件 key.interestOps(key.interestOps() - SelectionKey.OP_WRITE); } } } } } } 注:当 channel 发送数据,且 socket 缓冲区可写时,对应的事件会频繁发生,故需要在 socket 缓冲区写不下时再关注写事件,写完之后需要取消关注Clientpackage com.sw.netty._04.writeableEvents; import lombok.extern.slf4j.Slf4j; import java.io.IOException; import java.net.InetSocketAddress; import java.nio.ByteBuffer; import java.nio.channels.SelectionKey; import java.nio.channels.Selector; import java.nio.channels.SocketChannel; import java.util.Iterator; @Slf4j public class Client { public static void main(String[] args) throws IOException { Selector selector = Selector.open(); SocketChannel sc = SocketChannel.open(); sc.configureBlocking(false); sc.register(selector, SelectionKey.OP_CONNECT | SelectionKey.OP_READ); sc.connect(new InetSocketAddress("localhost", 8088)); int count = 0; while (true) { selector.select(); Iterator<SelectionKey> iterator = selector.selectedKeys().iterator(); while (iterator.hasNext()) { SelectionKey key = iterator.next(); iterator.remove(); if (key.isConnectable()) { log.info("key [{}] connected", key); sc.finishConnect(); } if (key.isReadable()) { ByteBuffer bf = ByteBuffer.allocate(1024 * 1024); count += sc.read(bf); bf.clear(); System.out.println("接收到:" + count + " 字节数据"); } } } } }
 -
NIO基础 - 文件编程 3. 文件编程3.1 FileChannelFileChannel 只能工作在阻塞模式下(1)获取通过 FileInputStream(读)、FileOutputStream(写)、RandomAccessFile(根据指定的模式决定读或写) 的 getChannel() 方法获取(2)读取// 返回值表示读取的字节,-1 表示读取到了文件的末尾 int readBytes = channel.read(bf);(3)写入ByteBuffer bf = ByteBuffer.allcate(16); bf.put(...); bf.flip(); // 后续还有值则继续写入,channel.write() 方法不一定能一次写完全部内容 while (bf.hasRemaining()) { channel.write(bf); }(4)关闭channel 使用完后必须关闭,可以使用 try-with-resources 语法糖或手动关闭 channel.close()(5)获取当前位置// 获取位置 long position = channel.position(); // 设置指定下标索引位置 channel.position(123);如果设置为文件末尾:这时进行读取,返回值为 -1执行写入时,会进行追加,如果 position 超过了文件末尾,新内容和原末尾之间会产生空洞(00)(6)大小channel.size();(7)强制写入写入的数据在操作系统的管理下并不是立刻写入磁盘,而是先到缓存中,可以通过 channel.force(true) 方法将文件内容和元数据进行立即写入3.2 两个 Channel 传输数据package com.sw.netty._01; import java.io.FileOutputStream; import java.net.URL; import java.nio.channels.FileChannel; import java.nio.file.Paths; public class FileChannelTransferToTest { public static void main(String[] args) { URL resource = ScatteringReadsTest.class.getClassLoader().getResource("ByteBufferTest.txt"); if (resource == null) { throw new IllegalArgumentException("resource not found: ScatteringReadsTest.txt"); } // try (FileChannel from = FileChannel.open(Paths.get(resource.toURI())); // FileChannel to = new FileOutputStream("FileChannelTransferTo.txt").getChannel()) { // // transferTo 一次最多传输 2G 的数据 // from.transferTo(0, from.size(), to); // } catch (Exception e) { // e.printStackTrace(); // } try (FileChannel from = FileChannel.open(Paths.get(resource.toURI())); FileChannel to = new FileOutputStream("FileChannelTransferTo.txt").getChannel()) { // 传输大于 2G 的文件 long size = from.size(); for (long left = size; left > 0; ) { left -= from.transferTo((size - left), left, to); } } catch (Exception e) { e.printStackTrace(); } } }
-
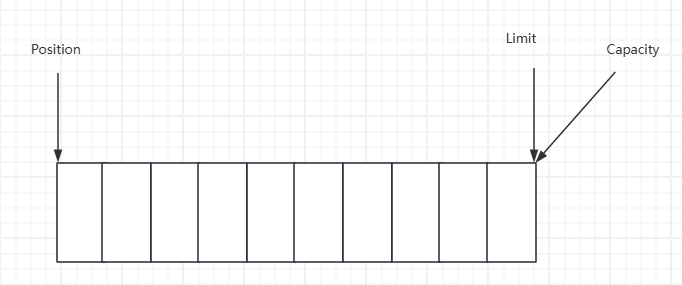
NIO基础 - ByteBuffer 2. ByteBuffer2.1 基本使用package com.sw.netty._01; import lombok.extern.slf4j.Slf4j; import java.io.IOException; import java.io.InputStream; import java.nio.ByteBuffer; import java.nio.channels.Channels; import java.nio.channels.ReadableByteChannel; @Slf4j public class ByteBufferTest { public static void main(String[] args) { try (InputStream is = ByteBufferTest.class.getClassLoader().getResourceAsStream("ByteBufferTest.txt")) { if (is == null) { throw new IllegalArgumentException("resource not found: ByteBufferTest.txt"); } try (ReadableByteChannel channel = Channels.newChannel(is)) { // 准备缓冲区 ByteBuffer bf = ByteBuffer.allocate(10); // 从 channel 读数据,写入 buffer int len = channel.read(bf); log.info("读取到的字节数:{}", len); // 切换为读模式 bf.flip(); while (bf.hasRemaining()) { byte b = bf.get(); log.info("读取到的字节:{}", (char) b); } // 切换为写模式 bf.clear(); } } catch (IOException e) { e.printStackTrace(); } } } 执行流程:向 buffer 写入数据, channel.read(buffer)调用 flip() 切换至读模式从 buffer 读数据,buffer.get()调用 clear() 或 compact() 切换至写模式重复步骤 1 - 42.2 结构buffer 包含的属性有:capacity、position、limit开始:写模式下,position 表示写入位置,limit 表示容量,写入4个字节调用 flip 后,position 切换为读取位置, limit切换为读取限制读取4个字节后的状态调用 clear 后调用 compact 方法,它的作用是把未读完的部分向前压缩,然后切换至写模式ByteBufferReadWriteTestpublic class ByteBufferReadWriteTest { public static void main(String[] args) { ByteBuffer bf = ByteBuffer.allocate(10); bf.put((byte) 0x16); debugAll(bf); bf.put(new byte[]{0x17, 0x18, 0x19}); debugAll(bf); bf.flip(); System.out.println(bf.get()); debugAll(bf); bf.compact(); debugAll(bf); bf.put(new byte[]{0x20, 0x21, 0x22}); debugAll(bf); // +--------+-------------------- all ------------------------+----------------+ // position: [1], limit: [10] // +-------------------------------------------------+ // | 0 1 2 3 4 5 6 7 8 9 a b c d e f | // +--------+-------------------------------------------------+----------------+ // |00000000| 16 00 00 00 00 00 00 00 00 00 |.......... | // +--------+-------------------------------------------------+----------------+ // +--------+-------------------- all ------------------------+----------------+ // position: [4], limit: [10] // +-------------------------------------------------+ // | 0 1 2 3 4 5 6 7 8 9 a b c d e f | // +--------+-------------------------------------------------+----------------+ // |00000000| 16 17 18 19 00 00 00 00 00 00 |.......... | // +--------+-------------------------------------------------+----------------+ // 22 // +--------+-------------------- all ------------------------+----------------+ // position: [1], limit: [4] // +-------------------------------------------------+ // | 0 1 2 3 4 5 6 7 8 9 a b c d e f | // +--------+-------------------------------------------------+----------------+ // |00000000| 16 17 18 19 00 00 00 00 00 00 |.......... | // +--------+-------------------------------------------------+----------------+ // +--------+-------------------- all ------------------------+----------------+ // position: [3], limit: [10] // +-------------------------------------------------+ // | 0 1 2 3 4 5 6 7 8 9 a b c d e f | // +--------+-------------------------------------------------+----------------+ // |00000000| 17 18 19 19 00 00 00 00 00 00 |.......... | // +--------+-------------------------------------------------+----------------+ // +--------+-------------------- all ------------------------+----------------+ // position: [6], limit: [10] // +-------------------------------------------------+ // | 0 1 2 3 4 5 6 7 8 9 a b c d e f | // +--------+-------------------------------------------------+----------------+ // |00000000| 17 18 19 20 21 22 00 00 00 00 |... !".... | // +--------+-------------------------------------------------+----------------+ } } 2.3 常见方法(1)分配空间// 使用堆内存,会受 gc 的影响 ByteBuffer.allocate(10); // 使用直接(物理)内存,读写效率高,但分配效率低 ByteBuffer.allocateDirect(10);(2)向 buffer 写入数据调用 channel 的 read 方法int len = channel.read(bf);调用 buffer 的 put 方法bf.put((byte) 0x16)(3)从 buffer 读取数据调用 channel 的 write 方法int len = channel.write(bf);调用 buffer 的 get 方法// get 方法会让 position 读指针向后走 // rewind 方法可以将 position 重新置为 0 // get(index) 方法获取指定索引下标的内容时,不会移动读指针 byte b = bf.get();ByteBufferReadTestpackage com.sw.netty._01; import java.nio.ByteBuffer; import static utils.ByteBufferUtil.debugAll; public class ByteBufferReadTest { public static void main(String[] args) { ByteBuffer bf = ByteBuffer.allocate(10); bf.put(new byte[]{'a', 'b', 'c', 'd'}); bf.flip(); // 读全部 bf.get(new byte[4]); debugAll(bf); // 从头重新开始读取一个字节 bf.rewind(); System.out.println((char) bf.get()); // +--------+-------------------- all ------------------------+----------------+ // position: [4], limit: [4] // +-------------------------------------------------+ // | 0 1 2 3 4 5 6 7 8 9 a b c d e f | // +--------+-------------------------------------------------+----------------+ // |00000000| 61 62 63 64 00 00 00 00 00 00 |abcd...... | // +--------+-------------------------------------------------+----------------+ // a // mark 标记 position 位置,reset 将 position 位置重置到 mark 标记的位置 System.out.println((char) bf.get()); // b bf.mark(); System.out.println((char) bf.get()); // c System.out.println((char) bf.get()); // d bf.reset(); System.out.println((char) bf.get()); // c // get(index) 不会改变读索引的位置 System.out.println((char) bf.get(3)); debugAll(bf); // d // +--------+-------------------- all ------------------------+----------------+ // position: [1], limit: [4] // +-------------------------------------------------+ // | 0 1 2 3 4 5 6 7 8 9 a b c d e f | // +--------+-------------------------------------------------+----------------+ // |00000000| 61 62 63 64 00 00 00 00 00 00 |abcd...... | // +--------+-------------------------------------------------+----------------+ } } (4)字符串与 ByteBuffer 互转package com.sw.netty._01; import java.nio.ByteBuffer; import java.nio.charset.StandardCharsets; import static utils.ByteBufferUtil.debugAll; public class ByteBuffer2StringTest { public static void main(String[] args) { ByteBuffer bf = ByteBuffer.allocate(10); // 字符串转 ByteBuffer // 1. 字符串 getBytes() bf.put("sxc".getBytes()); debugAll(bf); // +--------+-------------------- all ------------------------+----------------+ // position: [3], limit: [16] // +-------------------------------------------------+ // | 0 1 2 3 4 5 6 7 8 9 a b c d e f | // +--------+-------------------------------------------------+----------------+ // |00000000| 73 78 63 00 00 00 00 00 00 00 00 00 00 00 00 00 |sxc.............| // +--------+-------------------------------------------------+----------------+ // 2. Charset encode之后自动切换为读模式 ByteBuffer bf1 = StandardCharsets.UTF_8.encode("sxc"); debugAll(bf1); // +--------+-------------------- all ------------------------+----------------+ // position: [0], limit: [3] // +-------------------------------------------------+ // | 0 1 2 3 4 5 6 7 8 9 a b c d e f | // +--------+-------------------------------------------------+----------------+ // |00000000| 73 78 63 |sxc | // +--------+-------------------------------------------------+----------------+ // 3. wrap 同理方法2,自动切换为读模式 ByteBuffer bf2 = ByteBuffer.wrap("sxc".getBytes()); debugAll(bf2); // +--------+-------------------- all ------------------------+----------------+ // position: [0], limit: [3] // +-------------------------------------------------+ // | 0 1 2 3 4 5 6 7 8 9 a b c d e f | // +--------+-------------------------------------------------+----------------+ // |00000000| 73 78 63 |sxc | // +--------+-------------------------------------------------+----------------+ // ByteBuffer 转字符串 bf.flip(); System.out.println(StandardCharsets.UTF_8.decode(bf)); //sxc // Charset、wrap 方法生成的 ByteBuffer 对象不需要再手动显示切换为读模式 System.out.println(StandardCharsets.UTF_8.decode(bf1)); //sxc System.out.println(StandardCharsets.UTF_8.decode(bf2)); //sxc } } 2.4 Scattering Reads 分散读ScatteringReadsTestpackage com.sw.netty._01; import java.net.URL; import java.nio.ByteBuffer; import java.nio.channels.FileChannel; import java.nio.file.Paths; import static utils.ByteBufferUtil.debugAll; public class ScatteringReadsTest { public static void main(String[] args) { URL resource = ScatteringReadsTest.class.getClassLoader().getResource("ScatteringReadsTest.txt"); if (resource == null) { throw new IllegalArgumentException("resource not found: ScatteringReadsTest.txt"); } try (FileChannel channel = FileChannel.open(Paths.get(resource.toURI()))) { ByteBuffer bf1 = ByteBuffer.allocate(3); ByteBuffer bf2 = ByteBuffer.allocate(3); ByteBuffer bf3 = ByteBuffer.allocate(3); channel.read(new ByteBuffer[]{bf1, bf2, bf3}); bf1.flip(); bf2.flip(); bf3.flip(); debugAll(bf1); debugAll(bf2); debugAll(bf3); // +--------+-------------------- all ------------------------+----------------+ // position: [0], limit: [3] // +-------------------------------------------------+ // | 0 1 2 3 4 5 6 7 8 9 a b c d e f | // +--------+-------------------------------------------------+----------------+ // |00000000| 31 32 33 |123 | // +--------+-------------------------------------------------+----------------+ // +--------+-------------------- all ------------------------+----------------+ // position: [0], limit: [3] // +-------------------------------------------------+ // | 0 1 2 3 4 5 6 7 8 9 a b c d e f | // +--------+-------------------------------------------------+----------------+ // |00000000| 34 35 36 |456 | // +--------+-------------------------------------------------+----------------+ // +--------+-------------------- all ------------------------+----------------+ // position: [0], limit: [3] // +-------------------------------------------------+ // | 0 1 2 3 4 5 6 7 8 9 a b c d e f | // +--------+-------------------------------------------------+----------------+ // |00000000| 37 38 39 |789 | // +--------+-------------------------------------------------+----------------+ } catch (Exception e) { e.printStackTrace(); } } } 2.5 GatheringWrites 集中写GatheringWritesTestpackage com.sw.netty._01; import java.io.IOException; import java.io.RandomAccessFile; import java.nio.ByteBuffer; import java.nio.channels.FileChannel; import java.nio.charset.StandardCharsets; public class GatheringWritesTest { public static void main(String[] args) { ByteBuffer bf1 = StandardCharsets.UTF_8.encode("sun"); ByteBuffer bf2 = StandardCharsets.UTF_8.encode("xiao"); ByteBuffer bf3 = StandardCharsets.UTF_8.encode("chuan"); try (FileChannel channel = new RandomAccessFile("GatheringWritesTest.txt", "rw").getChannel()) { channel.write(new ByteBuffer[]{bf1, bf2, bf3}); } catch (IOException e) { e.printStackTrace(); } } } 2.6 黏包、半包ByteBufferExamTestpackage com.sw.netty._01; import java.nio.ByteBuffer; import static utils.ByteBufferUtil.debugAll; public class ByteBufferExamTest { public static void main(String[] args) { /** * 例:通过网络发送给服务器的多条数据如下: * Yao Shui Ge,\n * Jin Se Wei Ye Na,\n * Zhi Bo Jian. * 由于各种原因,变成了如下的形式(黏包、半包) * Yao Shui Ge,\nJin S * e Wei Ye Na,\nZ * hi Bo Jian. * 现要求将黏包、半包的数据恢复为正确的按 \n 分隔的数据 */ ByteBuffer originBf = ByteBuffer.allocate(45); originBf.put("Yao Shui Ge,\nJin S".getBytes()); split(originBf); originBf.put("e Wei Ye Na,\nZ".getBytes()); split(originBf); originBf.put("hi Bo Jian.\n".getBytes()); split(originBf); } private static void split(ByteBuffer source) { source.flip(); for (int i = 0; i < source.limit(); i++) { if ('\n' == source.get(i)) { int length = i + 1 - source.position(); ByteBuffer target = ByteBuffer.allocate(length); // 从 source 读,向 target 写 for (int j = 0; j < length; j++) { target.put(source.get()); } debugAll(target); } } // 此处不使用 clear,需使用 compact 将剩余未读的部分向前移动 source.compact(); } // +--------+-------------------- all ------------------------+----------------+ // position: [13], limit: [13] // +-------------------------------------------------+ // | 0 1 2 3 4 5 6 7 8 9 a b c d e f | // +--------+-------------------------------------------------+----------------+ // |00000000| 59 61 6f 20 53 68 75 69 20 47 65 2c 0a |Yao Shui Ge,. | // +--------+-------------------------------------------------+----------------+ // +--------+-------------------- all ------------------------+----------------+ // position: [18], limit: [18] // +-------------------------------------------------+ // | 0 1 2 3 4 5 6 7 8 9 a b c d e f | // +--------+-------------------------------------------------+----------------+ // |00000000| 4a 69 6e 20 53 65 20 57 65 69 20 59 65 20 4e 61 |Jin Se Wei Ye Na| // |00000010| 2c 0a |,. | // +--------+-------------------------------------------------+----------------+ // +--------+-------------------- all ------------------------+----------------+ // position: [13], limit: [13] // +-------------------------------------------------+ // | 0 1 2 3 4 5 6 7 8 9 a b c d e f | // +--------+-------------------------------------------------+----------------+ // |00000000| 5a 68 69 20 42 6f 20 4a 69 61 6e 2e 0a |Zhi Bo Jian.. | // +--------+-------------------------------------------------+----------------+ }
-
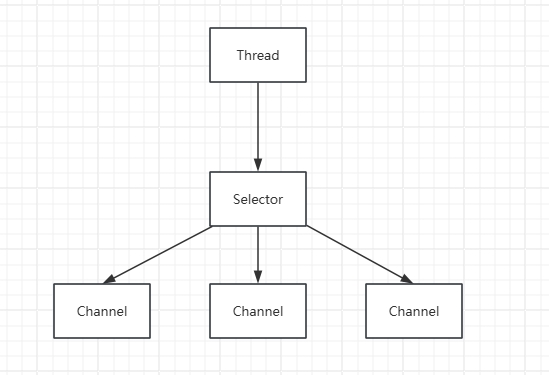
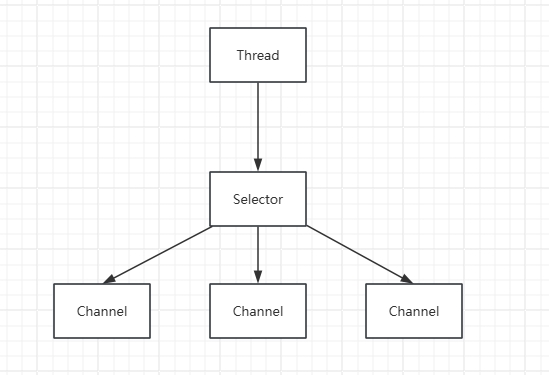
NIO基础 - 三大组件 Netty参考 B站 it黑马 Netty 课程一、NIO 基础1. 三大组件1.1 Channel、BufferChannel 是读写数据的双向通道,可以从 channel 将数据读入 buffer,也可以从 buffer 将数据写入 channel,常见的 Channel 有:FileChannelDatagramChannelSocketChannelServerSocketChannelBuffer 用于缓冲读写数据,常见的 Buffer 有:ByteBufferMappedByteBufferDirectByteBufferHeapByteBufferShortBufferIntBufferLongBufferFloatBufferDoubleBufferCharBuffer1.2 SelectorSelector 的作用是配合一个线程来管理多个 Channel,获取不同 Channel 上发生的事件,这些 Channel 工作在非阻塞模式下,不会让线程一直工作在一个 Channel 上,适合连接数多,但数据量不大的场景
-
React - zustand 更轻量级的集中式状态管理工具1. 示例import { create } from 'zustand' const useStore = create((set) => { return { // 状态数据 count: 0, // 修改状态数据的方法 inc: () => { // 修改原数据 set((state) => ({ count: state.count + 1 })) // 直接修改 // set({ count: 100 }) } } }) function App() { const { count, inc } = useStore() return ( <div className="App"> <p>{count}</p> <button onClick={inc}>+ 1</button> </div> ) } export default App 2. 异步方法import { useEffect } from 'react' import { create } from 'zustand' const useStore = create((set) => { return { // 状态数据 count: 0, channelList: [], // 修改状态数据的方法 inc: () => { // 修改原数据 set((state) => ({ count: state.count + 1 })) // 直接修改 // set({ count: 100 }) }, getChannelList: async () => { const res = await fetch('http://geek.itheima.net/v1_0/channels') const resJson = await res.json() console.log(resJson) set({ channelList: resJson.data.channels }) } } }) function App() { const { count, inc, channelList, getChannelList } = useStore() useEffect(() => { getChannelList() }, [getChannelList]) return ( <div className="App"> <p>{count}</p> <button onClick={inc}>+ 1</button> <ul> {channelList.map((item) => ( <li key={item.id}>{item.name}</li> ))} </ul> </div> ) } export default App 3. 切片模式当单个 store 较大时,可以用切片模式进行模块的拆分组合import { useEffect } from 'react' import { create } from 'zustand' const createCountStore = (set) => { return { count: 0, inc: () => { set((state) => ({ count: state.count + 1 })) } } } const createChannelStore = (set) => { return { channelList: [], getChannelList: async () => { const res = await fetch('http://geek.itheima.net/v1_0/channels') const resJson = await res.json() console.log(resJson) set({ channelList: resJson.data.channels }) } } } const useStore = create((...a) => { return { ...createCountStore(...a), ...createChannelStore(...a) } }) function App() { const { count, inc, channelList, getChannelList } = useStore() useEffect(() => { getChannelList() }, [getChannelList]) return ( <div className="App"> <p>{count}</p> <button onClick={inc}>+ 1</button> <ul> {channelList.map((item) => ( <li key={item.id}>{item.name}</li> ))} </ul> </div> ) } export default App
-
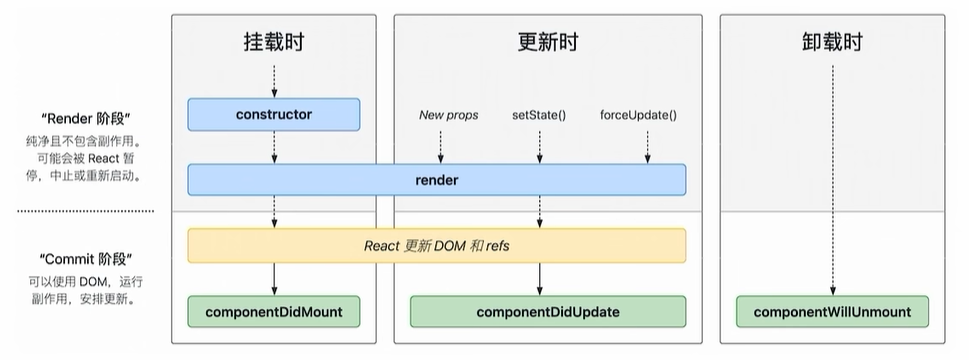
React - 类组件 1. 概念通过 js 中的类来组织代码2. 实现方式(1)通过类属性 state 定义状态数据(2)通过 setState 方法修改状态数据(3)通过 render 函数返回要渲染的 UI3. 示例import { Component } from 'react' class Counter extends Component { state = { count: 0 } setCount = () => { this.setState({ count: this.state.count + 1 }) } render() { return <button onClick={this.setCount}>{this.state.count}</button> } } function App() { return ( <div className="App"> <Counter /> </div> ) } export default App 4. 生命周期函数示例(以 componentDidMount, componentWillUnmount 为例):import { Component, useState } from 'react' class Son extends Component { // 组件渲染完毕执行一次 componentDidMount() { console.log('组件渲染完毕') this.timer = setInterval(() => { console.log('执行定时器') }, 1000) } // 组件卸载之后执行(常用于清除副作用) componentWillUnmount() { console.log('子组件被卸载') clearInterval(this.timer) } render() { return <div>Son Component</div> } } function App() { const [show, setShow] = useState(true) return ( <div className="App"> {show && <Son />} <button onClick={() => setShow(false)}>unmount son component</button> </div> ) } export default App 5. 组件通信概念:与常规的组件通信思路一致(父传子、子传父、兄弟组件间通信)(1)父传子import { Component } from 'react' class Parent extends Component { state = { msg: '父组件的数据' } render() { return ( <div> <p>Parent Component</p> <Son msg={this.state.msg} /> </div> ) } } class Son extends Component { render() { return ( <div> Son Component <p>{this.props.msg}</p> </div> ) } } function App() { return ( <div className="App"> <Parent /> </div> ) } export default App (2)子传父import { Component } from 'react' class Parent extends Component { state = { msg: '父组件的数据' } getSonMsg = (sonMsg) => { console.log('子组件传递的数据:', sonMsg) } render() { return ( <div> <p>Parent Component</p> <Son msg={this.state.msg} getSonMsg={this.getSonMsg} /> </div> ) } } class Son extends Component { render() { return ( <div> Son Component <p>{this.props.msg}</p> <button onClick={() => this.props.getSonMsg('孙笑川')}> 传递数据给父组件 </button> </div> ) } } function App() { return ( <div className="App"> <Parent /> </div> ) } export default App (3)兄弟组件通信import { Component } from 'react' class Parent extends Component { state = { msg: '父组件的数据', msg1: '' } setMsg1 = (val) => { this.setState({ msg1: val }) } getSonMsg = (sonMsg) => { console.log('子组件传递的数据:', sonMsg) } render() { return ( <div> <p>Parent Component</p> <hr /> <Son msg={this.state.msg} getSonMsg={this.getSonMsg} setMsg={this.setMsg1} /> <hr /> <Daughter msg={this.state.msg} brotherMsg={this.state.msg1} /> </div> ) } } class Son extends Component { render() { return ( <div> Son Component <p>{this.props.msg}</p> <button onClick={() => this.props.getSonMsg('孙笑川')}> 传递数据给父组件 </button> <br /> <button onClick={() => this.props.setMsg('药水哥')}> 传递数据给兄弟组件 </button> </div> ) } } class Daughter extends Component { render() { return ( <div> Daughter Component <p>父组件传递的数据:{this.props.msg}</p> <p>兄弟组件传递的数据:{this.props.brotherMsg}</p> </div> ) } } function App() { return ( <div className="App"> <Parent /> </div> ) } export default App
-
React - useImperativeHandle 作用:通过 ref 讲子组件的方法暴露给父组件import { forwardRef, useImperativeHandle, useRef } from 'react' const Son = forwardRef((props, ref) => { const inputRef = useRef(null) const inputHandle = () => { inputRef.current.focus() } useImperativeHandle(ref, () => { return { inputHandle } }) return <input type="text" ref={inputRef} /> }) function App() { const sonRef = useRef(null) const sonInputFocusHandle = () => { console.log(sonRef) sonRef.current.inputHandle() } return ( <div className="App"> <Son ref={sonRef} /> <button onClick={sonInputFocusHandle}>focus</button> </div> ) } export default App
-
React - forwardRef 作用:使用 ref 暴露组件给父节点import { forwardRef, useRef } from 'react' // function Son() { // return <input type="text" /> // } const Son = forwardRef((props, ref) => { return <input type="text" ref={ref} /> }) function App() { const sonRef = useRef(null) const sonInputFocus = () => { console.log(sonRef) sonRef.current.focus() } return ( <div className="App"> <Son ref={sonRef} /> <button onClick={sonInputFocus}>focus</button> </div> ) } export default App
-
React - useCallback 作用:在组件多次重新渲染时缓存函数import { memo, useCallback, useState } from 'react' const MemoInput = memo(function Input({ onChange }) { console.log('执行子组件重新渲染') return <input type="text" onChange={(e) => onChange(e.target.value)} /> }) function App() { const changeHandle = useCallback((val) => { console.log(val) }, []) const [count, setCount] = useState(0) return ( <div className="App"> <MemoInput onChange={changeHandle} /> <button onClick={() => setCount(count + 1)}>{count}</button> </div> ) } export default App
-
React - React.memo 作用:允许组件在 Props 没有改变的情况下跳过渲染注:React 组件渲染机制,只要父组件重新渲染,子组件也会重新渲染1. 示例import { memo, useState } from 'react' // function Son() { // console.log('执行子组件渲染') // return <div>Son Component</div> // } // props 发生变化时才重新渲染子组件 const MemoSon = memo(function Son() { console.log('执行子组件渲染') return <div>Son Component</div> }) function App() { const [count, setCount] = useState(0) return ( <div className="App"> count: {count} <button onClick={() => setCount(count + 1)}>count + 1</button> <MemoSon /> </div> ) } export default App 2. props 的比较机制在使用 memo 缓存组件后,React 会对每一个 prop 使用 Object.is 方法比较心值和旧值prop 是简单(基本)类型Object.is(1, 1) ---> true 无变化prop 是引用类型(对象/数组)Object.is([], []) ---> false 有变化(即:React 不关心内容,只关心引用是否发生变化)import { memo, useMemo, useState } from 'react' const MemoSon = memo(function Son({ count, list }) { console.log('执行子组件渲染') return <div>Son Component</div> }) function App() { const [count, setCount] = useState(0) const index = 100 const list = [1, 2, 3] // 保持引用稳定 const memoList = useMemo(() => { return [1, 2, 3] }, []) return ( <div className="App"> count: {count} <button onClick={() => setCount(count + 1)}>count + 1</button> {/* 子组件 prop 发生变化(count累加),执行重新渲染 */} {/* <MemoSon count={count} /> */} {/* 子组件 prop 无变化(传递的 count 是固定的),不执行重新渲染 */} {/* <MemoSon count={index} /> */} {/* count 累加变化时,父组件重新渲染,list 也会重新执行声明(即子组件 prop 参数的引用发生了变化,执行重新渲染) */} {/* <MemoSon list={list} /> */} {/* memo 保持引用稳定 */} <MemoSon list={memoList} /> </div> ) } export default App