
搜索到
3
篇与
的结果
-
 Bean的自动装配 Bean的自动装配==Spring会在上下文中自动寻找,并自动给bean装配属性==三种方式:1、在xml中显示的配置2、在Java中显示配置3、隐式的自动装配bean1、测试环境搭建:一个人有两个宠物Demo2、byName自动装配<bean id="cat" class="com.sw.pojo.Cat"/> <bean id="dog" class="com.sw.pojo.Dog"/> <!--byName:会自动在容器上下文中查找和自己对象中(Person)set方法后面的值对应的beanid--> <bean id="person" class="com.sw.pojo.Person" autowire="byName"> <property name="name" value="孙笑川"/> </bean>3、byType自动装配<bean id="cat2" class="com.sw.pojo.Cat"/> <bean id="dog1" class="com.sw.pojo.Dog"/> <!-- byName:会自动在容器上下文中查找,和自己对象中(Person)set方法后面的值对应的beanid byType:会自动在容器上下文中查找,和自己对象属性类型相对应的bean --> <bean id="person" class="com.sw.pojo.Person" autowire="byType"> <property name="name" value="孙笑川"/> </bean>注:byName:需要保证所有bean的id唯一,且这个bean需要和自动注入的属性的set方法的值一致byType:需要保证所有bean的class唯一,且这个bean需要和自动注入的属性的类型一致4、使用注解实现自动装配1、导入context约束2、开启注解<?xml version="1.0" encoding="UTF-8"?> <beans xmlns="http://www.springframework.org/schema/beans" xmlns:xsi="http://www.w3.org/2001/XMLSchema-instance" xmlns:context="http://www.springframework.org/schema/context" xsi:schemaLocation="http://www.springframework.org/schema/beans https://www.springframework.org/schema/beans/spring-beans.xsd http://www.springframework.org/schema/context https://www.springframework.org/schema/context/spring-context.xsd"> <context:annotation-config/> </beans>@Autowired 直接在属性上用即可,也可以在set方法上使用@Nullable //字段标记了这个注解,说明这个字段可以为null@Autowired(required = false) //如果显示的定义Autowired的required属性为fasle,说明这个对象可以为空//默认为true 不允许为空 public @interface Autowired { boolean required() default true; }注:如果@Autowired自动装配的环境比较复杂,无法通过一个@Autowired注解完成的时候,可以使用@Qualifier(value = "xxx"),指定一个唯一的bean对象public class Person { private String name; @Autowired private Dog dog; @Autowired @Qualifier(value = "cat") private Cat cat; }@Resourcepublic class Person { private String name; @Resource(name = "cat1212") private Dog dog; @Resource private Cat cat; }小结:@Autowired与@Resource的区别都是用来自动装配的@Autowired 通过byType的方式实现,且对象必须存在@Resource 默认通过byName的方式实现,如果找不到对应的bean id,则通过byType实现
 -
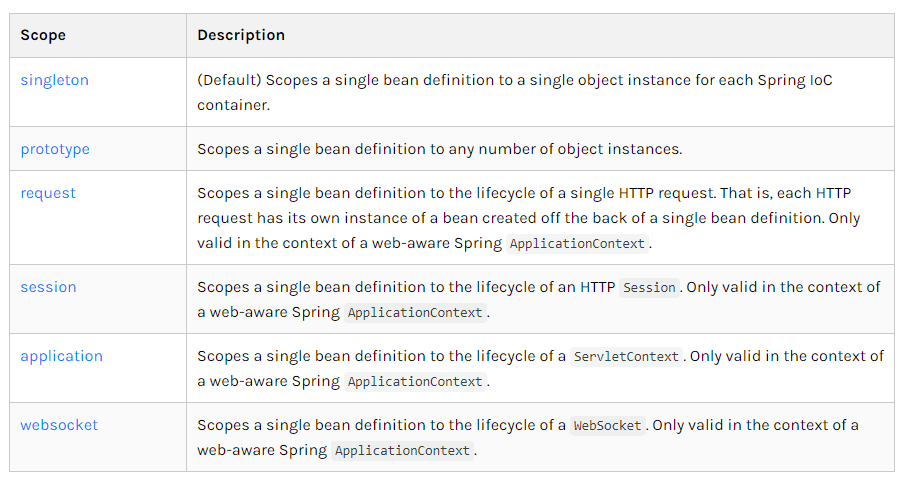
依赖注入 依赖注入1、构造器注入参考IoC创建对象的方式2、Set方式注入依赖注入:Set注入依赖:bean对象的创建依赖于容器注入:bean对象中的所有属性,由容器来注入环境搭建:1、复杂类型package com.sw.pojo; /** * @Author suaxi * @Date 2020/12/14 16:32 */ public class Adress { private String adress; public String getAdress() { return adress; } public void setAdress(String adress) { this.adress = adress; } } 2、真实测试对象package com.sw.pojo; import java.util.*; /** * @Author suaxi * @Date 2020/12/14 16:32 */ public class Student { private String name; private Adress adress; private String[] books; private List<String> hobbys; private Map<String,String> card; private Set<String> games; private String wife; private Properties info; …… } 3、beans.xml<?xml version="1.0" encoding="UTF-8"?> <beans xmlns="http://www.springframework.org/schema/beans" xmlns:xsi="http://www.w3.org/2001/XMLSchema-instance" xsi:schemaLocation="http://www.springframework.org/schema/beans https://www.springframework.org/schema/beans/spring-beans.xsd"> <bean id="student" class="com.sw.pojo.Student"> <!--普通值注入 value--> <property name="name" value="孙笑川"/> </bean> </beans>4、测试类import com.sw.pojo.Student; import org.springframework.context.ApplicationContext; import org.springframework.context.support.ClassPathXmlApplicationContext; /** * @Author suaxi * @Date 2020/12/14 16:38 */ public class MyTest { public static void main(String[] args) { ApplicationContext context = new ClassPathXmlApplicationContext("beans.xml"); Student student = (Student) context.getBean("student"); System.out.println(student.getName()); } } beans.xml补充:<?xml version="1.0" encoding="UTF-8"?> <beans xmlns="http://www.springframework.org/schema/beans" xmlns:xsi="http://www.w3.org/2001/XMLSchema-instance" xsi:schemaLocation="http://www.springframework.org/schema/beans https://www.springframework.org/schema/beans/spring-beans.xsd"> <bean id="address" class="com.sw.pojo.Address"> <property name="address" value="昆明"/> </bean> <bean id="student" class="com.sw.pojo.Student"> <!--普通值注入 value--> <property name="name" value="孙笑川"/> <!--bean注入 ref--> <property name="address" ref="address"/> <!--数组--> <property name="books"> <array> <value>高数一</value> <value>英语一</value> <value>毛概</value> </array> </property> <!--list--> <property name="hobbys"> <list> <value>跑步</value> <value>游泳</value> <value>听音乐</value> </list> </property> <!--map--> <property name="card"> <map> <entry key="身份证" value="12345678"/> <entry key="银行卡" value="87654321"/> </map> </property> <!--set--> <property name="games"> <set> <value>LOL</value> <value>FF14</value> <value>CSGO</value> </set> </property> <!--null--> <property name="wife"> <null/> </property> <!--properties--> <property name="info"> <props> <prop key="姓名">孙笑川</prop> <prop key="学号">123</prop> <prop key="性别">男</prop> </props> </property> </bean> </beans>3、拓展方式注入可以使用p命名空间和c命名空间<?xml version="1.0" encoding="UTF-8"?> <beans xmlns="http://www.springframework.org/schema/beans" xmlns:xsi="http://www.w3.org/2001/XMLSchema-instance" xmlns:p="http://www.springframework.org/schema/p" xmlns:c="http://www.springframework.org/schema/c" xsi:schemaLocation="http://www.springframework.org/schema/beans https://www.springframework.org/schema/beans/spring-beans.xsd"> <!--p命名空间注入,可以直接注入属性的值:property--> <bean id="user" class="com.sw.pojo.User" p:id="1" p:name="孙笑川"/> <!--c命名空间注入,通过构造器注入constructor-args--> <bean id="user1" class="com.sw.pojo.User" c:id="2" c:name="刘波"/> </beans>注:使用前需导入xml约束xmlns:p="http://www.springframework.org/schema/p" xmlns:c="http://www.springframework.org/schema/c"4、bean的作用域1、单例模式(Spring默认)<bean id="user1" class="com.sw.pojo.User" c:id="2" c:name="刘波" scope="singleton"/>@Test public void test1(){ ApplicationContext context = new ClassPathXmlApplicationContext("userBeans.xml"); User user1 = (User) context.getBean("user"); User user2 = (User) context.getBean("user"); System.out.println(user1==user2); //true }2、原型模式:每次从容器中get的时候都会产生一个新对象<bean id="user1" class="com.sw.pojo.User" c:id="2" c:name="刘波" scope="prototype"/>@Test public void test1(){ ApplicationContext context = new ClassPathXmlApplicationContext("userBeans.xml"); User user1 = (User) context.getBean("user1"); User user2 = (User) context.getBean("user1"); System.out.println(user1.hashCode()); //838411509 System.out.println(user2.hashCode()); //1434041222 System.out.println(user1==user2); //false }3、其余的request、session、application在web开发中使用
-
IOC创建对象的方式 IOC创建对象的方式:1、使用无参构造创建对象(默认)<bean id="user" class="com.sw.pojo.User"> <property name="name" value="孙笑川"/> </bean>2、使用有参构造创建对象下标赋值<bean id="user" class="com.sw.pojo.User"> <constructor-arg index="0" value="孙笑川"/> </bean>类型<bean id="user" class="com.sw.pojo.User"> <constructor-arg type="java.lang.String" value="孙笑川"/> </bean>参数名<bean id="user" class="com.sw.pojo.User"> <constructor-arg name="name" value="孙笑川"/> </bean>==在配置文件加载的时候,容器中管理的对象就已经初始化了。==