
搜索到
19
篇与
的结果
-
 RabbitMQ集群 以单机多节点搭建为例1、启动第一个节点 rabbit-1RABBITMQ_NODE_PORT=5672 RABBITMQ_NODENAME=rabbit-1 rabbitmq-server start &2、启动第二个节点 rabbit-2注:web管理插件的端口号需要另外指定,否则会提示默认的 5672 端口占用RABBITMQ_NODE_PORT=5673 RABBIT_SERVER_START_ARGS="-rabbitmq_management listener [{port,15673}]" RABBITMQ_NODENAME=rabbit-2 rabbitmq-server start &3、查看服务ps aux|grep rabbitmq4、设置rabbit-1为主节点# 停止应用 rabbitmqctl -n rabbit-1 stop_app # 重置,清除节点上的历史信息 rabbitmqctl -n rabbit-1 reset # 启动 rabbitmqctl -n rabbit-1 start_app5、设置从节点# 停止应用 rabbitmqctl -n rabbit-2 stop_app # 重置,清除节点上的历史信息 rabbitmqctl -n rabbit-2 reset # 将rabbit-2加入到rabbit-1主节点 # 'Server-node' 主节点名,实际操作时需更换为主机名 rabbitmqctl -n rabbit-2 join_cluster rabbit-1@'Server-node' # 启动 rabbitmqctl -n rabbit-2 start_app6、验证集群状态rabbitmqctl cluster_status -n rabbit-17、web管理给node节点设置用户名和密码rabbitmqctl -n rabbit-1 add_user admin 123456 rabbitmqctl -n rabbit-1 set_user_tags admin administrator rabbitmqctl -n rabbit-1 set_permissions -p / admin ".*" ".*" ".*" # 其他节点以此类推补充如果采用多机部署集群的方式,需读取其中一个节点的cookie,并复制到其他节点(节点之间通过cookie确认相互间是否能进行通信)cookie存放路径:/var/lib/rabbitmq/.erlang.cookie
 -
内存和磁盘监控 官方文档:https://www.rabbitmq.com/configure.html1、内存当出现警告的时候,可以通过修改或调整配置一般建议大小为物理机内存的40%~70%之间命令行rabbitmqctl set_vm_memory_high_watermark <fraction> # 二者任选其一 rabbitmqctl set_vm_memory_high_watermark absolute 50MB配置文件 rabbitmq.conf# /etc/rabbitmq/rabbitmq.conf # 默认 vm_memory_high_watermark.relative = 0.4 # 取值在0.4~0.7之间,不建议超过0.7 # 设置固定值 vm_memory_high_watermark.absolute = 1GB 测试手动修改内存为固定的50MBrabbitmq的运行内存超过了50MB,监控面板内存报红消息队列随之被挂起,不再提供服务测试之后手动恢复rabbitmqctl set_vm_memory_high_watermark 0.42、内存换页在某个Broker节点及内存阻塞生产者之前,它会将队列中的消息换页到磁盘中,以释放内存空间,持久化和非持久化的消息都会写入磁盘中(持久化消息本身就有一个副本在磁盘中,所以在转移过程中持久化的消息会率先从内存中转移)默认情况下,内存达到阈值的50%就会进行换页处理,即:默认阈值为0.4的情况下,当内存超过0.4*0.5=0.2时就会进行换页处理,因为当出现内存警告,服务被挂起时才来进行换页已经没有意义。vm_memory_high_watermark.relative = 0.4 vm_memory_high_watermark_paging_ratio = 0.7 # 设置小于1的值(一般不超过0.7)3、磁盘当磁盘剩余空间小于阈值时,RabbitMQ同样会产生预警,将服务挂起,同理内存预警命令行rabbitmqctl set_disk_free_limit <disk_limit> rabbitmqctl set_disk_free_limit memory_limit <faction> # disk_limit 固定值,单位KB MB GB # faction 相对阈值,建议范围在1.0~2.0之间,此处须于内存的阈值区分开来配置文件disk_free_limit.relative = 3.0 disk_free_limit.absolute = 50mb
-
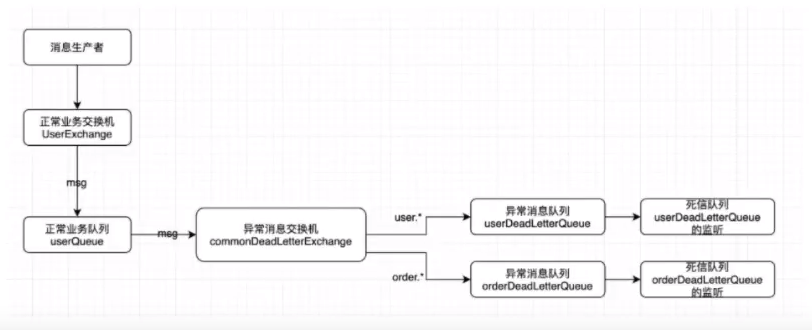
死信队列 修改已创建队列的参数,重启服务报错,原因:修改后的参数随服务的重启并不会进行覆盖1、概述Dead-Letter-Exchange(DLX)死信队列,也称作死信交换机,死信邮箱。当一个消息在队列中变成死信(dead message)之后,它会被重新发送到一个交换机中,这个交换机就是DLX,绑定DLX的队列就是死信队列。消息变为死信的原因有:消息被拒绝消息过期队列达到最大长度DLX也是一个正常的交换机,和一般的交换机没有区别,它能在任何的队列上被指定,也就是设置某一个队列的属性。当这个队列中存在死信时,RabbitMQ就会可将这个消息重新发送到设置的DLX上,进而被路由到另一个队列,即死信队列。使用:在定义队列的时候设置队列参数 x-dead-letter-exchange指定交换机即可 图片来源:学相伴 - 飞哥 - RabbitMQ测试:创建队列@Configuration public class DeadRabbitMQConfig { //1、声明注册direct模式的交换机 @Bean public DirectExchange DeadDirectExchange() { return new DirectExchange("dead_direct_exchange", true, false); } //2、声明队列过期时间 @Bean public Queue deadQueue() { return new Queue("dead.direct.queue", true); } @Bean public Binding deadBind() { return BindingBuilder.bind(deadQueue()).to(DeadDirectExchange()).with("dead"); } }绑定 TTL队列 和 死信队列@Configuration public class TTLRabbitMQConfig { //1、声明注册direct模式的交换机 @Bean public DirectExchange ttlDirectExchange() { return new DirectExchange("ttl_direct_exchange", true, false); } //2、声明队列过期时间 @Bean public Queue directTTLQueue() { Map<String, Object> args = new HashMap<>(); //单位 ms args.put("x-message-ttl", 5000); //绑定死信交换机 args.put("x-dead-letter-exchange", "dead_direct_exchange"); //fanout模式不需要指定路由key args.put("x-dead-letter-routing-key", "dead"); return new Queue("ttl.direct.queue", true, false, false, args); } @Bean public Queue directTTLMessageQueue() { return new Queue("ttl.message.direct.queue", true); } //过期队列 @Bean public Binding ttlQueue(){ return BindingBuilder.bind(directTTLQueue()).to(ttlDirectExchange()).with("ttl"); } //消息含有过期时间,队列没有设置过期时间 @Bean public Binding ttlMessageQueue(){ return BindingBuilder.bind(directTTLMessageQueue()).to(ttlDirectExchange()).with("ttlMessage"); } }生产者@Service public class OrderService { @Autowired private RabbitTemplate rabbitTemplate; // ttl 单独设置过期时间 public void makeOrderTtlMessage(String userId, String productId, int num) { //1、根据商品id查询库存 //2、保存订单 String orderId = UUID.randomUUID().toString().replaceAll("-", ""); System.out.println("创建订单成功:" + orderId); //3、通过 MQ 来完成消息的分发 String exchangeName = "ttl_direct_exchange"; String routingKry = "ttlMessage"; //设置消息过期时间 MessagePostProcessor message = new MessagePostProcessor() { @Override public Message postProcessMessage(Message message) throws AmqpException { message.getMessageProperties().setExpiration("5000"); message.getMessageProperties().setContentEncoding("UTF-8"); return message; } }; /** * 过期队列:消息存入死信队列 * 消息设置过期时间:过期后,消息直接移除 */ //交换机 路由key/queue队列名 消息内容 rabbitTemplate.convertAndSend(exchangeName, routingKry, orderId, message); } }消费者 暂不设置,目的是让消息过期 路由 到死信队列中消息未过期消息过期后
-
过期时间 TTL 1、概述过期时间TTL指可以对消息设置预期的时间,在这个时间内都可以被消费者接收获取;过后将被自动删除,RabbitMQ设置TTL的两种方式:通过队列属性设置,队列中所有的消息都有相同的过期时间对消息进行单独的设置,每条消息的TTL不同如果同时使用以上两种方式,则以较小的那个时间为准。消息在队列的生存时间一旦超过设置的TTL值,将被投递到死信队列,成为dead message,消费者将无法再收到该消息。过期队列:消息存入死信队列 消息设置过期时间:过期后,消息直接移除创建队列@Configuration public class TTLRabbitMQConfig { //1、声明注册direct模式的交换机 @Bean public DirectExchange ttlDirectExchange() { return new DirectExchange("ttl_direct_exchange", true, false); } //2、声明队列过期时间 @Bean public Queue directTTLQueue() { Map<String, Object> args = new HashMap<>(); //单位 ms args.put("x-message-ttl", 5000); return new Queue("ttl.direct.queue", true, false, false, args); } @Bean public Queue directTTLMessageQueue() { return new Queue("ttl.message.direct.queue", true); } //过期队列 @Bean public Binding ttlQueue(){ return BindingBuilder.bind(directTTLQueue()).to(ttlDirectExchange()).with("ttl"); } //消息含有过期时间,队列没有设置过期时间 @Bean public Binding ttlMessageQueue(){ return BindingBuilder.bind(directTTLMessageQueue()).to(ttlDirectExchange()).with("ttlMessage"); } }生产者@Service public class OrderService { @Autowired private RabbitTemplate rabbitTemplate; // ttl public void makeOrderTtl(String userId, String productId, int num) { //1、根据商品id查询库存 //2、保存订单 String orderId = UUID.randomUUID().toString().replaceAll("-", ""); System.out.println("创建订单成功:" + orderId); //3、通过 MQ 来完成消息的分发 String exchangeName = "ttl_direct_exchange"; String routingKry = "ttl"; //交换机 路由key/queue队列名 消息内容 rabbitTemplate.convertAndSend(exchangeName, routingKry, orderId); } // ttl 单独设置过期时间 public void makeOrderTtlMessage(String userId, String productId, int num) { //1、根据商品id查询库存 //2、保存订单 String orderId = UUID.randomUUID().toString().replaceAll("-", ""); System.out.println("创建订单成功:" + orderId); //3、通过 MQ 来完成消息的分发 String exchangeName = "ttl_direct_exchange"; String routingKry = "ttlMessage"; //设置消息过期时间 MessagePostProcessor message = new MessagePostProcessor() { @Override public Message postProcessMessage(Message message) throws AmqpException { message.getMessageProperties().setExpiration("5000"); message.getMessageProperties().setContentEncoding("UTF-8"); return message; } }; //交换机 路由key/queue队列名 消息内容 rabbitTemplate.convertAndSend(exchangeName, routingKry, orderId, message); } }消费者//消费者代码同理fanout模式的消费者
-
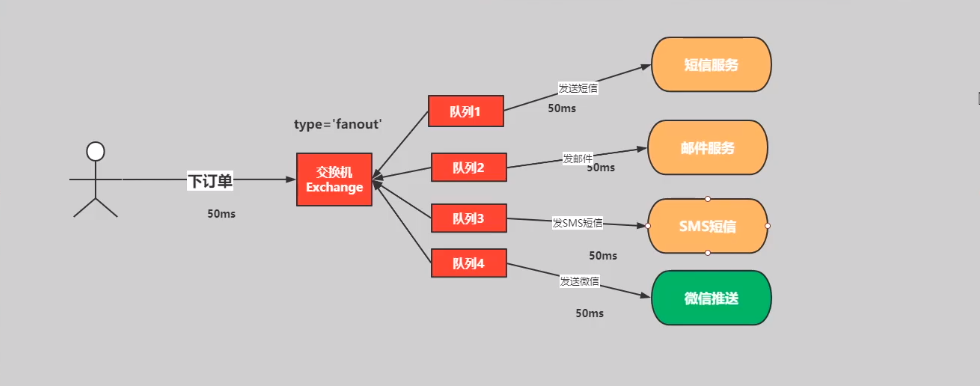
SpringBoot整合RabbitMQ 1、Fanout模式创建队列@Configuration public class FanoutRabbitMQConfig { //1、声明注册fanout模式的交换机 @Bean public FanoutExchange fanoutExchange() { return new FanoutExchange("fanout_order_exchange", true, false); } //2、声明队列 msg.fanout.queue,email.fanout.queue,sms.fanout.queue @Bean public Queue fanoutMsgQueue() { return new Queue("msg.fanout.queue", true); } @Bean public Queue fanoutEmailQueue() { return new Queue("email.fanout.queue", true); } @Bean public Queue fanoutSmsQueue() { return new Queue("sms.fanout.queue", true); } //3、完成绑定 @Bean public Binding msgBinding() { return BindingBuilder.bind(fanoutMsgQueue()).to(fanoutExchange()); } @Bean public Binding emailBinding() { return BindingBuilder.bind(fanoutEmailQueue()).to(fanoutExchange()); } @Bean public Binding smsBinding() { return BindingBuilder.bind(fanoutSmsQueue()).to(fanoutExchange()); } } 生产者@Service public class OrderService { @Autowired private RabbitTemplate rabbitTemplate; //fanout模式 模拟用户下单 public void makeOrderFanout(String userId, String productId, int num) { //1、根据商品id查询库存 //2、保存订单 String orderId = UUID.randomUUID().toString().replaceAll("-", ""); System.out.println("创建订单成功:" + orderId); //3、通过 MQ 来完成消息的分发 String exchangeName = "fanout_order_exchange"; String routingKey = ""; //交换机 路由key/queue队列名 消息内容 rabbitTemplate.convertAndSend(exchangeName, routingKey, orderId); } }消费者@Service @RabbitListener(queues = {"email.fanout.queue"}) public class FanoutEmailConsumer { @RabbitHandler public void receiveMessage(String message){ System.out.println("email.fanout 接收到订单信息:" + message); } }@Service @RabbitListener(queues = {"msg.fanout.queue"}) public class FanoutMsgConsumer { @RabbitHandler public void receiveMessage(String message){ System.out.println("msg.fanout 接收到订单信息:" + message); } } @Service @RabbitListener(queues = {"sms.fanout.queue"}) public class FanoutSmsConsumer { @RabbitHandler public void receiveMessage(String message){ System.out.println("sms.fanout 接收到订单信息:" + message); } } 2、Direct模式创建队列@Configuration public class DirectRabbitMQConfig { //1、声明注册direct模式的交换机 @Bean public DirectExchange directExchange() { return new DirectExchange("direct_order_exchange", true, false); } //2、声明队列 msg.direct.queue,email.direct.queue,sms.direct.queue @Bean public Queue directMsgQueue() { return new Queue("msg.direct.queue", true); } @Bean public Queue directEmailQueue() { return new Queue("email.direct.queue", true); } @Bean public Queue directSmsQueue() { return new Queue("sms.direct.queue", true); } //3、完成绑定 @Bean public Binding msgBinding() { return BindingBuilder.bind(directMsgQueue()).to(directExchange()).with("smg"); } @Bean public Binding emailBinding() { return BindingBuilder.bind(directEmailQueue()).to(directExchange()).with("email"); } @Bean public Binding smsBinding() { return BindingBuilder.bind(directSmsQueue()).to(directExchange()).with("sms"); } }生产者@Service public class OrderService { @Autowired private RabbitTemplate rabbitTemplate; //direct模式 public void makeOrderDirect(String userId, String productId, int num) { //1、根据商品id查询库存 //2、保存订单 String orderId = UUID.randomUUID().toString().replaceAll("-", ""); System.out.println("创建订单成功:" + orderId); //3、通过 MQ 来完成消息的分发 String exchangeName = "direct_order_exchange"; //交换机 路由key/queue队列名 消息内容 rabbitTemplate.convertAndSend(exchangeName, "sms", orderId); rabbitTemplate.convertAndSend(exchangeName, "email", orderId); } }消费者@Service @RabbitListener(queues = {"email.direct.queue"}) public class DirectEmailConsumer { @RabbitHandler public void receiveMessage(String message){ System.out.println("email.direct接收到订单信息:" + message); } } @Service @RabbitListener(queues = {"msg.direct.queue"}) public class DirectMsgConsumer { @RabbitHandler public void receiveMessage(String message){ System.out.println("msg.direct 接收到订单信息:" + message); } } @Service @RabbitListener(queues = {"sms.direct.queue"}) public class DirectSmsConsumer { @RabbitHandler public void receiveMessage(String message){ System.out.println("sms.direct 接收到订单信息:" + message); } } 3、Topic模式生产者@Service public class OrderService { @Autowired private RabbitTemplate rabbitTemplate; //topic模式 public void makeOrderTopic(String userId, String productId, int num) { //1、根据商品id查询库存 //2、保存订单 String orderId = UUID.randomUUID().toString().replaceAll("-", ""); System.out.println("创建订单成功:" + orderId); //3、通过 MQ 来完成消息的分发 String exchangeName = "topic_order_exchange"; String routingKry = "com.msg"; //交换机 路由key/queue队列名 消息内容 // #.msg.# msg // *.email.# email // com.# sms rabbitTemplate.convertAndSend(exchangeName, routingKry, orderId); } }创建队列(通过注解)、消费者@Service @RabbitListener(bindings = @QueueBinding( value = @Queue(value = "email.topic.queue", durable = "true", autoDelete = "false"), exchange = @Exchange(value = "topic_order_exchange", type = ExchangeTypes.TOPIC), key = "*.email.#" )) public class TopicEmailConsumer { @RabbitHandler public void receiveMessage(String message){ System.out.println("email.topic 接收到订单信息:" + message); } }@Service @RabbitListener(bindings = @QueueBinding( value = @Queue(value = "msg.topic.queue", durable = "true", autoDelete = "false"), exchange = @Exchange(value = "topic_order_exchange", type = ExchangeTypes.TOPIC), key = "#.msg.#" )) public class TopicMsgConsumer { @RabbitHandler public void receiveMessage(String message){ System.out.println("msg.topic 接收到订单信息:" + message); } } @Service @RabbitListener(bindings = @QueueBinding( value = @Queue(value = "sms.topic.queue", durable = "true", autoDelete = "false"), exchange = @Exchange(value = "topic_order_exchange", type = ExchangeTypes.TOPIC), key = "com.#" )) public class TopicSmsConsumer { @RabbitHandler public void receiveMessage(String message){ System.out.println("sms.topic 接收到订单信息:" + message); } }
-
RabbitMQ的使用场景 1、解耦、削峰、异步同步异步的问题(串行)串行方式:创建订单信息 ---> 发送注册邮件 ---> 再发送注册短信,完成以上三个步骤之后,返回给客户端。public void order(){ //1、创建订单 orderService.saveOrder(); //2、发送邮件 emailService.sendEmail(); //3、发送短信 smsService.sendSMS(); //4、发送app服务 appService.sendApp(); }并行方式 异步线程池并行方式:创建订单信息成功后,在发送注册邮件的同时,发送注册短信,完成以上步骤之后,返回给客户端。public void order(){ //1、创建订单 orderService.saveOrder(); //相关发送 relationMessage(); } public void relationMessage(){ //异步 threadPool.submit(new Callable<Object>{ public Object sms(){ //2、发送短信 smsService.sendSMS(); } }) //异步 threadPool.submit(new Callable<Object>{ public void email(){ //3、发送邮件 emailService.sendEmail(); } }) ...... }存在的问题:耦合度高需要维护自定义的线程池消息可能会丢失消息可靠性低需考虑服务器可用性的问题异步消息队列方式优点:1、完全解耦,使用MQ进行桥接2、有独立的线程池和运行模式3、消息持久化功能等public void order(){ //1、创建订单 orderService.save(); rabbitTemplate.convertSend("exchange","2","消息内容"); }2、高内聚 低耦合图片来源:学相伴 飞哥-RabbitMQ3、流量削峰4、分布式事务的可靠消费和可靠生产5、索引、缓存、静态化处理的数据同步6、流量监控7、日志监控(ELK)8、下单、订单分发、抢票等
-
Work模式 Work模式1、轮询模式(Round-Robin)类型:无特点:当有多个消费者时,一个消费者分配一条消息,直至消费完成Producer:package com.sw.docker.rabbitmq.work.lunxun; import com.rabbitmq.client.Channel; import com.rabbitmq.client.Connection; import com.rabbitmq.client.ConnectionFactory; /** * @Author suaxi * @Date 2021/4/8 23:26 * 轮询模式 */ public class Producer { public static void main(String[] args) { //1.创建连接工厂 ConnectionFactory conn = new ConnectionFactory(); conn.setHost("x.x.x.x"); conn.setPort(5672); conn.setUsername("admin"); conn.setPassword("123456"); conn.setVirtualHost("/"); Connection connection = null; Channel channel = null; try { //2.创建连接 connection = conn.newConnection("生产者"); //3.通过连接获取通道 channel = connection.createChannel(); //4.准备消息内容 for (int i = 0; i <= 20; i++) { String msg = "你好,谢谢" + i; //5.发送消息给队列queue channel.basicPublish("", "queue01", null, msg.getBytes()); } System.out.println("消息发送成功"); }catch (Exception e){ //7.关闭通道 if (channel != null && channel.isOpen()){ try{ channel.close(); }catch (Exception e1){ e.printStackTrace(); } } //8.关闭连接 if (connection != null && connection.isOpen()){ try{ connection.close(); }catch (Exception e1){ e.printStackTrace(); } } } } } Work01:package com.sw.docker.rabbitmq.work.lunxun; import com.rabbitmq.client.*; import java.io.IOException; /** * @Author suaxi * @Date 2021/4/8 23:26 */ public class Work01 { public static void main(String[] args) { //1.创建连接工厂 ConnectionFactory conn = new ConnectionFactory(); conn.setHost("x.x.x.x"); conn.setPort(5672); conn.setUsername("admin"); conn.setPassword("123456"); conn.setVirtualHost("/"); Connection connection = null; Channel channel = null; try { connection = conn.newConnection("消费者-work01"); channel = connection.createChannel(); Channel finalChannel = channel; finalChannel.basicQos(1); finalChannel.basicConsume("queue01", true, new DeliverCallback() { @Override public void handle(String s, Delivery delivery) throws IOException { try { System.out.println("work01收到的消息是:" + new String(delivery.getBody(), "UTF-8")); Thread.sleep(2000); } catch (Exception e) { e.printStackTrace(); } } }, new CancelCallback() { @Override public void handle(String s) throws IOException { } }); System.out.println("work01 开始接收消息"); System.in.read(); } catch (Exception e) { //7.关闭通道 if (channel != null && channel.isOpen()) { try { channel.close(); } catch (Exception e1) { e.printStackTrace(); } } //8.关闭连接 if (connection != null && connection.isOpen()) { try { connection.close(); } catch (Exception e1) { e.printStackTrace(); } } } } } Work02://Work02的代码同理012、公平分发根据消费者的消费能力进行公平分发(按处理效率进行分配)Producer:package com.sw.docker.rabbitmq.work.lunxun; import com.rabbitmq.client.Channel; import com.rabbitmq.client.Connection; import com.rabbitmq.client.ConnectionFactory; /** * @Author suaxi * @Date 2021/4/8 23:26 * Work模式 */ public class Producer { public static void main(String[] args) { //1.创建连接工厂 ConnectionFactory conn = new ConnectionFactory(); conn.setHost("x.x.x.x"); conn.setPort(5672); conn.setUsername("admin"); conn.setPassword("123456"); conn.setVirtualHost("/"); Connection connection = null; Channel channel = null; try { //2.创建连接 connection = conn.newConnection("生产者"); //3.通过连接获取通道 channel = connection.createChannel(); //4.准备消息内容 for (int i = 0; i <= 20; i++) { String msg = "你好,谢谢" + i; //5.发送消息给队列queue channel.basicPublish("", "queue01", null, msg.getBytes()); } System.out.println("消息发送成功"); }catch (Exception e){ //7.关闭通道 if (channel != null && channel.isOpen()){ try{ channel.close(); }catch (Exception e1){ e.printStackTrace(); } } //8.关闭连接 if (connection != null && connection.isOpen()){ try{ connection.close(); }catch (Exception e1){ e.printStackTrace(); } } } } }Work01:将消息接收模式改为手动应答,且需设置 qos,注意:在轮询模式中,qos设置与不设置没有影响,此处需做区分package com.sw.docker.rabbitmq.work.fair; import com.rabbitmq.client.*; import java.io.IOException; /** * @Author suaxi * @Date 2021/4/8 23:26 */ public class Work01 { public static void main(String[] args) { //1.创建连接工厂 ConnectionFactory conn = new ConnectionFactory(); conn.setHost("x.x.x.x"); conn.setPort(5672); conn.setUsername("admin"); conn.setPassword("123456"); conn.setVirtualHost("/"); Connection connection = null; Channel channel = null; try { connection = conn.newConnection("消费者-work01"); channel = connection.createChannel(); Channel finalChannel = channel; finalChannel.basicQos(1); finalChannel.basicConsume("queue01", false, new DeliverCallback() { @Override public void handle(String s, Delivery delivery) throws IOException { try { System.out.println("work01收到的消息是:" + new String(delivery.getBody(), "UTF-8")); Thread.sleep(2000); //接收消息改为手动应答 finalChannel.basicAck(delivery.getEnvelope().getDeliveryTag(), false); } catch (Exception e) { e.printStackTrace(); } } }, new CancelCallback() { @Override public void handle(String s) throws IOException { } }); System.out.println("work01 开始接收消息"); System.in.read(); } catch (Exception e) { //7.关闭通道 if (channel != null && channel.isOpen()) { try { channel.close(); } catch (Exception e1) { e.printStackTrace(); } } //8.关闭连接 if (connection != null && connection.isOpen()) { try { connection.close(); } catch (Exception e1) { e.printStackTrace(); } } } } }
-
消息队列测试实例 消息队列测试实例Producer:通过代码创建交换机、队列、绑定队列和交换机的关系package com.sw.docker.rabbitmq.all; import com.rabbitmq.client.Channel; import com.rabbitmq.client.Connection; import com.rabbitmq.client.ConnectionFactory; /** * @Author suaxi * @Date 2021/4/8 23:26 * direct模式 */ public class Producer { public static void main(String[] args) { //1.创建连接工厂 ConnectionFactory conn = new ConnectionFactory(); conn.setHost("x.x.x.x"); conn.setPort(5672); conn.setUsername("admin"); conn.setPassword("123456"); conn.setVirtualHost("/"); Connection connection = null; Channel channel = null; try { //2.创建连接 connection = conn.newConnection("生产者"); //3.通过连接获取通道 channel = connection.createChannel(); //5.准备消息内容 String msg = "你好,谢谢"; //准备交换机 String exchangeName = "direct_message_exchange"; //交换机类型:direct/topic/fanout/headers String exchangeType = "direct"; //声明交换机,并开启持久化,如果不开启,服务器重启,存盘内容会随之丢失 channel.exchangeDeclare(exchangeName, exchangeType, true); //声明队列 channel.queueDeclare("queue03", true, false, false, null); channel.queueDeclare("queue04", true, false, false, null); channel.queueDeclare("queue05", true, false, false, null); //绑定队列和交换机的关系 channel.queueBind("queue03", exchangeName, "order"); channel.queueBind("queue04", exchangeName, "order"); channel.queueBind("queue05", exchangeName, "class"); //6.发送消息给队列queue channel.basicPublish(exchangeName, "order", null, msg.getBytes()); System.out.println("消息发送成功"); }catch (Exception e){ //7.关闭通道 if (channel != null && channel.isOpen()){ try{ channel.close(); }catch (Exception e1){ e.printStackTrace(); } } //8.关闭连接 if (connection != null && connection.isOpen()){ try{ connection.close(); }catch (Exception e1){ e.printStackTrace(); } } } } } Consumer:package com.sw.docker.rabbitmq.all; import com.rabbitmq.client.*; import java.io.IOException; /** * @Author suaxi * @Date 2021/4/8 23:26 */ public class Comsumer { private static Runnable runnable = new Runnable() { public void run() { //1.创建连接工厂 ConnectionFactory conn = new ConnectionFactory(); conn.setHost("x.x.x.x"); conn.setPort(5672); conn.setUsername("admin"); conn.setPassword("123456"); conn.setVirtualHost("/"); //获取队列名称 final String queueName = Thread.currentThread().getName(); Connection connection = null; Channel channel = null; try { //2.创建连接 connection = conn.newConnection("生产者"); //3.通过连接获取通道 channel = connection.createChannel(); //4.创建交换机,声明队列,绑定关系,路由key,发送消息,接收消息 channel.basicConsume(queueName, true, new DeliverCallback() { public void handle(String s, Delivery delivery) throws IOException { System.out.println(queueName + "收到消息:" + new String(delivery.getBody(), "UTF-8")); } }, new CancelCallback() { public void handle(String s) throws IOException { System.out.println(queueName + "接收消息失败!"); } }); System.out.println(queueName + "开始接收消息"); System.in.read(); } catch (Exception e) { //7.关闭通道 if (channel != null && channel.isOpen()) { try { channel.close(); } catch (Exception e1) { e.printStackTrace(); } } //8.关闭连接 if (connection != null && connection.isOpen()) { try { connection.close(); } catch (Exception e1) { e.printStackTrace(); } } } } }; public static void main(String[] args) { //启动三个线程接收消息 new Thread(runnable, "queue03").start(); new Thread(runnable, "queue04").start(); new Thread(runnable, "queue05").start(); } }