
搜索到
103
篇与
的结果
-
 Shiro Shiro1、导入依赖<dependency> <groupId>org.apache.shiro</groupId> <artifactId>shiro-spring</artifactId> <version>1.4.1</version> </dependency>2、Config配置UserRealm:package com.sw.config; import com.sw.pojo.User; import com.sw.service.UserService; import org.apache.shiro.SecurityUtils; import org.apache.shiro.authc.*; import org.apache.shiro.authz.AuthorizationInfo; import org.apache.shiro.authz.SimpleAuthorizationInfo; import org.apache.shiro.realm.AuthorizingRealm; import org.apache.shiro.session.Session; import org.apache.shiro.subject.PrincipalCollection; import org.apache.shiro.subject.Subject; import org.springframework.beans.factory.annotation.Autowired; /** * @Author suaxi * @Date 2020/12/24 16:56 */ //自定义UserRealm public class UserRealm extends AuthorizingRealm { @Autowired private UserService userService; @Override protected AuthorizationInfo doGetAuthorizationInfo(PrincipalCollection principalCollection) { System.out.println("执行了===》授权doGetAuthorizationInfo"); SimpleAuthorizationInfo info = new SimpleAuthorizationInfo(); info.addStringPermission("user:add"); //获得当前登录的对象 Subject subject = SecurityUtils.getSubject(); User currentUser = (User) subject.getPrincipal(); //拿到user对象 //设置当前用户的权限 info.addStringPermission(currentUser.getPerms()); return info; } @Override protected AuthenticationInfo doGetAuthenticationInfo(AuthenticationToken token) throws AuthenticationException { System.out.println("执行了===》认证doGetAuthorizationInfo"); UsernamePasswordToken userToken = (UsernamePasswordToken) token; //从数据库查询用户信息 User user = userService.findUserByName(userToken.getUsername()); if (user==null){ //用户为空 return null; //抛出 UnknownAccountException 异常 } //设置session Subject subject = SecurityUtils.getSubject(); Session session = subject.getSession(); session.setAttribute("loginUser",user); //密码认证由shiro做 return new SimpleAuthenticationInfo(user,user.getPassword(),""); } } ShiroConfig:package com.sw.config; import at.pollux.thymeleaf.shiro.dialect.ShiroDialect; import org.apache.shiro.spring.web.ShiroFilterFactoryBean; import org.apache.shiro.web.mgt.DefaultWebSecurityManager; import org.springframework.beans.factory.annotation.Qualifier; import org.springframework.context.annotation.Bean; import org.springframework.context.annotation.Configuration; import java.util.LinkedHashMap; import java.util.Map; /** * @Author suaxi * @Date 2020/12/24 16:54 */ @Configuration public class ShiroConfig { //3、ShiroFilterFactoryBean @Bean public ShiroFilterFactoryBean getShiroFilterFactoryBean(@Qualifier("securityManager")DefaultWebSecurityManager defaultWebSecurityManager){ ShiroFilterFactoryBean bean = new ShiroFilterFactoryBean(); //设置安全管理器 bean.setSecurityManager(defaultWebSecurityManager); //添加shiro的内置过滤器 /* anon:无需认证 authc:必须认证 user:必须有 “记住我” 功能才可以访问 perms:拥有对某个资源的权限才能访问 role:拥有某个角色权限才能访问 */ Map<String, String> filterMap = new LinkedHashMap<>(); filterMap.put("/user/update","perms[user:update]"); filterMap.put("/user/add","perms[user:add]"); filterMap.put("/logout","logout"); //注销 filterMap.put("/user/*","authc"); bean.setFilterChainDefinitionMap(filterMap); //设置登录请求 bean.setLoginUrl("/toLogin"); //未授权页面 bean.setUnauthorizedUrl("/noauth"); return bean; } //2、DefaultWebSecurityManager @Bean(name = "securityManager") public DefaultWebSecurityManager getDefaultWebSecurityManager(@Qualifier("userRealm")UserRealm userRealm){ DefaultWebSecurityManager securityManager = new DefaultWebSecurityManager(); //关联UserRealm securityManager.setRealm(userRealm); return securityManager; } //1、创建Realm对象 @Bean public UserRealm userRealm(){ return new UserRealm(); } //整合ShiroDialect shiro-thymeleaf @Bean public ShiroDialect getShiroDialect(){ return new ShiroDialect(); } }
 -
SpringSecurity SpringSecurity1、导入依赖<dependency> <groupId>org.springframework.boot</groupId> <artifactId>spring-boot-starter-security</artifactId> </dependency>2、Config配置package com.sw.config; import org.springframework.security.config.annotation.authentication.builders.AuthenticationManagerBuilder; import org.springframework.security.config.annotation.web.builders.HttpSecurity; import org.springframework.security.config.annotation.web.configuration.EnableWebSecurity; import org.springframework.security.config.annotation.web.configuration.WebSecurityConfigurerAdapter; import org.springframework.security.crypto.bcrypt.BCryptPasswordEncoder; /** * @Author suaxi * @Date 2020/12/24 14:45 */ @EnableWebSecurity public class SercurityConfig extends WebSecurityConfigurerAdapter { //授权 @Override protected void configure(HttpSecurity http) throws Exception { //首页所有人可以访问,功能页需要权限才能访问 //请求授权规则 http.authorizeRequests() .antMatchers("/").permitAll() .antMatchers("/level1/*").hasRole("vip1") .antMatchers("/level2/*").hasRole("vip2") .antMatchers("/level3/*").hasRole("vip3"); //没有权限,默认跳转到登录页 //自定义登录页 http.formLogin().loginPage("/toLogin").loginProcessingUrl("/login"); http.csrf().disable(); //注销 http.logout().logoutSuccessUrl("/"); //开启记住我 //自定义rememberMe http.rememberMe().rememberMeParameter("remember"); } //认证 @Override protected void configure(AuthenticationManagerBuilder auth) throws Exception { //在内存中虚拟用户 auth.inMemoryAuthentication().passwordEncoder(new BCryptPasswordEncoder()) .withUser("1").password(new BCryptPasswordEncoder().encode("1")).roles("vip1") .and() .withUser("2").password(new BCryptPasswordEncoder().encode("1")).roles("vip2") .and() .withUser("3").password(new BCryptPasswordEncoder().encode("1")).roles("vip3") .and() .withUser("root").password(new BCryptPasswordEncoder().encode("1")).roles("vip1","vip2","vip3"); } }
-
yaml配置 yaml配置文件application.properties语法结构:key=valueapplication.yaml语法结构:key:空格 valueyamlYAML是"YAML Ain't a Markup Language"(YAML不是一种标记语言)的递归缩写。基本语法:# k=v name: test #对象 student: name: test age: 3 #行内写法 student1: {name: test,age: 3} #数组 students: -test1 -test2 -test3 students1: [test1,test2,test3]注入配置文件1、导入配置文件的依赖<dependency> <groupId>org.springframework.boot</groupId> <artifactId>spring-boot-configuration-processor</artifactId> <optional>true</optional> </dependency>2、yaml配置文件person: name: test age: 3 happy: false birth: 2020/12/22 map: {k: v,k1: v1} list: -code -girl dog: name: test age: 33、实体类package com.sw.pojo; import lombok.AllArgsConstructor; import lombok.Data; import lombok.NoArgsConstructor; import org.springframework.boot.context.properties.ConfigurationProperties; import org.springframework.stereotype.Component; import java.util.Date; import java.util.List; import java.util.Map; /** * @Author suaxi * @Date 2020/12/22 10:38 */ @Data @AllArgsConstructor @NoArgsConstructor @Component //注册Bean @ConfigurationProperties(prefix = "person") public class Person { private String name; private int age; private Boolean happy; private Date birth; private Map<String,Object> map; private List<Object> list; private Dog dog; } @ConfigurationProperties的作用:将配置文件中配置的每一个属性的值,映射到这个组件中,参数prefix = "person",将配置文件中person下的所有属性一一对应补充:通过properties注入属性@PropertySource(value = "classpath:application.properties")properties与yaml对比 @ConfigurationProperties@value功能批量注入配置文件中的属性需单个一一指定松散绑定是否SPEL表达式否是JSR303校验是否复杂类型封装是否松散绑定:yaml中写的是last-name,实体类中写的是lastName,值依然能注入,yaml中 - 后面的第一个字母默认大写JSR303校验:JSR是Java Specification Requests的缩写,意思是Java 规范提案。使用时须在实体类前加上注解 @Validated //JSR303校验
-
SpringBoot自动装配原理 SpringBoot自动装配原理pom.xmlSpring-boot-dependencies:核心依赖在父工程中导入依赖时不用指定版本,因为有版本仓库启动器:SpringBoot的启动场景例:spring-boot-starter-web,会自动导入web环境所有的依赖SpringBoot会将所有的功能场景,都变成一个个的启动器主程序:package com.sw.helloworld; import org.springframework.boot.SpringApplication; import org.springframework.boot.autoconfigure.SpringBootApplication; @SpringBootApplication //标注这是一个SpringBoot应用 public class HelloworldApplication { public static void main(String[] args) { //启动SpringBoot SpringApplication.run(HelloworldApplication.class, args); } } 1、SpringBoot在启动的时候从类路径下的META-INF/spring.factories中获取AutoConfiguration指定的值2、将这些值作为自动配置类导入容器,自动配置类生效3、J2EE的整体解决方案和自动配置都在SpringBoot-autoConfig的jar包中4、它会将需要的组件以全类名的方式返回,这些组件就会被添加到容器中5、他会给容器中导入非常多的配置类,也就是导入并配置这个场景所需要的组件@SpringApplication(启动类注解) ---> @EnableAutoConfiguration(自动配置注解) ---> @Import(AutoConfigurationSelector.class)(自动导入配置文件的选择器) ---> getCandidateConfigurations()(获取所有候选配置) ---> 通过spring.factories获取配置类的位置 ---> @ConditionOnClass判断 ---> 条件成立(不加载该配置类) ---> 条件不成立(获取配置类,在上层方法中循环封装为properties来使用)xxxAutoConfiguration:自动配置类(给容器中添加组件)xxxProperties:封装配置文件中的相关属性(application.yaml)SpringApplication:1、推断应用的类型是普通项目还是web项目2、查找并加载所有可用初始化器,设置到initializers属性中3、找出所有的应用程序监听器,设置到listeners属性中4、推断并设置main方法的定义类,找到运行的主类
-
Vue基础语法 Vue基础语法1、Vue模板<!DOCTYPE html> <html lang="en"> <head> <meta charset="UTF-8"> <title>Vue模板</title> <script src="https://cdn.jsdelivr.net/npm/vue@2.5.21/dist/vue.min.js"></script> </head> <body> <!--view层 模板--> <div id="app"> </div> <script> var vm = new Vue({ el: '#app', //model:数据 data: { } }); </script> </body> </html>2、else if<!DOCTYPE html> <html lang="en"> <head> <meta charset="UTF-8"> <title>else if</title> <script src="https://cdn.jsdelivr.net/npm/vue@2.5.21/dist/vue.min.js"></script> </head> <body> <!--view层 模板--> <div id="app"> <h1 v-if="type==='A'">A</h1> <h1 v-else-if="type==='B'">B</h1> <h1 v-else>C</h1> </div> <script> var vm = new Vue({ el: '#app', //model:数据 data: { type: 'A' } }); </script> </body> </html>2、for循环<!DOCTYPE html> <html lang="en"> <head> <meta charset="UTF-8"> <title>for循环</title> <script src="https://cdn.jsdelivr.net/npm/vue@2.5.21/dist/vue.min.js"></script> </head> <body> <!--view层 模板--> <div id="app"> <li v-for="(item,index) in items"> {{item.message}}--{{index}} </li> </div> <script> var vm = new Vue({ el: '#app', //model:数据 data: { items:[ {message: '孙笑川'}, {message: '刘波'}, {message: 'Giao哥'} ] } }); </script> </body> </html>4、事件绑定<!DOCTYPE html> <html lang="en" xmlns:v-on="http://www.w3.org/1999/xhtml"> <head> <meta charset="UTF-8"> <title>事件绑定</title> <script src="https://cdn.jsdelivr.net/npm/vue@2.5.21/dist/vue.min.js"></script> </head> <body> <!--view层 模板--> <div id="app"> <button v-on:click="sayHello">点我</button> </div> <script> var vm = new Vue({ el: '#app', //model:数据 data: { message: "Hello World" }, methods:{ //方法必须定义在Vue的methods对象中,v-on:事件 sayHello: function () { alert(this.message); } } }); </script> </body> </html>5、双向绑定<!DOCTYPE html> <html lang="en"> <head> <meta charset="UTF-8"> <title>双向绑定</title> <script src="https://cdn.jsdelivr.net/npm/vue@2.5.21/dist/vue.min.js"></script> </head> <body> <!--view层 模板--> <div id="app"> 用户名:<input type="text" v-model="msg"> {{msg}} <br> 文本框:<textarea name="text" id="" cols="30" rows="10" v-model="msg1"></textarea>{{msg1}} <br> 性别: <input type="radio" name="sex" value="男" v-model="msg2"> 男 <input type="radio" name="sex" value="女" v-model="msg2"> 女 <span>选中的性别为:{{msg2}}</span> <br> 选择城市: <select v-model="msg3"> <option value="" disabled>--请选择--</option> <option >北京</option> <option>上海</option> <option>广州</option> </select> <span>{{msg3}}</span> </div> <script> var vm = new Vue({ el: '#app', data: { msg: "", msg1: "", msg2: "", msg3: "" } }); </script> </body> </html>6、组件<!DOCTYPE html> <html lang="en"> <head> <meta charset="UTF-8"> <title>组件</title> <script src="https://cdn.jsdelivr.net/npm/vue@2.5.21/dist/vue.min.js"></script> </head> <body> <!--view层 模板--> <div id="app"> <!--组件:传递组件中的值:props--> <!--v-for遍历data中的值,v-bind绑定test01到item,接收遍历出来的值--> <test v-for="item in items" v-bind:test01="item"></test> </div> <script> //定义一个Vue组件component Vue.component("test",{ props: ['test01'], //接收参数 template: '<li>{{test01}}</li>' //模板 } ); var vm = new Vue({ el: '#app', data: { items: ["孙笑川","刘波","Giao哥"] } }); </script> </body> </html>7、vue-axios<!DOCTYPE html> <html lang="en" xmlns:v-bind="http://www.w3.org/1999/xhtml"> <head> <meta charset="UTF-8"> <title>vue-axios</title> <script src="https://cdn.jsdelivr.net/npm/vue@2.5.21/dist/vue.min.js"></script> <script src="https://unpkg.com/axios/dist/axios.min.js"></script> <!--v-clock解决闪烁问题--> <style> [v-clock]{ display: none; } </style> </head> <body> <!--view层 模板--> <div id="app" v-clock> <div>{{info.name}}</div> <a v-bind:href="info.url">{{info.url}}</a> <div>{{info.page}}</div> <div>{{info.isNonProfit}}</div> <div>{{info.address.street}}</div> <div>{{info.address.city}}</div> <div>{{info.address.country}}</div> </div> <script> var vm = new Vue({ el: '#app', data(){ return{ //请求的返回参数格式必须和json字符串一样 info:{ name: null, url: null, page: null, isNonProfit: null, address:{ street: null, city: null, country: null }, links:[ { name: null, url: null }, { name: null, url: null }, { name: null, url: null }, ] } } }, mounted(){ //钩子函数 链式编程 axios.get('../data.json').then(response=>(this.info=response.data)); } }); </script> </body> </html>8、计算属性<!DOCTYPE html> <html lang="en"> <head> <meta charset="UTF-8"> <title>计算属性</title> <script src="https://cdn.jsdelivr.net/npm/vue@2.5.21/dist/vue.min.js"></script> </head> <body> <!--view层 模板--> <div id="app"> <p>currentTime1:{{currentTime1()}}</p> <p>currentTime2:{{currentTime2}}</p> </div> <script> var vm = new Vue({ el: '#app', //model:数据 data: { msg: "Hello" }, methods: { currentTime1: function () { return Date.now(); //返回一个时间戳 } }, computed: { //计算属性,与mothods的方法名不能重名,如果重名,只会调用methods的方法 currentTime2: function () { this.msg; //类似于Mybatis缓存,一旦涉及到增删改,虚拟DOM重新计算 return Date.now(); //虚拟DOM } } }); </script> </body> </html>9、插槽slot<!DOCTYPE html> <html lang="en"> <head> <meta charset="UTF-8"> <title>slot插槽</title> <script src="https://cdn.jsdelivr.net/npm/vue@2.5.21/dist/vue.min.js"></script> </head> <body> <!--view层 模板--> <div id="app"> <todo> <todo-title slot="todo-title" v-bind:title="title"></todo-title> <todo-items slot="todo-items" v-for="item in todoItems" v-bind:item="item"></todo-items> </todo> </div> <script> //slot插槽 Vue.component("todo",{ template: '<div>' + '<slot name="todo-title"></slot>'+ '<ul>' + '<slot name="todo-items"></slot>'+ '</ul>'+ '</div>' }); Vue.component("todo-title",{ props: ['title'], template: '<div>{{title}}</div>' }); Vue.component("todo-items",{ props: ['item'], template: '<li>{{item}}</li>' }); var vm = new Vue({ el: '#app', data: { title: "科目", todoItems: ["Java","PHP","Vue"] } }); </script> </body> </html>10、自定义事件内容分发<!DOCTYPE html> <html lang="en"> <head> <meta charset="UTF-8"> <title>自定义事件内容分发</title> <script src="https://cdn.jsdelivr.net/npm/vue@2.5.21/dist/vue.min.js"></script> </head> <body> <!--view层 模板--> <div id="app"> <todo> <todo-title slot="todo-title" v-bind:title="title"></todo-title> <todo-items slot="todo-items" v-for="(item,index) in todoItems" v-bind:item="item" v-bind:index="index" v-on:remove="removeItems(index)"></todo-items> </todo> </div> <script> //slot插槽 Vue.component("todo",{ template: '<div>' + '<slot name="todo-title"></slot>'+ '<ul>' + '<slot name="todo-items"></slot>'+ '</ul>'+ '</div>' }); Vue.component("todo-title",{ props: ['title'], template: '<div>{{title}}</div>' }); Vue.component("todo-items",{ props: ['item','index'], //只能绑定当前组件的方法 template: '<li>{{index}}--{{item}} <button @click="remove">删除</button></li>', methods: { remove: function (index) { //自定义事件分发 this.$emit('remove',index); } } }); var vm = new Vue({ el: '#app', data: { title: "科目", todoItems: ["Java","PHP","Vue"] }, methods: { removeItems: function (index) { console.log("删除"+this.todoItems[index]+"成功!"); this.todoItems.splice(index,1); //一次删除一个元素 } } }); </script> </body> </html>
-
JSON JSONJSON(JavaScript Object Notation,JS标记对象)是一种轻量级的数据交换格式。1、jackson导入依赖<dependency> <groupId>com.fasterxml.jackson.core</groupId> <artifactId>jackson-databind</artifactId> <version>2.12.0</version> </dependency>Utils工具类package com.sw.utils; import com.fasterxml.jackson.core.JsonProcessingException; import com.fasterxml.jackson.databind.ObjectMapper; import com.fasterxml.jackson.databind.SerializationFeature; import java.text.SimpleDateFormat; /** * @Author suaxi * @Date 2020/12/17 16:08 */ public class JsonUtils { public static String getJson(Object object){ return getJson(object,"yyyy-MM-dd HH:mm:ss"); } public static String getJson(Object object,String dateFormate){ ObjectMapper mapper = new ObjectMapper(); //不使用时间戳 mapper.configure(SerializationFeature.WRITE_DATES_AS_TIMESTAMPS,false); //自定义时间格式 SimpleDateFormat sdf = new SimpleDateFormat(dateFormate); mapper.setDateFormat(sdf); try { return mapper.writeValueAsString(object); } catch (JsonProcessingException e) { e.printStackTrace(); } return null; } } Controllerpackage com.sw.controller; import com.alibaba.fastjson.JSON; import com.fasterxml.jackson.core.JsonProcessingException; import com.fasterxml.jackson.databind.ObjectMapper; import com.sw.pojo.User; import com.sw.utils.JsonUtils; import org.springframework.stereotype.Controller; import org.springframework.web.bind.annotation.RequestMapping; import org.springframework.web.bind.annotation.ResponseBody; import org.springframework.web.bind.annotation.RestController; import java.util.ArrayList; import java.util.Date; import java.util.List; /** * @Author suaxi * @Date 2020/12/17 15:38 */ //@Controller @RestController public class UserController { @RequestMapping("/j1") //@ResponseBody //不会走视图解析器,直接返回一个字符串 public String test01() throws JsonProcessingException { //jackson ObjectMapper ObjectMapper mapper = new ObjectMapper(); User user = new User("孙笑川", 33, "男"); String s = mapper.writeValueAsString(user); return s; } @RequestMapping("/j2") public String test02() throws JsonProcessingException { List<User> userList = new ArrayList<User>(); User user1 = new User("孙笑川1", 33, "男"); User user2 = new User("孙笑川2", 33, "男"); User user3 = new User("孙笑川3", 33, "男"); userList.add(user1); userList.add(user3); userList.add(user2); return JsonUtils.getJson(userList); } @RequestMapping("/j3") public String test03() throws JsonProcessingException { return JsonUtils.getJson(new Date()); } } 2、fastjson<dependency> <groupId>com.alibaba</groupId> <artifactId>fastjson</artifactId> <version>1.2.75</version> </dependency>Controllerpackage com.sw.controller; import com.alibaba.fastjson.JSON; import com.sw.pojo.User; import org.springframework.web.bind.annotation.RequestMapping; import org.springframework.web.bind.annotation.RestController; import java.util.ArrayList; import java.util.List; /** * @Author suaxi * @Date 2020/12/17 15:38 */ //@Controller @RestController public class UserController { @RequestMapping("/j4") public String test04(){ List<User> userList = new ArrayList<User>(); User user1 = new User("孙笑川1", 33, "男"); User user2 = new User("孙笑川2", 33, "男"); User user3 = new User("孙笑川3", 33, "男"); userList.add(user1); userList.add(user3); userList.add(user2); String s = JSON.toJSONString(userList); return s; } }
-
RestFul风格 RestFul风格RestFul就是一个资源定位及资源操作的风格,它不是标准也不是协议,基于这个风格设计的软件可以更简洁,更有层次,更易于实现缓存等机制。传统资源操作方式:http://127.0.0.1/project/findUser.do?id=1 查询 GEThttp://127.0.0.1/project/addUser.do 新增 POSThttp://127.0.0.1/project/modifyUser.do 更新 POSThttp://127.0.0.1/project/deleteUser.do?id=1 删除 GET或POST使用RestFul风格:http://127.0.0.1/project/1 查询 GEThttp://127.0.0.1/project 新增 POSThttp://127.0.0.1/project 更新 POSThttp://127.0.0.1/project/1 删除 GET或POST常用的资源操作:POST、DELETE、PUT、GETpackage com.sw.controller; import org.springframework.stereotype.Controller; import org.springframework.ui.Model; import org.springframework.web.bind.annotation.PathVariable; import org.springframework.web.bind.annotation.PostMapping; import org.springframework.web.bind.annotation.RequestMapping; import org.springframework.web.bind.annotation.RequestMethod; /** * @Author suaxi * @Date 2020/12/17 11:25 */ @Controller public class RestFulController { //传统风格 http://localhost:8088/add01?a=1&b=1 @RequestMapping(value = "/add01/{a}/{b}",method = RequestMethod.GET) public String test01(@PathVariable int a,@PathVariable int b, Model m){ int result = a + b; m.addAttribute("msg","结果1为:"+result); return "hello"; } //简化 http://localhost:8088/add02/1/2 @PostMapping("/add02/{a}/{b}") public String test02(@PathVariable int a,@PathVariable int b, Model m){ int result = a + b; m.addAttribute("msg","结果2为:"+result); return "hello"; } } 注:@PathVariable 让方法参数的值对应绑定到一个URI模板变量上
-
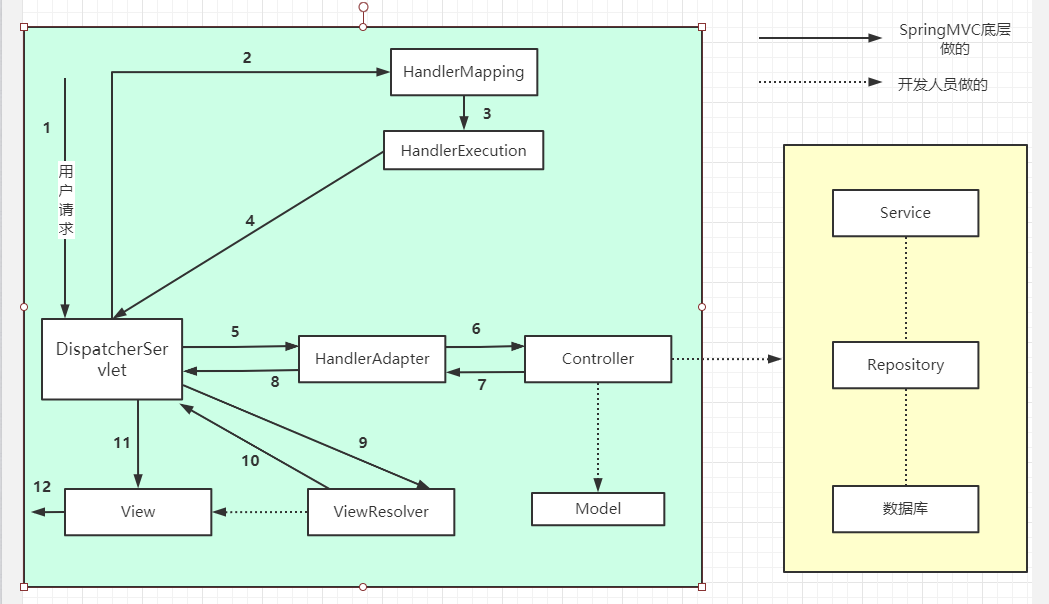
SpringMVC执行原理 SpringMVC执行原理流程分析:DispatcherServlet表示前置控制器,是整个SpringMVC的控制中心。用户发出请求,DispatcherServlet接收并拦截请求HandlerMapping为处理器映射,DispatcherServlet调用HandlerMapping,根据请求url查找HandlerHandlerExecution为具体的Handler,其作用是根据url查找控制器HandlerExecution将解析后的信息传递给DispatcherServletHandlerAdapter表示处理适配器,按照特定的规则去执行HandlerHandler让具体的Controller执行Controller将具体的执行信息返回给HandlerAdapter(ModelAndView)HandlerAdapter将视图逻辑名或模型传递给DispatcherServletDispatcherServlet调用视图解析器(ViewResolver)解析HandlerAdapter传递的逻辑视图名视图解析器将解析的逻辑视图名传给DispatcherServletDispatcherServlet根据视图解析器解析的结果,调用具体的视图返回用户请求,呈现视图给用户