
搜索到
6
篇与
的结果
-
 Sentinel整合Open Feign 1、环境搭建以8884模块为例pom文件添加依赖<!-- openfign --> <dependency> <groupId>org.springframework.cloud</groupId> <artifactId>spring-cloud-starter-openfeign</artifactId> </dependency>yml添加# 激活sentinel对feign的支持 feign: sentinel: enabled: true启动类@SpringBootApplication @EnableDiscoveryClient @EnableFeignClients public class OrderMain84 { public static void main(String[] args) { SpringApplication.run(OrderMain84.class, args); } }创建远程调用接口@FeignClient(value = "nacos-payment-provider") public interface PaymentService { @GetMapping("/payment/{id}") public CommonResult<Payment> payment(@PathVariable("id")Long id); }实现类(用于服务降级)@Component public class PaymentFallbackService implements PaymentService { @Override public CommonResult<Payment> payment(Long id) { return new CommonResult<Payment>(444, "服务降级返回--PaymentService", new Payment(id, "errorSerial")); } }接口指定降级的类@FeignClient(value = "nacos-payment-provider", fallback = PaymentFallbackService.class) public interface PaymentService { @GetMapping("/payment/{id}") public CommonResult<Payment> payment(@PathVariable("id")Long id); }controller@Resource private PaymentService service; @GetMapping("/payment/{id}") public CommonResult<Payment> payment(@PathVariable("id")Long id){ return service.payment(id); }2、测试启动9003、8884,如果中途9003出现问题关闭,8884服务降级成功3、熔断框架比较 SentinelHystrixresilience4j隔离策略信号量隔离线程池/信号量隔离信号量隔离熔断降级策略基于响应时间、异常比例、异常数异常比例异常比例、响应时间实时统计滑动窗口(LeapArray)滑动窗口(Rxjava)Ring Bit Buffer动态规则支持多种数据源支持多种数据源有限的支持扩展性多个扩展点插件接口基于注解的支持支持支持支持限流QPS、调用关系有限的支持Rate Limiter图片来源:尚硅谷 - 周阳 - Spring Cloud Alibaba
 -
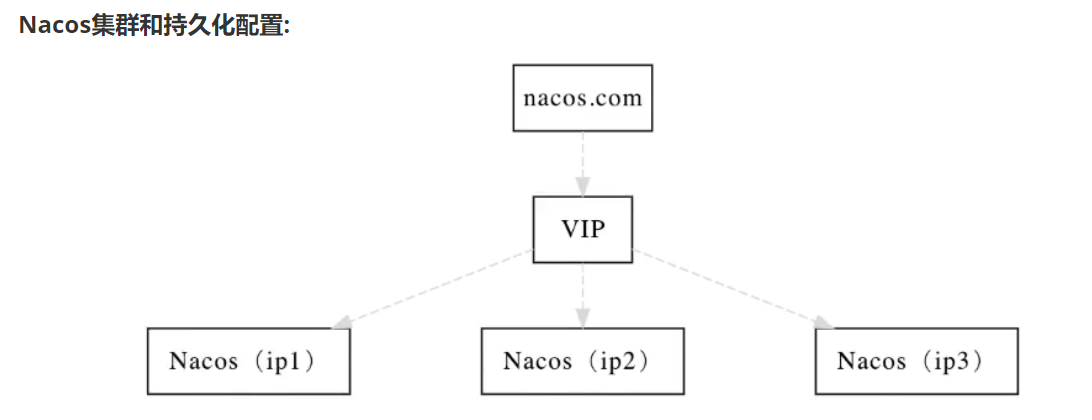
Nacos集群和持久化配置 Nacos默认使用嵌入式数据库实现数据存储,如果启动多个默认配置下的nacos节点,则存在数据一致性问题,为了解决这个问题,Nacos采用集中式存储来支持集群化部署,目前仅支持MySQl。三种部署方式单机 - 用于测试和单机试用集群 - 生产环境,确保高可用多集群 - 多用于数据中心等场景1、单机版1、在MySQl新建nacos_config数据库;2、运行conf文件夹下的nacos-mysql.sql,导入数据;3、修改conf文件夹下的application.properties,末尾添加以下内容,将数据库改为MySQlspring.datasource.platform=mysql db.num=1 db.url.0=jdbc:mysql://127.0.0.1:3306/nacos_config?characterEncoding=utf8&connectTimeout=1000&socketTimeout=3000&autoReconnect=true db.user=root db.password=1234564、重启startup.cmd(nacos)之后,数据源就改为了自己的2、集群以Nginx作为vip,三个nacos节点为例1、下载Linux版Nacos2、新建nacos_config数据库3、修改数据源(同理单机版配置)4、修改cluster.conf,进去conf文件夹,执行以下命令,备份原文件cp cluster.conf.example cluster.conf运行hostname -i,查看主机名,此处以127.0.0.1为例(实际需替换为自己linux服务器执行hostname -i命令后的结果)在cluster.conf文件中添加127.0.0.1:3333 127.0.0.1:4444 127.0.0.1:55555、修改/bin/startup.sh文件在nohup $JAVA这一行添加-Dserver.port=${PORT}nohup $JAVA -Dserver.port=${PORT} ${JAVA_OPT} nacos.nacos >> ${BASE_DIR}/logs/start.out 2>&1 &注:新版的Nacos 2.0.0不需要添加case中的PORT,已自带# 为了方便使用,将2.0.0版本中的 EMBEDDED_STORAGE 改为了PORT while getopts ":m:f:s:c:p:" opt do case $opt in m) MODE=$OPTARG;; f) FUNCTION_MODE=$OPTARG;; s) SERVER=$OPTARG;; c) MEMBER_LIST=$OPTARG;; p) EMBEDDED_STORAGE=$OPTARG;; ?) echo "Unknown parameter" exit 1;; esac done6、Nginx配置# 通过1111端口反代三个Nginx集群 upstream cluster{ server 127.0.0.1:3333; server 127.0.0.1:4444; server 127.0.0.1:5555; } server { listen 1111; listen [::]:80 default_server; server_name localhost; #root /usr/share/nginx/html; # Load configuration files for the default server block. #include /etc/nginx/default.d/*.conf; location / { proxy_pass http://cluster; } 7、启动# 先启动Nacos节点 ./startup.sh -p 3333 ./startup.sh -p 4444 ./startup.sh -p 5555 # 再启动Nginx systemctl start nginx8、访问x.x.x.x:1111测试Nacos集群9、将微服务注册到Nacos集群修改yml配置文件的注册地址即可server: port: 9001 spring: application: name: nacos-payment-provider cloud: nacos: discovery: server-addr: x.x.x.x:1111 # Nginx反代的地址 management: endpoints: web: exposure: include: '*'
-
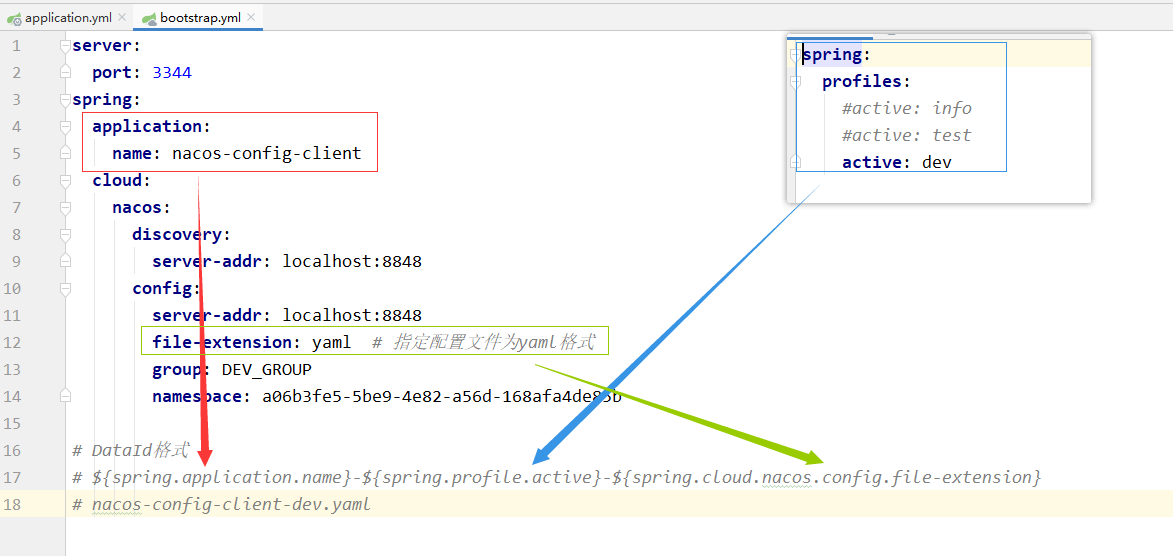
Nacos配置中心 使用nacos作为配置中心,在项目初始化时,要保证先从配置中心进行配置拉取,才能保证项目的正常启动1、创建配置中心模块pom<!-- Nacos discovery --> <dependency> <groupId>com.alibaba.cloud</groupId> <artifactId>spring-cloud-starter-alibaba-nacos-discovery</artifactId> </dependency> <!-- Nacos config --> <dependency> <groupId>com.alibaba.cloud</groupId> <artifactId>spring-cloud-starter-alibaba-nacos-config</artifactId> </dependency> <dependency> <groupId>org.springframework.boot</groupId> <artifactId>spring-boot-starter-web</artifactId> </dependency> <dependency> <groupId>org.springframework.boot</groupId> <artifactId>spring-boot-starter-actuator</artifactId> </dependency> <dependency> <groupId>org.springframework.boot</groupId> <artifactId>spring-boot-starter-test</artifactId> <scope>test</scope> </dependency>bootstarp.ymlserver: port: 3344 spring: application: name: nacos-config-client cloud: nacos: discovery: server-addr: localhost:8848 config: server-addr: localhost:8848 file-extension: yaml # 指定配置文件为yaml格式 group: DEV_GROUP namespace: a06b3fe5-5be9-4e82-a56d-168afa4de85b # DataId格式 # ${spring.application.name}-${spring.profile.active}-${spring.cloud.nacos.config.file-extension} # nacos-config-client-dev.yamlapplication.ymlspring: profiles: #active: info #active: test active: dev启动类@SpringBootApplication @EnableDiscoveryClient public class NacosConfigClientMain3344 { public static void main(String[] args) { SpringApplication.run(NacosConfigClientMain3344.class, args); } }controller@RestController @RequestMapping("/config") @RefreshScope //支持Nacos的动态刷新 public class ConfigController { @Value("${config.info}") private String configInfo; @GetMapping("/info") public String getConfigInfo(){ return configInfo; } } 2、Nacos配置规则配置规则:即在客户端指定如何读取配置文件以及配置文件的命名规则默认命名规则:${prefix}-${spring.profile.active}.${file-extension} # prefix # 当前服务名称,也可以通过spring.cloud.nacos.config.prefix获取 # spring.profile.active # 当前指定的开发环境 # file-extension # 当前文件的格式,目前只支持yaml和properties注:DataId配置文件名必须遵循配置规则中的命名方式图片来源:尚硅谷 - 周阳 - Spring Cloud Alibaba补充nacos默认开启了自动刷新,更改配置文件,客户端读取的配置信息也随之改变(Nacos支持Bus消息总线,会自动发送命令更新信息)3、配置分类Namespace + Group + DataId1、配置不同的DataId# 通过yml配置读取指定的配置文件 spring: profiles: #active: info #active: test active: dev2、配置不同的GroupId3、配置不同的Namespace# 客户端yml配置不同的namespace server: port: 3344 spring: application: name: nacos-config-client cloud: nacos: discovery: server-addr: localhost:8848 config: server-addr: localhost:8848 file-extension: yaml # 指定配置文件为yaml格式 group: DEV_GROUP namespace: a06b3fe5-5be9-4e82-a56d-168afa4de85b
-
Nacos CP、AP模式的选择 CP、AP模式选择1、如果不需要存储服务器级别的信息且服务实例通过nacos-client注册,并且能够保持心跳上报,就可以选择AP模式。AP模式为了可用性而减弱了一致性,因此AP模式下只支持注册临时实例2、如果需要在服务器级别编辑或存储配置信息,必须选CP模式(K8s和DNS服务适用于CP模式)。CP模式下支持注册持久化实例,此时是以Raft协议为集群运行模式,该模式下注册实例前必须先注册服务,如果服务不存在,则返回错误。切换模式curl -X PUT '$NACOS_SERVER:8848/nacos/v1/ns/operator/switches?entry=serverMode&value=CP'
-
Nacos与其他注册中心对比 Nacos与其他注册中心对比 NacosEurekaConsulCoreDNSZookeeper一致性协议CP + APAPCP/CP健康检查TCP/HTTP/MySQL/Client BeatClient BeatTCP/HTTP/gRPC/Cmd/Client Beat负载均衡权重/DSL/metadata/CMDBRibbonFabioRR/雪崩保护支持支持不支持不支持不支持自动注销实例支持支持不支持不支持支持访问协议HTTP/DNS/UDPHTTPHTTP/DNSDNSTCP监听支持支持支持不支持支持多数据中心支持支持支持不支持不支持跨注册中心支持不支持支持不支持不支持Spring Cloud集成支持支持支持不支持不支持Dubbo集成支持不支持不支持不支持支持K8s集成支持不支持支持支持不支持
-
Nacos 服务注册和配置中心的组合:Nacos = Eureka + config + bus一、安装1、环境:java8、Mavennacos地址:https://github.com/alibaba/nacos2、启动# 注:单机启动,需修改bin目录下的startup.cmd为`standalone`模式 set MODE="standalone" set FUNCTION_MODE="all" set SERVER=nacos-server set MODE_INDEX=-1 set FUNCTION_MODE_INDEX=-1 set SERVER_INDEX=-1 set EMBEDDED_STORAGE_INDEX=-1 set EMBEDDED_STORAGE=""windows环境下,双击startup.cmd启动3、访问Nacos# nacos默认监听8848 # 默认账号:nacos,密码:nacos localhost:8848二、测试1、payment模块新建cloudalibaba-provider-payment9001、cloudalibaba-provider-payment9002两个模块pom<!-- Nacos --> <dependency> <groupId>com.alibaba.cloud</groupId> <artifactId>spring-cloud-starter-alibaba-nacos-discovery</artifactId> </dependency> <dependency> <groupId>org.springframework.boot</groupId> <artifactId>spring-boot-starter-web</artifactId> </dependency> <dependency> <groupId>org.springframework.boot</groupId> <artifactId>spring-boot-starter-actuator</artifactId> </dependency> <dependency> <groupId>org.springframework.boot</groupId> <artifactId>spring-boot-starter-test</artifactId> <scope>test</scope> </dependency>ymlserver: port: 9001 spring: application: name: nacos-payment-provider cloud: nacos: discovery: server-addr: localhost:8848 management: endpoints: web: exposure: include: '*'主启动类@SpringBootApplication @EnableDiscoveryClient public class PaymentMain9001 { public static void main(String[] args) { SpringApplication.run(PaymentMain9001.class, args); } }controller@RestController @RequestMapping("/payment") public class PaymentController { @Value("${server.port}") private String serverPort; @GetMapping("/nacos/{id}") public String getPayment(@PathVariable("id")int id){ return "nacos registry, serverPort: " + serverPort + "\t id: " + id; } }2、order模块pom同理paymentymlserver: port: 8088 spring: application: name: nacos-payment-consumer cloud: nacos: discovery: server-addr: localhost:8848 # 消费者将要去访问的微服务名称(注册进nacos的服务提供者) service-url: nacos-user-service: http://nacos-payment-provider主启动类@SpringBootApplication @EnableDiscoveryClient public class ConsumerMain80 { public static void main(String[] args) { SpringApplication.run(ConsumerMain80.class, args); } }config@Configuration public class ApplicationContextConfig { @Bean @LoadBalanced public RestTemplate getRestTemplate(){ return new RestTemplate(); } }controller@RestController @RequestMapping("/consumer") public class ConsumerController { @Autowired private RestTemplate restTemplate; @Value("${service-url.nacos-user-service}") private String serverURL; @GetMapping("/payment/nacos/{id}") public String paymentInfo(@PathVariable("id")int id){ return restTemplate.getForObject(serverURL + "/payment/nacos/" + id, String.class); } }