
搜索到
463
篇与
的结果
-
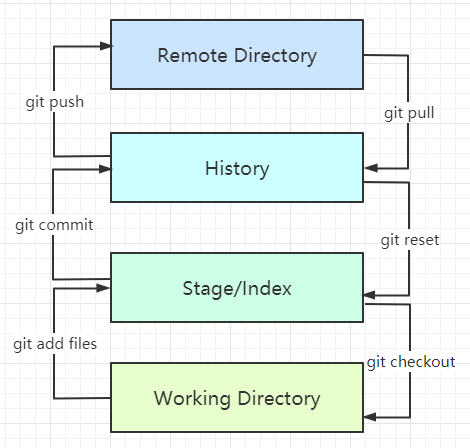
 Git Git1、设置用户名、邮箱git config --global user.name "suaxi" #用户名 git config --global user.email xxx@qq.com #邮箱2、Git基本理论Git本地有三个工作区域:工作目录(Working Directory),暂存区(Stage/Index),资源区(Repository或Git Directory),另外还有远程仓库(Remote Directory)WorkSpace:工作区,平时存放代码的地方Index/Stage:暂存区(待提交更新区),临时存放改动过的文件,在提交进入repo之前,所有的更新都放在暂存区Repository:仓库区,安全存放数据的位置,这里有提交的所有历史版本,其中,HEAD指向提交到仓库的最新版本Remote:远程仓库,例如:GitHub、Gitee.git:存放git管理信息的目录,初始化仓库的时候自动创建Local Repo:本地仓库,存放在本地的版本库Stash:工作状态保存栈,用于保存/恢复WorkSpace中的临时状态3、搭建仓库1、初始化本地仓库#在需要创建仓库的文件夹执行 git init2、克隆远程仓库git clone https://github.com/xxx/xxx.git4、文件的四种状态Untracked:未跟踪,此文件在文件夹中,但并没有加入到git仓库,不参与版本控制,可以通过git add将状态变为stagedUnmodify:文件已经入库,未修改,版本库中的文件快照内容与文件夹完全一致。如果他被修改,状态变为Modified,如果使用git rm移除版本库,则变为Untracked文件Modified:文件已修改,但未进行其他操作。通过git add可以进入staged状态,也可以使用git checkout丢弃修改过的,返回到Unmodify状态,注:git checkout从库中取出文件,覆盖当前修改Staged:暂存状态,通过git commit可以将修改同步到库中,这时库中的文件与本地文件状态一致,状态为Unmodify。执行git reset HEAD filename可以取消暂存状态,此时文件状态为Modified查看文件状态#查看指定文件状态 git status filename #查看所有文件状态 git status #添加文件到暂存区 git add . #提交暂存区中的文件到本地仓库(必须加上注释) git commit -m "用户自定义的注释信息" 忽略文件IDEA新建项目时,会自动生成.gitignore文件,其中包含了项目打包或上传时需要忽略的文件#例: *.txt #忽略所有.txt结尾的文件 !test.txt #忽略test.txt除外的文件HELP.md target/ !.mvn/wrapper/maven-wrapper.jar !**/src/main/** !**/src/test/** ### STS ### .apt_generated .classpath .factorypath .project .settings .springBeans .sts4-cache ### IntelliJ IDEA ### .idea *.iws *.iml *.ipr ### NetBeans ### /nbproject/private/ /nbbuild/ /dist/ /nbdist/ /.nb-gradle/ build/ ### VS Code ### .vscode/ 5、Git分支#查看所有分支 git branch -r #新建一个分支(心在完成后依然停留在当前的文件目录下) git branch branch-name #新建一个分支并切换到新建的分支目录下 git branch -b branch-name #和并指定分支到当前分支 git merge branch-name #删除分支(注意与新建并切换分支区分) git branch -d branch-name #删除远程分支 git push origin --delete branch-name git branch -dr https://github.com/xxx/branch-name
 -
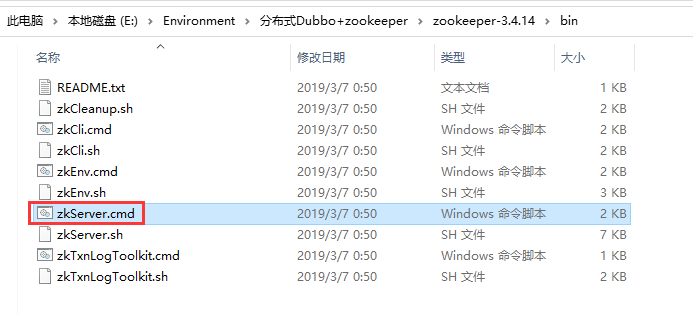
服务注册发现 服务注册发现步骤:1、开启zookeeper服务2、提供者导入依赖配置注册中心的地址,服务发现名,要扫描的包在想要注册的服务类上增加(Dubbo包下的)@Service注解3、消费者导入依赖配置注册中心地址,服务名从远程注入服务(Dubbo包下的)@Reference注解1、开启zookeeper服务(以windows环境为例)2、通过maven命令打包dubbo,或者在github下载源码导入idea打包通过cmd命令java -jar dubbo-admin-0.0.1-SNAPSHOT.jar启动dubbo3、服务者Demo导入依赖(服务者和消费者需要的依赖一样)<!--Dubbo--> <dependency> <groupId>org.apache.dubbo</groupId> <artifactId>dubbo-spring-boot-starter</artifactId> <version>2.7.3</version> </dependency> <!--zkClient--> <dependency> <groupId>com.github.sgroschupf</groupId> <artifactId>zkclient</artifactId> <version>0.1</version> </dependency> <!--引入zookeeper--> <dependency> <groupId>org.apache.curator</groupId> <artifactId>curator-framework</artifactId> <version>2.12.0</version> </dependency> <dependency> <groupId>org.apache.curator</groupId> <artifactId>curator-recipes</artifactId> <version>2.12.0</version> </dependency> <dependency> <groupId>org.apache.zookeeper</groupId> <artifactId>zookeeper</artifactId> <version>3.4.14</version> <!--排除slf4j-log4j12--> <exclusions> <exclusion> <groupId>org.slf4j</groupId> <artifactId>slf4j-log4j12</artifactId> </exclusion> </exclusions> </dependency>application.yml配置(服务者)server: port: 8088 dubbo: application: name: provider-server registry: address: zookeeper://127.0.0.1:2181 scan: base-packages: com.sw.service Servicepackage com.sw.service; /** * @Author suaxi * @Date 2020/12/27 11:57 */ public interface TicketService { public String getTicket(); } package com.sw.service; import org.apache.dubbo.config.annotation.Service; import org.springframework.stereotype.Component; /** * @Author suaxi * @Date 2020/12/27 11:58 * zookeeper:服务注册与发现 */ @Service //Dubbo @Service注解可以被扫描到,项目一启动,服务就自动注册到注册中心 @Component //使用Dubbo后尽量用Component注解,Spring的Service注解导包时容易搞混 public class TicketServiceImpl implements TicketService{ @Override public String getTicket() { return "获得票一张!"; } } 4、消费者Demo导入pom.xml的依赖与服务者一样application.yml配置(消费者)server: port: 8089 dubbo: application: name: consumer-server registry: address: zookeeper://127.0.0.1:2181Servicepackage com.sw.service; /** * @Author suaxi * @Date 2020/12/27 11:57 */ public interface TicketService { public String getTicket(); } package com.sw.service; import org.apache.dubbo.config.annotation.Reference; import org.springframework.stereotype.Service; /** * @Author suaxi * @Date 2020/12/27 12:07 */ @Service //放到Spring容器中 public class UserService { //想要拿到provider-server的票,需要到注册中心拿 @Reference //引用,pom坐标,可以定义路径相同的接口名 TicketService ticketService; public void buyTicket(){ String ticket = ticketService.getTicket(); System.out.println("在注册中心拿到===>"+ticket); } } Junit测试类package com.sw; import com.sw.service.UserService; import org.junit.jupiter.api.Test; import org.springframework.beans.factory.annotation.Autowired; import org.springframework.boot.test.context.SpringBootTest; @SpringBootTest class ConsumerServerApplicationTests { @Autowired private UserService userService; @Test public void consumerTest() { userService.buyTicket(); } } 5、Dubbo前端管理页面通过localhost:7001可以进入dubbo的管理员页面,账号密码都是root
-
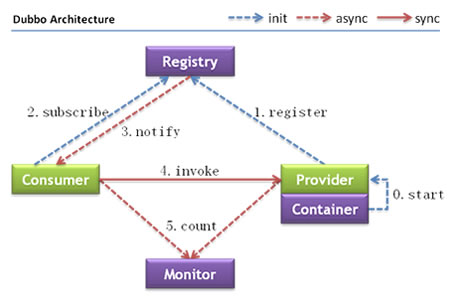
Dubbo Dubbo什么是分布式系统?分布式系统是若干个独立计算机的集合,这些计算机对用户来说就像是单个系统一样。RPCRPC(Remote Produce Call)指远程过程调用,是一种进程间的通信方式。如:有服务器A、服务器B,一个应用部署在A服务器上,数据、函数/方法等在服务器B上,现想通过A的应用调用B的数据,由于两者不在一个内存空间,不能直接调用,需通过网络来表达调用的语义和传达调用的数据。RPC的两个核心模块:通信、序列化Dubbo面向接口的远程方法调用,智能容错和负载均衡,服务自动注册和发现注:图片来源Apache Dubbo官网Provider:暴露服务的服务提供商,服务提供者在启动时,向注册中心注册自己提供的服务Consumer:调用远程服务的服务消费方,服务消费者在启动时,向注册中心订阅自己所需的服务,服务消费者,从提供者地址列表中,基于软负载均衡算法,选一台提供者进行调用,如果调用失败,再选另一台调用Registry:注册中心返回服务提供者地址列表给消费者,如果有变更,注册中心将基于长连接推送变更数据给消费者Monitor:服务消费者和提供者,在内存中累计调用次数和调用时间,定时每分钟发送一次监控数据到统计中心
-
定时任务 定时任务1、SpringBoot启动类开启定时任务注解package com.sw; import org.springframework.boot.SpringApplication; import org.springframework.boot.autoconfigure.SpringBootApplication; import org.springframework.scheduling.annotation.EnableAsync; import org.springframework.scheduling.annotation.EnableScheduling; @EnableScheduling //开启定时任务 @SpringBootApplication public class Springboot09AsynctaskApplication { public static void main(String[] args) { SpringApplication.run(Springboot09AsynctaskApplication.class, args); } } 2、测试package com.sw.service; import org.springframework.scheduling.annotation.Scheduled; import org.springframework.stereotype.Service; /** * @Author suaxi * @Date 2020/12/26 17:35 * 定时任务 */ @Service public class ScheduledService { /* cron:秒 分 时 日 月 周几 0/3 * * * * 0-7 周一到周日每三秒执行一次 0 0 21 26 12 ? 12月26日21时执行 */ @Scheduled(cron = "0/3 * * * * 0-7") public void hello(){ System.out.println("抽象!"); } } 注:定时任务需使用cron表达式来源:cron百度百科 0 0 2 1 * ? * 表示在每月的1日的凌晨2点调度任务 0 15 10 ? * MON-FRI 表示周一到周五每天上午10:15执行作业 0 15 10 ? * 6L 2002-2006 表示2002-2006年的每个月的最后一个星期五上午10:15执行作 0 0 10,14,16 * * ? 每天上午10点,下午2点,4点 0 0/30 9-17 * * ? 朝九晚五工作时间内每半小时 0 0 12 ? * WED 表示每个星期三中午12点 "0 0 12 * * ?" 每天中午12点触发 "0 15 10 ? * *" 每天上午10:15触发 "0 15 10 * * ?" 每天上午10:15触发 "0 15 10 * * ? *" 每天上午10:15触发 "0 15 10 * * ? 2005" 2005年的每天上午10:15触发 "0 * 14 * * ?" 在每天下午2点到下午2:59期间的每1分钟触发 "0 0/5 14 * * ?" 在每天下午2点到下午2:55期间的每5分钟触发 "0 0/5 14,18 * * ?" 在每天下午2点到2:55期间和下午6点到6:55期间的每5分钟触发 "0 0-5 14 * * ?" 在每天下午2点到下午2:05期间的每1分钟触发 "0 10,44 14 ? 3 WED" 每年三月的星期三的下午2:10和2:44触发 "0 15 10 ? * MON-FRI" 周一至周五的上午10:15触发 "0 15 10 15 * ?" 每月15日上午10:15触发 "0 15 10 L * ?" 每月最后一日的上午10:15触发 "0 15 10 ? * 6L" 每月的最后一个星期五上午10:15触发 "0 15 10 ? * 6L 2002-2005" 2002年至2005年的每月的最后一个星期五上午10:15触发 "0 15 10 ? * 6#3" 每月的第三个星期五上午10:15触发
-
SpringBoot邮件发送 邮件发送1、application配置spring: mail: host: smtp.qq.com username: xxx@qq.com password: 123456 #qq邮箱需设置安全加密 properties.mail.smtp.ssl.enable: true注:1、host:邮件发送服务器2、username:邮箱地址3、password:密码4、使用QQ邮箱时,需设置安全加密2、Junit单元测试package com.sw; import org.junit.jupiter.api.Test; import org.springframework.beans.factory.annotation.Autowired; import org.springframework.boot.test.context.SpringBootTest; import org.springframework.mail.SimpleMailMessage; import org.springframework.mail.javamail.JavaMailSenderImpl; import org.springframework.mail.javamail.MimeMessageHelper; import javax.mail.MessagingException; import javax.mail.internet.MimeMessage; import java.io.File; @SpringBootTest class Springboot09AsynctaskApplicationTests { @Autowired JavaMailSenderImpl mailSender; @Test void mailTest() { //简单邮件 SimpleMailMessage mailMessage = new SimpleMailMessage(); //标题 mailMessage.setSubject("Test"); //正文 mailMessage.setText("SpringBoot Mail Test"); //收件人 mailMessage.setTo("xxx@gmail.com"); //发件人 mailMessage.setFrom("xxx@qq.com"); mailSender.send(mailMessage); } @Test public void mailTest02() throws MessagingException { //复杂邮件测试 MimeMessage mimeMessage = mailSender.createMimeMessage(); //组装 MimeMessageHelper helper = new MimeMessageHelper(mimeMessage, true); //正文 helper.setSubject("哈尼"); helper.setText("<p style='color:red'>这是一封SpringBoot-mail测试邮件</p>",true); //开启html支持 //附件 helper.addAttachment("hani.png",new File("xxx/hani.png")); //绝对路径 helper.setTo("568362762@qq.com"); helper.setFrom("281463547@qq.com"); mailSender.send(mimeMessage); } } 注:如需发送附件,需填写绝对路径的地址
-
异步任务 异步任务1、Servicepackage com.sw.service; import org.springframework.scheduling.annotation.Async; import org.springframework.stereotype.Service; /** * @Author suaxi * @Date 2020/12/26 15:57 */ @Service public class AsyncService { //告诉Spring这是一个异步任务 @Async public void hello(){ try { Thread.sleep(3000); } catch (InterruptedException e) { e.printStackTrace(); } System.out.println("数据正在加载..."); } } 2、Controllerpackage com.sw.controller; import com.sw.service.AsyncService; import org.springframework.beans.factory.annotation.Autowired; import org.springframework.web.bind.annotation.RequestMapping; import org.springframework.web.bind.annotation.RestController; /** * @Author suaxi * @Date 2020/12/26 15:58 */ @RestController public class AsyncController { @Autowired private AsyncService asyncService; @RequestMapping("/test") public String hello(){ asyncService.hello(); return "Ok"; } } 3、SpringBoot启动类开启异步任务的注解package com.sw; import org.springframework.boot.SpringApplication; import org.springframework.boot.autoconfigure.SpringBootApplication; import org.springframework.scheduling.annotation.EnableAsync; import org.springframework.scheduling.annotation.EnableScheduling; @EnableAsync //开启异步任务注解 @SpringBootApplication public class Springboot09AsynctaskApplication { public static void main(String[] args) { SpringApplication.run(Springboot09AsynctaskApplication.class, args); } } 当用户执行/test请求时,前端页面及时返回结果,同时异步任务延迟三秒在控制台打印输出结果
-
Swagger SwaggerSwagger 是一个规范和完整的框架,用于生成、描述、调用和可视化 RESTful 风格的 Web 服务。1、导入依赖<dependency> <groupId>io.springfox</groupId> <artifactId>springfox-swagger2</artifactId> <version>2.9.2</version> </dependency> <dependency> <groupId>io.springfox</groupId> <artifactId>springfox-swagger-ui</artifactId> <version>2.9.2</version> </dependency>2、SwaggerConfig配置package com.sw.swagger.config; import org.springframework.context.annotation.Bean; import org.springframework.context.annotation.Configuration; import org.springframework.core.env.Environment; import org.springframework.core.env.Profiles; import springfox.documentation.builders.PathSelectors; import springfox.documentation.builders.RequestHandlerSelectors; import springfox.documentation.service.ApiInfo; import springfox.documentation.service.Contact; import springfox.documentation.spi.DocumentationType; import springfox.documentation.spring.web.plugins.Docket; import springfox.documentation.swagger2.annotations.EnableSwagger2; import java.util.ArrayList; /** * @Author suaxi * @Date 2020/12/26 11:03 */ @Configuration @EnableSwagger2 public class SwaggerConfig { //配置Swagger的Docket @Bean public Docket docket(Environment environment) { //配置哪种环境下需要启用Swagger Profiles profiles = Profiles.of("dev", "test"); //监听配置文件 boolean flag = environment.acceptsProfiles(profiles); //链式编程 return new Docket(DocumentationType.SWAGGER_2) .apiInfo(apiInfo()) .enable(flag) //配置是否启动Swagger,默认为true,如需关闭须手动设置为false .select() //RequestHandlerSelectors 配置扫描接口的方式 //basePackage() 指定要扫描的包 //any() 扫描全部 //none() 不扫描 //withClassAnnotation(Controller.class) 扫描类注解(参数是一个注解的反射对象) //withMethodAnnotation(RequestMapping.class) 扫描方法上的注解 .apis(RequestHandlerSelectors.basePackage("com.sw.swagger.controller")) //paths() 过滤的路径 .paths(PathSelectors.ant("/**")) .build(); } //配置Swagger apiInfo private ApiInfo apiInfo(){ //作者信息 Contact contact = new Contact("suaix","http://wangchouchou.com","281463547@qq.com"); return new ApiInfo( "Swagger StudyDemo", "SwaggerStudy", "1.0", "http://wangchouchou.com", contact, "Apache 2.0", "http://www.apache.org/licenses/LICENSE-2.0", new ArrayList()); } } Docket配置//配置Swagger的Docket @Bean public Docket docket(Environment environment) { //配置哪种环境下需要启用Swagger Profiles profiles = Profiles.of("dev", "test"); //监听配置文件 boolean flag = environment.acceptsProfiles(profiles); //链式编程 return new Docket(DocumentationType.SWAGGER_2) .apiInfo(apiInfo()) .enable(flag) //配置是否启动Swagger,默认为true,如需关闭须手动设置为false .select() //RequestHandlerSelectors 配置扫描接口的方式 //basePackage() 指定要扫描的包 //any() 扫描全部 //none() 不扫描 //withClassAnnotation(Controller.class) 扫描类注解(参数是一个注解的反射对象) //withMethodAnnotation(RequestMapping.class) 扫描方法上的注解 .apis(RequestHandlerSelectors.basePackage("com.sw.swagger.controller")) //paths() 过滤的路径 .paths(PathSelectors.ant("/**")) .build(); }配置什么环境下需要使用Swagger通过监听配置文件实现//配置那种环境下需要启用Swagger Profiles profiles = Profiles.of("dev", "test"); //监听配置文件 boolean flag = environment.acceptsProfiles(profiles); 3、配置文档分组.groupName("Demo")如何配置实现多个分组?配置多个Docket实例即可4、实体类package com.sw.swagger.pojo; import io.swagger.annotations.Api; import io.swagger.annotations.ApiModel; import io.swagger.annotations.ApiModelProperty; /** * @Author suaxi * @Date 2020/12/26 14:39 */ //@Api("用户实体类") @ApiModel("用户实体类") public class User { @ApiModelProperty("用户名") public String username; @ApiModelProperty("密码") public String password; } 5、Controllerpackage com.sw.swagger.controller; import com.sw.swagger.pojo.User; import io.swagger.annotations.ApiOperation; import io.swagger.annotations.ApiParam; import org.springframework.web.bind.annotation.GetMapping; import org.springframework.web.bind.annotation.PostMapping; import org.springframework.web.bind.annotation.RestController; /** * @Author suaxi * @Date 2020/12/26 10:59 */ @RestController public class HelloController { @ApiOperation("POST测试") @PostMapping("/hello") public String helloTest(@ApiParam("用户名") String username){ return "swagger-springboot"; } @ApiOperation("返回User对象") @PostMapping("/u") public User user(){ return new User(); } @ApiOperation("Hello控制类") @GetMapping("/h") public String hello(){ return "swagger-springboot"; } } 小结:1、通过Swagger可以给一些难以理解的属性或接口添加注释信息2、接口文档实时更新3、在线测试
-
Shiro Shiro1、导入依赖<dependency> <groupId>org.apache.shiro</groupId> <artifactId>shiro-spring</artifactId> <version>1.4.1</version> </dependency>2、Config配置UserRealm:package com.sw.config; import com.sw.pojo.User; import com.sw.service.UserService; import org.apache.shiro.SecurityUtils; import org.apache.shiro.authc.*; import org.apache.shiro.authz.AuthorizationInfo; import org.apache.shiro.authz.SimpleAuthorizationInfo; import org.apache.shiro.realm.AuthorizingRealm; import org.apache.shiro.session.Session; import org.apache.shiro.subject.PrincipalCollection; import org.apache.shiro.subject.Subject; import org.springframework.beans.factory.annotation.Autowired; /** * @Author suaxi * @Date 2020/12/24 16:56 */ //自定义UserRealm public class UserRealm extends AuthorizingRealm { @Autowired private UserService userService; @Override protected AuthorizationInfo doGetAuthorizationInfo(PrincipalCollection principalCollection) { System.out.println("执行了===》授权doGetAuthorizationInfo"); SimpleAuthorizationInfo info = new SimpleAuthorizationInfo(); info.addStringPermission("user:add"); //获得当前登录的对象 Subject subject = SecurityUtils.getSubject(); User currentUser = (User) subject.getPrincipal(); //拿到user对象 //设置当前用户的权限 info.addStringPermission(currentUser.getPerms()); return info; } @Override protected AuthenticationInfo doGetAuthenticationInfo(AuthenticationToken token) throws AuthenticationException { System.out.println("执行了===》认证doGetAuthorizationInfo"); UsernamePasswordToken userToken = (UsernamePasswordToken) token; //从数据库查询用户信息 User user = userService.findUserByName(userToken.getUsername()); if (user==null){ //用户为空 return null; //抛出 UnknownAccountException 异常 } //设置session Subject subject = SecurityUtils.getSubject(); Session session = subject.getSession(); session.setAttribute("loginUser",user); //密码认证由shiro做 return new SimpleAuthenticationInfo(user,user.getPassword(),""); } } ShiroConfig:package com.sw.config; import at.pollux.thymeleaf.shiro.dialect.ShiroDialect; import org.apache.shiro.spring.web.ShiroFilterFactoryBean; import org.apache.shiro.web.mgt.DefaultWebSecurityManager; import org.springframework.beans.factory.annotation.Qualifier; import org.springframework.context.annotation.Bean; import org.springframework.context.annotation.Configuration; import java.util.LinkedHashMap; import java.util.Map; /** * @Author suaxi * @Date 2020/12/24 16:54 */ @Configuration public class ShiroConfig { //3、ShiroFilterFactoryBean @Bean public ShiroFilterFactoryBean getShiroFilterFactoryBean(@Qualifier("securityManager")DefaultWebSecurityManager defaultWebSecurityManager){ ShiroFilterFactoryBean bean = new ShiroFilterFactoryBean(); //设置安全管理器 bean.setSecurityManager(defaultWebSecurityManager); //添加shiro的内置过滤器 /* anon:无需认证 authc:必须认证 user:必须有 “记住我” 功能才可以访问 perms:拥有对某个资源的权限才能访问 role:拥有某个角色权限才能访问 */ Map<String, String> filterMap = new LinkedHashMap<>(); filterMap.put("/user/update","perms[user:update]"); filterMap.put("/user/add","perms[user:add]"); filterMap.put("/logout","logout"); //注销 filterMap.put("/user/*","authc"); bean.setFilterChainDefinitionMap(filterMap); //设置登录请求 bean.setLoginUrl("/toLogin"); //未授权页面 bean.setUnauthorizedUrl("/noauth"); return bean; } //2、DefaultWebSecurityManager @Bean(name = "securityManager") public DefaultWebSecurityManager getDefaultWebSecurityManager(@Qualifier("userRealm")UserRealm userRealm){ DefaultWebSecurityManager securityManager = new DefaultWebSecurityManager(); //关联UserRealm securityManager.setRealm(userRealm); return securityManager; } //1、创建Realm对象 @Bean public UserRealm userRealm(){ return new UserRealm(); } //整合ShiroDialect shiro-thymeleaf @Bean public ShiroDialect getShiroDialect(){ return new ShiroDialect(); } }